
6. Advanced Functions
6.1Calibration1 Calibration of Tool Center Point (TCP)
Calibrating the tool coordinates TCP is a crucial step to ensure precise positioning of the EWAS robot welding torch. Users can follow the steps below for calibration:
6.1.1 Calibration preparation
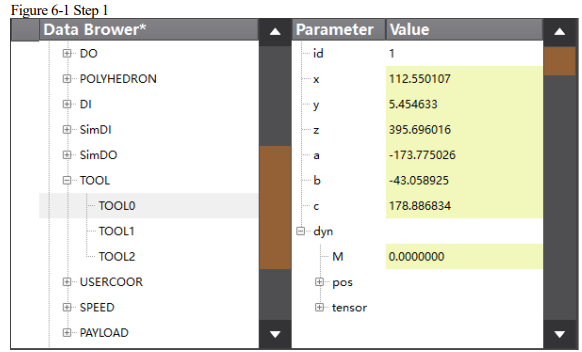
Step 1: Prepare a calibration cone with the pointed end facing upward, positioned on the worktable. Enter the program data interface and select the tool coordinates you want to calibrate, such as TOOL0, as shown in the figure below.
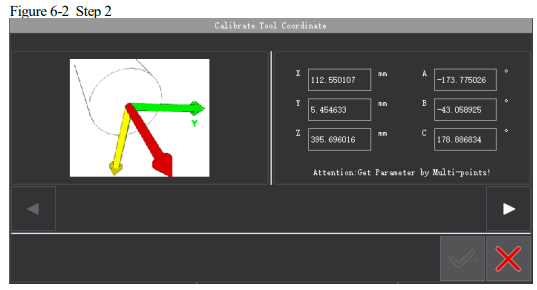
Step 2: Click "Modify", and you will enter the preview interface for the reference coordinate system, as shown in the figure below.
Step 3: Click "Settings" to enter the calibration method selection interface for the reference coordinate system, as shown in the figure below
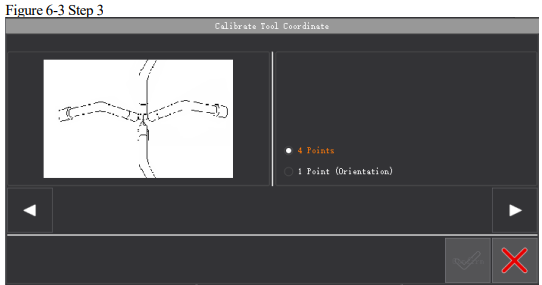
Step 4: Choose the calibration method for offset or posture.
6.1.2 4-point Calibration
Select the “4-point Calibration”, which means that you need to calibrate tool offset by teaching 4 different postures of the same point. Click "Next". Move the robot TCP to a position and click "Teach", as shown in figure below.
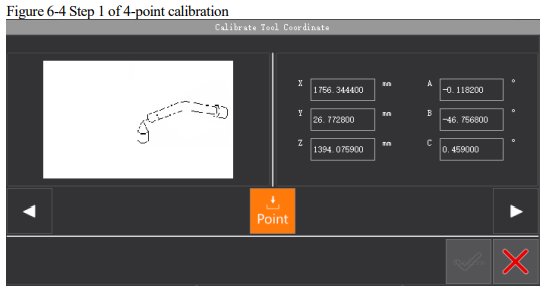
Then, click "Next" to change the posture of the robot, and click "Teach", as shown in figure below.
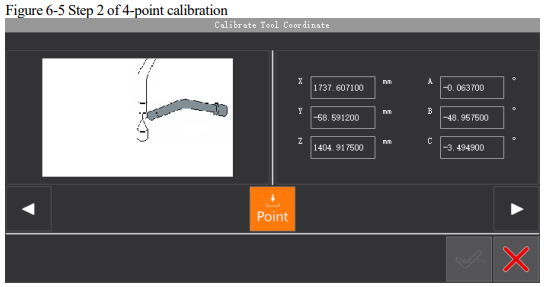
Click "Next" to change the posture of the robot, and click "Teach", as shown in figure below.
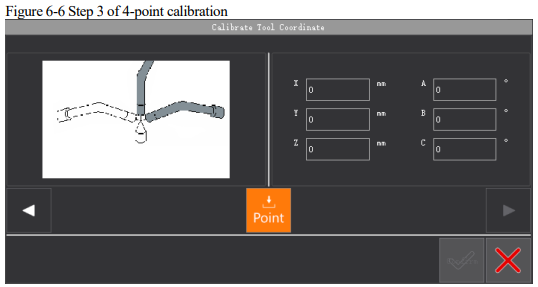
Click "Next" to change the posture of the robot, and click "Teach", as shown in figure below.
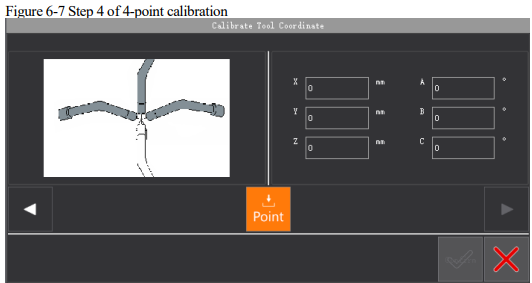
The accuracy error after this teaching will appear. User can continue to save the result or recalibrate as needed.
Click "Next" to get the calibrated value, as shown in figure below.
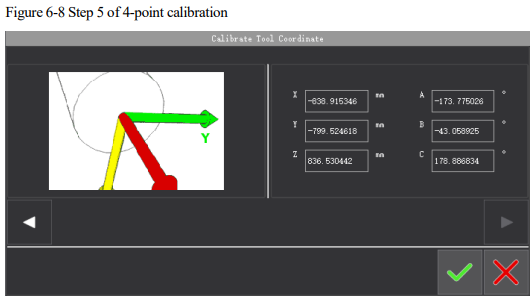
Click "OK" after it is confirmed to be correct. The modification is finished.
6.1.3 One-point Calibration
Select "One-point Calibration" to indicate the posture of the next calibration tool. It can only
calibrate the posture change if a tool in an axis direction under tool coordinates. Click "Next".
Make the direction of the robot's end in parallel to the Z axis, and click "Teach", as shown in figure below.
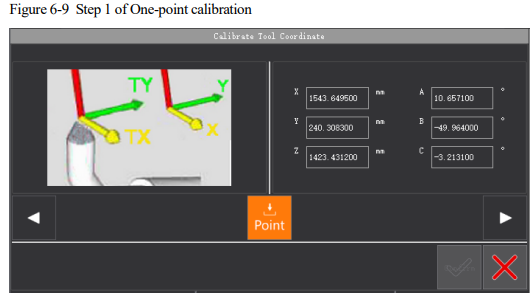
Click "Next", and the result of the posture calibration of tool coordinates will appear, as shown in figure below.
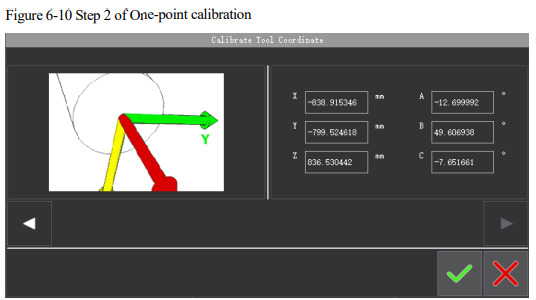
Click "OK" after it is confirmed to be correct. The modification is finished, as shown in figure below.
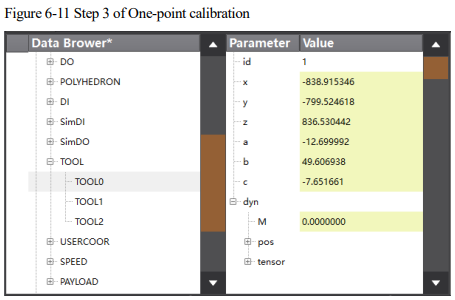
6.2 External Axis Coordination
When using external axis coordination for the first time, you can access the welding settings interface from the main screen of the teach pendant. Click on the "Advanced Settings" button for external axis coordination in the bottom navigation bar, or press the Fn+F2 key combination to bring up the external axis coordination interface, as shown in the figure below.
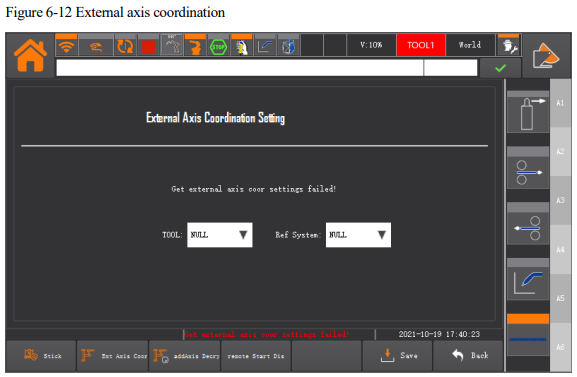
Select the appropriate tool as the current tool and choose the suitable positioner coordinate system as the reference coordinates. Click the "Save" button to save your current selections.
The next time you use this function, press the External Axis Coordination key  on the teach pendant once. At this point, the green indicator light in the upper left corner of the button will illuminate. The current tool and current reference coordinates on the teach pendant interface's upper right corner will switch to the results you saved during your last use. The current JOG coordinate system will become the positioner coordinate system.
When you want to stop using this function, press the External Axis Coordination key once again.
The green indicator light will turn off, and the above status indicators will return to their default settings.
6.3Additional Axis Encryption
This function is developed to facilitate the adaptation of ESTUN's additional axis for users. Users will need to provide the corresponding machine code to the vendor. To use this function, go to
Welding Application→ Advanced Settings→ Additional Axis Encryption, or press the key combination Fn+F3 in the Welding Application →Advanced Settings screen to bring up the following screen interface:
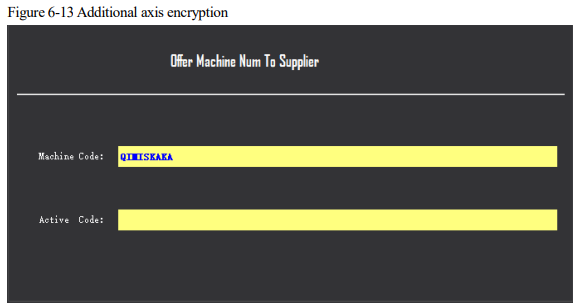
The machine code is generated by the system automatically. Users can send the machine code to our technical personnel. After our technical personnel provide the activation code, you can validate whether the machine code and activation code match by clicking the OK button. This is to ensure that the added additional axis is a product from our company.
6.4Hardware Testing
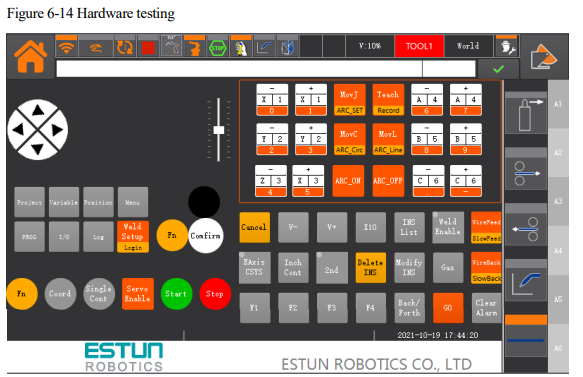
The hardware testing function is designed to allow users to test if each physical button on the teach pendant is functioning properly. To enable this function, you can access the hardware settings interface by clicking on "Advanced Settings" and then "Hardware Settings", as shown in the figure below. By pressing the corresponding buttons, the corresponding indicators in the interface will turn re.
6.5 Conveyor Tracking
6.5.1 Function overview
The conveyor tracking is designed to synchronize the movement of the robot and the workpieces on a conveyor, which move along the conveyor as it runs. The position information of the workpiece is obtained through a visual system or sensor, and transmitted to the robot via a designated interaction method. This allows the robot to pick up the workpiece from a fixed or moving conveyor based on the feedback from the sensor. There are two types of conveyors available, namely linear and disc-shaped.
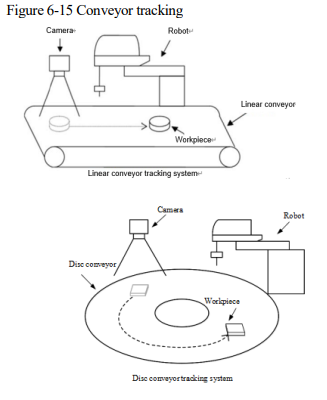

To access the conveyor configuration interface, users can click on "User Application-Conveyor Tracking" in the teach pendant. In this interface, conveyor parameters can be configured, including enabling the conveyor belt, checking and calibrating the pulse equivalent, viewing the conveyor belt position and speed, and toggling the display of reasons for non-tracking. Users can also switch between five configuration pages, namely "Conveyor Parameters", "Tracking Parameters", "Trigger Parameters", "Visual Parameters", and "Virtual Conveyor Belt", to further configure the settings.
6.5.2 Configuration of conveyor parameters
Select [Conveyor Parameters] and choose either [Linear Type] or [Disc Type] in the "Type" column. This will allow you to enter the configuration interface for both linear conveyors and disc conveyors respectively.
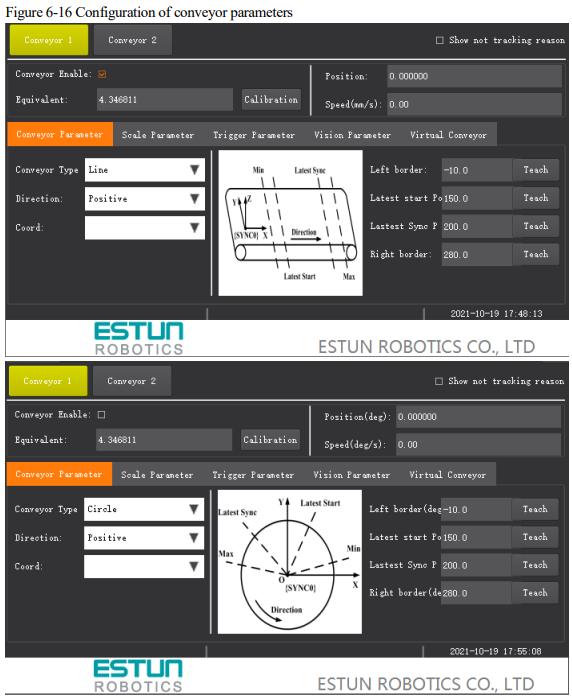
⚫ Type: linear or disc.
⚫ Direction: set the direction of the conveyor.
⚫ Moving coordinate system: The moving coordinate system bound to such conveyor.
⚫ Min./max. boundary/latest start point/latest synchronization point: For a linear conveyor, these represent the coordinate values in the X-direction in the corresponding moving coordinates. For a disc conveyor, they represent the angle at the center of the XOY plane in the corresponding moving coordinates.
6.5.3 Tracking parameters configuration
Select "Tracking Parameters" to enter the conveyor parameters configuration interface.
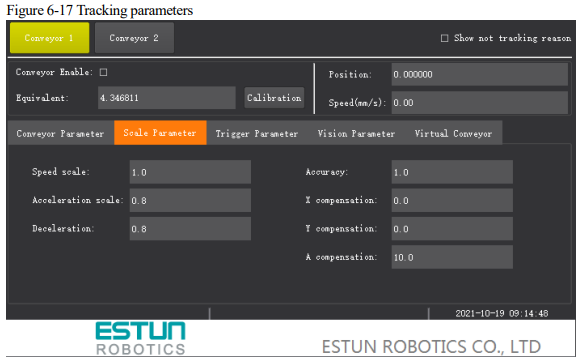
⚫ Velocity coefficient/Accel coefficient/Decel coefficient: the ratios of the velocity/Accel/Decel during the tracking synchronization process.
⚫ Tracking tolerance: the threshold used to judge the accuracy of the tracking synchronization, representing the maximum allowable displacement error between the robot and the target object.
⚫ X-axis compensation: the compensation for workpiece offset relative to the target position in the X direction.
⚫ Y-axis compensation: the compensation for workpiece offset relative to the target position in the Y direction.
⚫ A-axis compensation: the compensation for workpiece offset relative to the target position in the A direction.
6.5.4 Trigger parameter configuration
Select "Trigger Parameters" to enter the trigger parameter configuration interface.
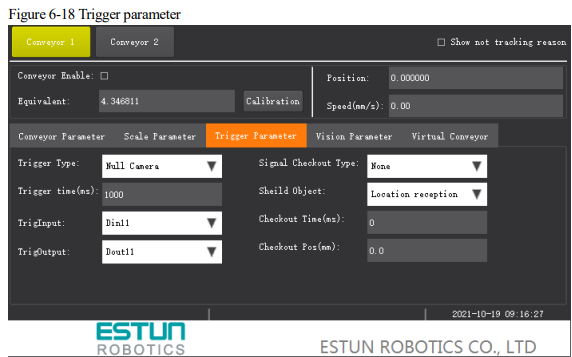
⚫ Trigger Types:
Timing trigger: The system will output a high level signal from the trigger output port based on the configured trigger time (ms) and cycle, of which high-level hold time is 1/2 of the trigger time.
External IO trigger: When the system detects a rising edge signal at the trigger input port (detection cycle of 4ms), set the trigger output port to output a high level signal. The high-level hold time is synchronized with the trigger input port.
Non-camera trigger: No visual operation mode, and a task program needs to be created: detecting input signals, sending target information, and so on. RUN program can be used to write the commands. When the rising edge signal is detected at the trigger input port, call the SetTargetPos to send the workpiece position information.
⚫ Trigger time: The settings are valid when the "Trigger Type" is of "Timed Trigger". It indicates the interval time for inputting the high level signal at the specified trigger output port.
⚫ Trigger input port: Specify the trigger input port information for system detection. The settings can be valid when the "Trigger Type" is of "External IO Trigger" or "Non-Camera Trigger".
⚫ Trigger output port: Specify the trigger output port information output by the system, so that the camera can perform shooting. The settings can be valid when "Trigger Type" is of "Timed Trigger" or "External IO Trigger".
6.5.5 Visual parameter configuration
Select [Visual Parameters] to enter the visual parameter configuration interface.
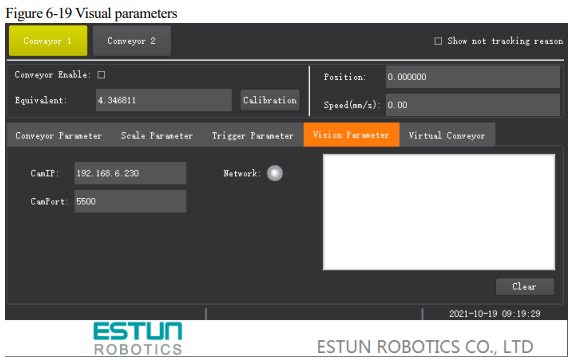
⚫ Visual IP: Set to the IP address of the camera.
⚫ Port Number: The default port number is 5500.
⚫ Connection Status: Display the connection status with the camera server. GREEN indicates a connected status, GREY indicates a disconnected status, and Colorless indicates an unconnected status.
6.6Multi-station Reservation
6.6.1 Function overview
With this function, the robot can complete tasks on up to 4 stations without intermittent.
Multi-station Reservation function works to bind each station in the robot working area to different input ports, and assign these input ports with the functions of starting and stopping, and then the user can enable the robot to execute the station program bound to it automatically by entering effective signal to the input port. Also, by using this function, user can start the programs on the corresponding tooling in turn according to the sending order of the signals.
The figure below illustrates a working example of a robot: its working sequence is tool 1, tool 2 and tool 3; the jobs performed on each tool are program 1, program 2 and program 3.
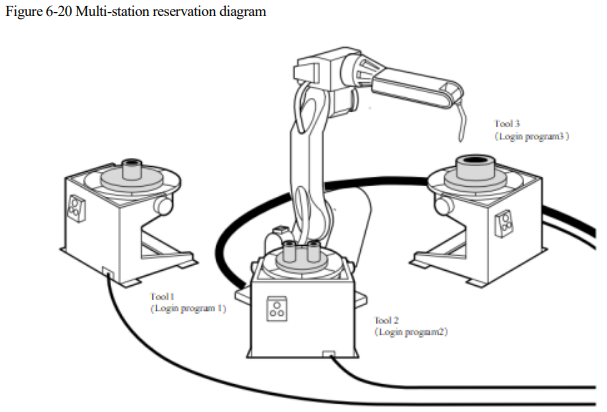
Each of the three toolings process the different workpieces, corresponding to different processing procedures. There’re following two effects when starting it under Playback mode, assuming that the procedures are program 1, program 2, and program 3:
⚫ When there’s no program executed currently, user sends signal to tool 1, and the robot will automatically load and run program 1. The starting mode of tools 2 and 3 is the same as the tool 1.
⚫ The program currently being executed by the robot: Assuming that program 1 is currently being executed, and workpieces are prepared for tools 2 and 3, the user first sends the starting signal to tool 3, and then the tool 2. At this moment, as the robot is executing the tool 1, then the system will record the appointment waiting status of tools 3 and 2 in turn. When program 1 is executed, the robot will execute program 3 first, and then the program 2. The whole appointment process is finished by this moment.
When the robot operates, the user can check the working status and IO signal of each station using the teach pendant.
6.6.2 Way of use
To use this function correctly, user needs to complete the following tasks:
⚫ The program of each station has been edited correctly. For the editing method of the program, please refer to the Programming Commands.
⚫ The Start button located on the tooling of each station can be used properly.
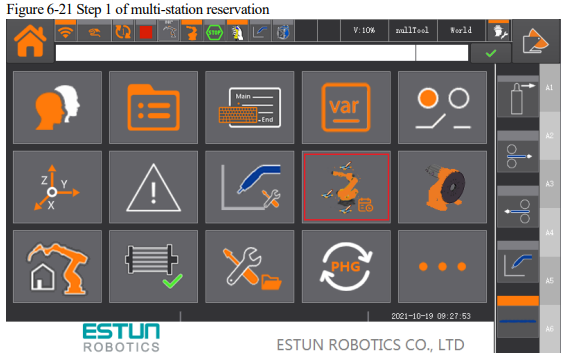
Step 1 Click "Multi-station Reservation" in the "User Application" plug-ins on the Home interface, as shown in the two figures below.
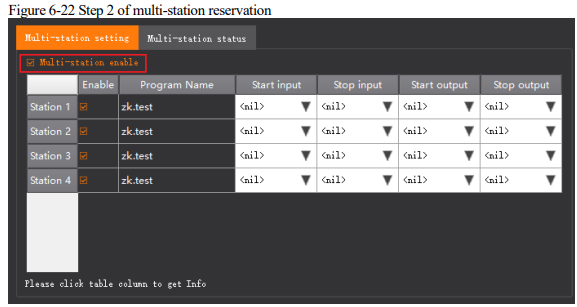
Step 2 After entering "Multi-station Reservation Settings", check "Multi-station Reservation Enable" and the "station" to be operated.
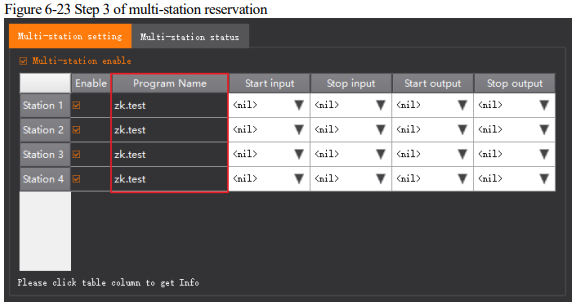
Step 3 Click the "program name" in the row where each "station" is located.
Step 4 Select the program you want to perform from the "Project List".
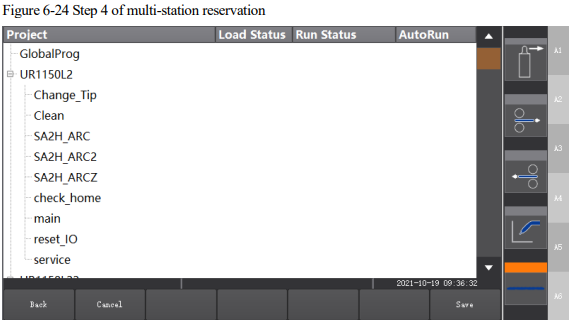
⚫ Click "Back" to return to the "Multi-station Reservation Setting" interface.
⚫ Click "Clear" to reset the "Preset Program" of the "Station".
⚫ Click "Select" to preset the currently selected "Program" to this "Station", and return to the "Multi station Reservation Setting" interface.
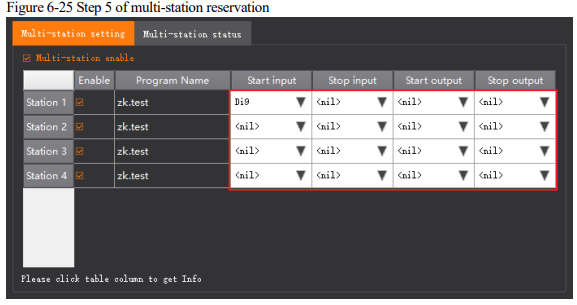
Step 5 Assign the "Start Input", "Stop Input", "Status Output" and "Stop Output" signals to each "station" correctly.
Note: Repeated use of the unified IO ports is not allowed.
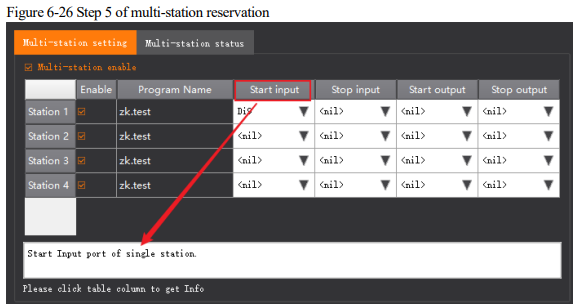
Users can click each cell in the table header listed on the interface to view the “Help” information.
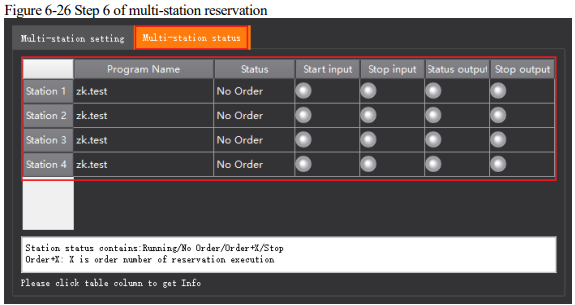
Step 6 Click "Multi-station Reservation Status" to view the status of each "Station" as well as its IO signal status.
[Note]
⚫ After the parameters of the Multi-station Reservation are properly set, you can perform the multi-station reservation operation after switching the system to Playback mode.
When a program is not executed and the reservation is successfully made, but you then want to cancel the current reservation, just cancel the reservation by inputting signal to the start unit.
6.7 Maintenance
6.7.1 Function overview
This function is primarily used to remind users to perform timely maintenance and service on the robot to prevent a reduction in its lifespan due to prolonged use without maintenance.
There are two ways in which reminders are provided during usage:
⚫ Accumulated running time: Each model corresponds to a maintenance execution cycle (e.g. 10,000 hours, 11,520 hours, etc.). When the maintenance execution time exceeds this cycle, the system will prompt "Maintenance overdue, please maintain in a timely manner!".
⚫ Use date: Each model corresponds to a cumulative usage period (e.g. 2 years, 3 years, etc.). From the factory/execution date to the end of the usage period, which is the next maintenance date, the system will prompt "Maintenance overdue, please maintain in a timely manner!".
6.7.2 Way of use
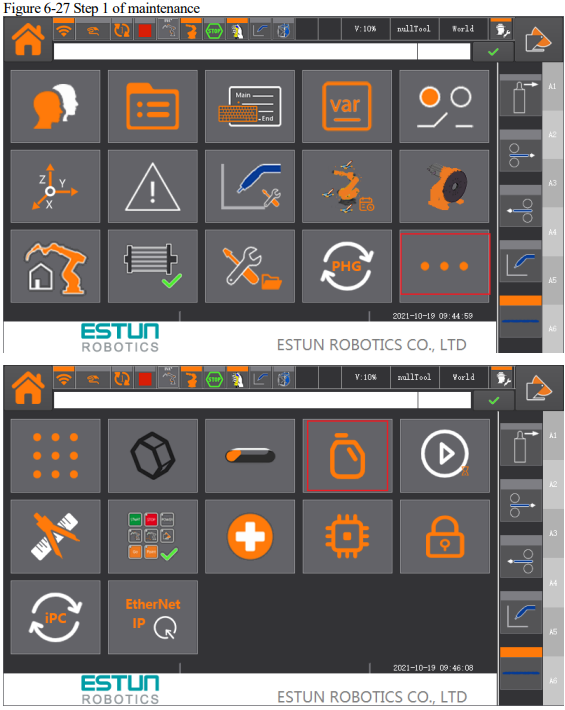
Step 1: On the Home interface, click on "Maintenance Tips" within the "User Applications" plugin group, as shown in the figure below.
Step 2 Enter the "Maintenance Tips" interface, as shown in the figure below:
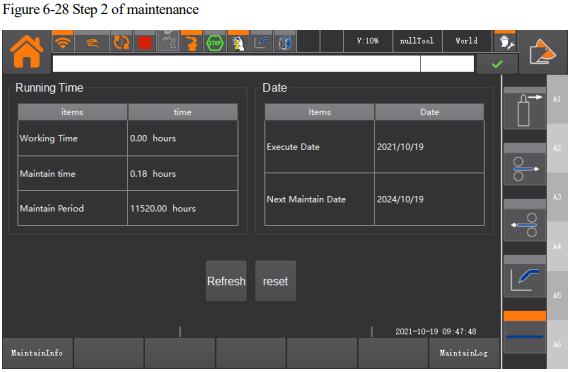
Step 3: Interface introduction:
⚫ Total running time: The accumulated running time of the robot since the factory, this value keeps accumulating and cannot be cleared.
⚫ Maintenance execution time: The running time accumulated since the factory or reset
⚫ Maintenance execution cycle: Each model has a corresponding maintenance cycle (e.g. 10,000 hours, 11,520 hours, etc.). When the maintenance execution time exceeds the maintenance execution cycle, the maintenance tips will appear.
⚫ Manufacture/execution date: The date when the robot's control system first runs or when it is reset.
⚫ Next maintenance date: The date of the next maintenance. When the system date is later than the next maintenance date, the maintenance tips will appear.
Step 4: Operation introduction:
⚫ Refresh: Click "Refresh" to get the current maintenance information again.
⚫ Reset: Click "Reset" and enter the dynamic password to execute. There is special software to get the dynamic password through verification code. Please contact relevant technical personnel to obtain the dynamic password.
Resetting will clear the "Maintenance Execution Time" and set the "Manufacture/Execution Date" and "Next maintenance date" to the current system date.
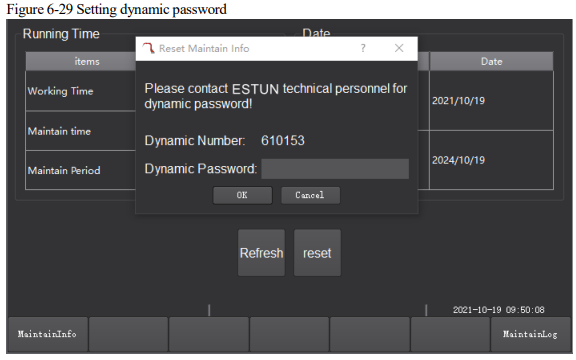
Step 5: Prompt information:
⚫ Prompt Log: The information of recent maintenance tips will be saved, as shown in figure below. Click "Prompt Log" to access historical prompt records.
⚫ Prompt contents: If the maintenance cycle or date has passed, a reminder with code 53006 will be displayed.
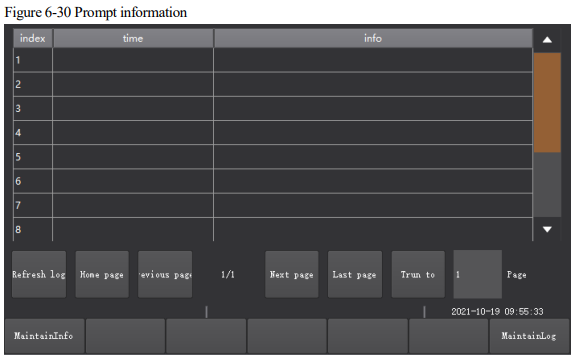
[Note]
⚫ After the due date or maintenance cycle, please perform maintenance promptly. If not maintained in a timely manner, the prompt information will appear during normal use of the robot.
6.8Multi-type Area Monitoring
6.8.1 Function overview
By setting up safety zones, the position of the robot can be monitored in real time under a variety of working conditions, minimizing the likelihood of collisions.
Multi-type area monitoring consists of the following three main types:
⚫ WorkArea:
All CheckPoints (TCPs) of the robot are only allowed to move within the WorkArea. In the event of a violation of the WorkArea rules, there are two ways of handling:
When the robot leaves the WorkArea, the program stops and alarms.
When the robot enters the WorkArea, it continues its operation and outputs a signal.
⚫ BlockedArea
All CheckPoints (TCPs) of the robot are not allowed to move within the BlockedArea. In the event of a violation of the BlockedArea rule, there are two ways of handling:
When the robot leaves the BlockedArea, the program stops and alarms.
When the robot enters the BlockedArea, it continues its operation and outputs a signal.
⚫ SignalArea
All CheckPoints (TCPs) of the robot are only allowed to move within any areas. In the event of a violation of the WorkArea rules, there are two ways of handling:
When the robot enters the signal work area, it continues to run the program and outputs a signal
When the robot leaves the signal work area, it continues to run the program and outputs a signal
6.8.2 How to use standard area monitoring
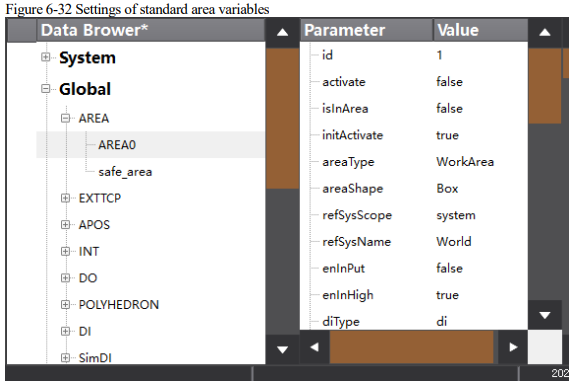
Step 1 Go to the program data interface and click on the standard area variable you want to set in the global domain, e.g. AREA0.
Step 2 Click on "Modify" and you will be taken to the interface for setting the area variable. By default, the standard area variable is "inactive" and the user can activate it by clicking "Activate".
Step 3 Click on "Modify" as shown in the figure below.
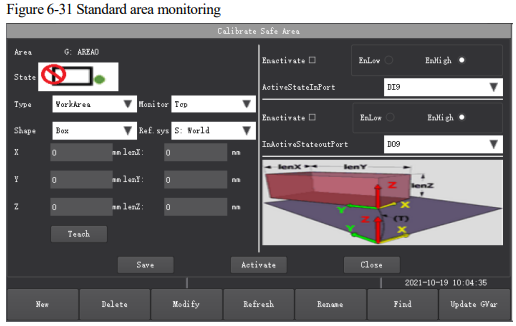
Step 4 Modify the parameters of this interface as described below.
⚫ Area Name: Display the name of standard area variable
⚫ Status: Determine if the TCP point is inside or outside the area when the area is active.
⚫ Type: Select the type of the area:
⚫ Reference Coordinates: Select the reference coordinates for this area, which defaults to the World Coordinates.
⚫ Shape: Choose the shape of the area, currently supporting BOX and CYLINDER shapes.
⚫ Input Ports: Check "Port Enable" to select the input ports that activate variables within this area. Specify whether they are "Low Active" or "High Active".
⚫ Output Ports: Check "Port Enable" to select the output ports that activate variables within this area. Specify whether they are "Low Active" or "High Active".
⚫ X, Y, Z, lenX, lenY, lenZ: Set the starting coordinates and size of the area. The starting coordinates are relative to the reference coordinates.
Step 5 Click "OK" to complete the setting of the standard area variables, as shown in figure below
[Note]
1. When the standard area is in an active state and the area type is either WorkArea or BlockedArea, the system will periodically check the robot's TCP point position during operation, providing real-time output regarding whether the robot is within the defined area.
2. When the standard area is in an active state and the area type is a signal area, the system wil periodically check the robot's TCP point position regardless of whether it is powered up. It will continuously provide real-time output regarding whether the robot is within the defined area.
3. After enabling the output ports, signals can be generated based on the robot's presence within the defined area.
4. After enabling the input ports, you can activate or freeze the area using a rising edge trigger on the DI (coexisting with standard area activation commands, standard area freeze commands, and whichever is triggered later).
5. When the "activate" parameter in the AREA-type variable is set to true, it defaults to automatically activating this standard area. The system will reevaluate this upon loading the AREA-type variable. If the DI port is not enabled, the area automatically activates. If the DI port is enabled, the area's activation is determined by the state of the DI signal.
6. The activation or freezing of standard areas can be executed through the variable configuration interface, commands, or input ports (as configured).
6.8.3 Method for using Polyhedron area monitoring
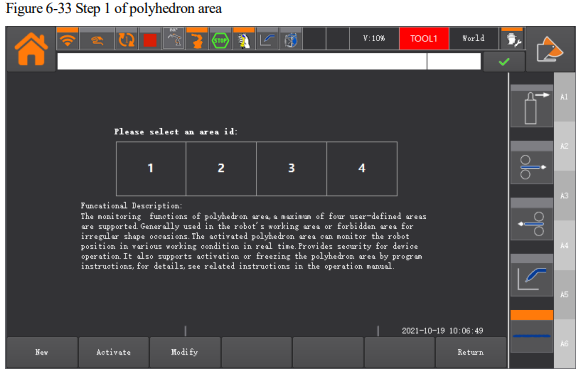
Step 1: When using the "Polyhedron Area" monitoring function, the polyhedron area needs to be configured first.
Click on "User Application > Polyhedron Area" to enter the Polyhedron Area plugin interface, as shown in figure below. Currently, up to 4 polyhedron regions are supported;
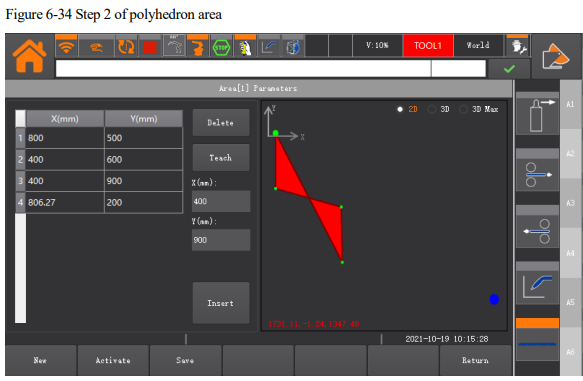
Step 2: Select the Area ID that you wish to configure. For instance, if you choose Area ID "1", you will enter the configuration interface for that area, as shown in the figure below. If this polygonal area has not been configured yet, you will receive a prompt stating, "This area does not exist; please create it!" In this case, click the "Create" button to enter the configuration interface.
Step 3: Modify the parameters of the interface according to the following instructions:
⚫ Status: After activation of this area, determine whether the TCP point is inside or outside the area.
⚫ Auto Activation: When selected, this area will be automatically activated after the controller starts.
⚫ Type: Select the type of this area.
⚫ Coordinate System: Select the reference coordinates for this area, which defaults to the World Coordinates.
⚫ Vertex Z Value: Indicate the starting position of the area in the Z-direction of the coordinates. It can be entered manually or obtained by clicking the "Get Current Z Value" button. The result is obtained by subtracting the vertex height value from the Z-axis coordinate in the current coordinates.
⚫ Area Height: Indicate the height of the area in the Z-direction of the coordinates. It can be entered manually or calculated by clicking the "Calculate Z-Height" button, which displays the Z-axis coordinate value of the current coordinates minus the vertex height value.
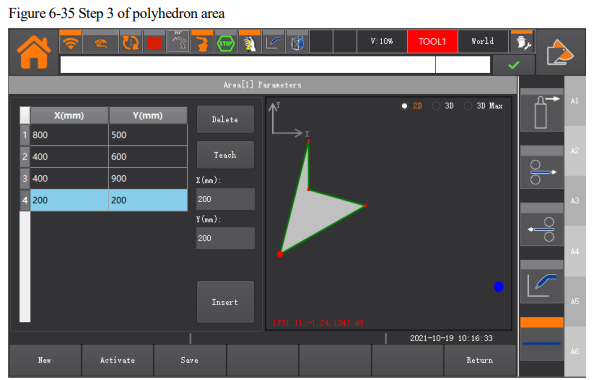
⚫ Count of Vertices: Indicate the count of vertices on the bottom of the polyhedron area. Clicking on "Vertex Information" will bring up the vertex configuration interface, as shown in Figure 7-2. Clicking on "Add" will automatically add the current TCP position in the user coordinates. If you need to modify a vertex of the polyhedron area, select the corresponding vertex and modify it by clicking on "Teach" or entering the XY coordinates. If you need to delete a vertex of the polyhedron area, select the corresponding vertex and click on "Delete". The right side of the interface supports the preview of the 2D and 3D effects of the polyhedron area, as well as the enlarged 3D effect of only the polyhedron area. Preview supports synchronous display of the monitoring point position (blue dot in the figure). In 2D mode, only the position of the TCP point in the XY plane is displayed, and switching to 3D mode can preview the relative position of the actual TCP point;
⚫ Input Port: Check "Port Enable" to select the input port that needs to activate this area variable, and set it to "Low Active" or "High Active".
⚫ Output Port: Check "Port Enable" to select the output port that needs to activate this area variable, and set it to "Low Active" or "High Active".
Step 4: Click "Save" after completing the settings.
Step 5: When using a polyhedron area in the command, create a POLYHEDRON type variable and specify the correct polyhedron area ID in the "index" parameter. After creation, activate or deactivate the polyhedron area using the PolyhedronAreaActivate or PolyhedronAreaDeactivate command.
1. When the polyhedron area is activated and the area type is a WorkArea or a BlockedArea, the system will periodically check the TCP point position during operation and output the robot's status in the set area in real time.
2. When the standard area is activated and the area type is a signal area, the system will periodically check the robot TCP point position regardless of whether the excitation is on or off and output the robot's status in the set area in real time.
3. After setting the automatic activation parameter for the polyhedron area, it will not take effect immediately. The system will load the polyhedron parameters during a restart and determine whether to activate the area automatically based on the DI port status. When the DI port is disabled, the area is automatically activated, and when the DI port is enabled, the area is activated or not depending on the DI level.
4. The logic for activating or deactivating the polyhedron area is the same as the usage status of the input/output port and standard area monitoring function.
5. The activation or deactivation of the polyhedron area can be performed through the variable configuration interface, commands, or input ports (if configured).
6.9Collision Detection
6.9.1 Function overview
The collision detection function can detect whether the robot collides in real-time without the need for an external force sensor. If a collision is detected, the robot will immediately alarm and stop working, providing safety protection and effectively reducing the damage to the robot or other equipment. Users can turn ON or OFF the collision detection function according to the needs of the site. For safety reasons, it is recommended to turn on the collision detection function.
6.9.2 Way of use
To access the collision detection settings, select the "Common Settings" group on the System Home, and click on "Collision Detection," as shown in the figure below.
[Note]
If the current robot model does not support collision detection functionality, the interface will display "Collision detection is not supported by this model".
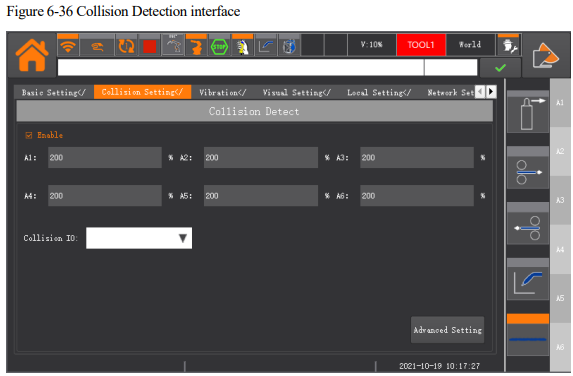
⚫ Enable: Checking this option enables collision detection, while unchecking it disables collision detection.
⚫ A1 to A6: These settings determine the sensitivity of collision detection, with a default value of 100.
A higher value results in lower sensitivity, whereas a lower value increases sensitivity in collision detection.
[Note]
⚫ This function detects collisions based on load information and device information, so the load information must be set correctly to avoid false alarms or affect detection sensitivity. For setting the load parameters, please refer to "PAYLOAD0" and "SetPayload" commands.
⚫ Different working conditions and operating conditions may result in different collision sensitivities with the same parameter settings. Therefore, false alarms may occur. If a collision false alarm occurs, appropriately reduce the sensitivity of the collision axis according to the alarm information by increasing the numerical value until the false alarm no longer occurs.
6.10 Vibration Suppression
6.10.1 Function overview
The Vibration Suppression function is used to reduce residual vibration at the end of the robot, allowing for smoother motion, to improve positioning accuracy, and shorter positioning time. The strength of the residual vibration varies depending on the robot's movement path, as well as its speed and end load. Typically, high-speed movement and heavy end loads are more likely to cause vibration and produce stronger vibrations.
6.10.2 Way of use
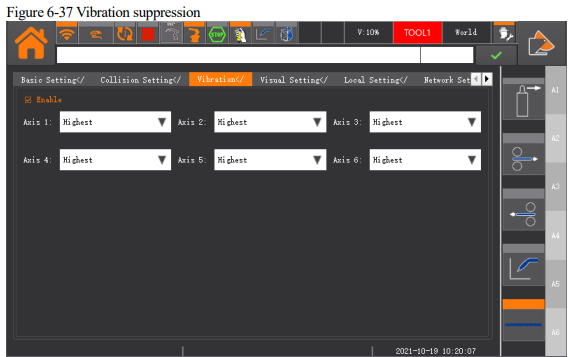
Select the "Common Settings" group on the System Home and click on "Vibration Suppression", to enter the configuration interface as shown in the figure below.
Users can tailor the vibration suppression settings to different application scenarios and requirements. By checking the "Enable" checkbox in the vibration suppression interface, users can then set the "Intensity" level for vibration suppression. There are five intensity levels available for vibration suppression: Low, Low-Medium, Standard, Medium-High, and High. The vibration suppression effect progressively strengthens with each higher intensity level. The default setting is the Standard intensity level.
[Note]
When using the Vibration Suppression function, it is essential to set the correct payload parameters, which affect the controller's adjustment of vibration suppression. Refer to the Basic Setting Interface for Setting Payload Parameters and the SetPayload Command for information on setting payload parameters.
6.11System IP Setup
6.11.1 Network settings
System IP Setup is only available to users with "Administrator" user type.
Select "Advanced Settings" on the System Home and click on "Network Settings" to enter the system "Network Settings" page. The teach pendant will display the corresponding setting page according to the controller system version.
To ensure normal communication, the parameters in this interface should be set to the correct values according to the actual situation.
Network Settings A
The controller system uses internal bridging for its network card. When any network port is connected to a LAN, the IP addresses of the teach pendant, OS1, and OS2 cannot be the same as those of other devices on the LAN, otherwise network address conflicts may result in communication anomalies.
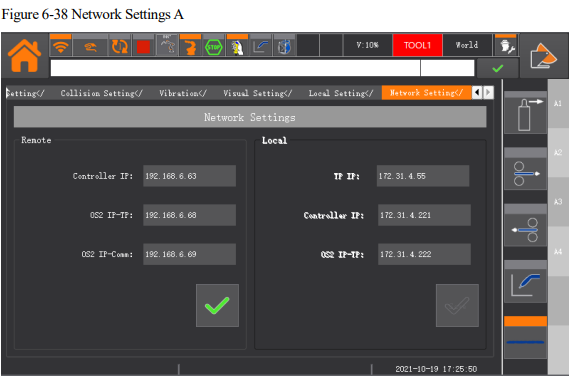
⚫ Remote Network Settings: Modify the IP addresses of the OS ends that are currently connected to the programming pendant remotely.
OS1 IP: IP address of OS1.
OS2 IP-TP: IP address of OS2.
OS2 IP-Comm: IP address used for communication with OS2.
⚫ Local Network Settings: Only modify the IP addresses of the OS ends that are locally connected to the programming pendant.
Programming pendant IP: IP address of the programming pendant.
OS1 IP: IP address of OS1.
OS2 IP-TP: IP address of OS2.
Network Settings B
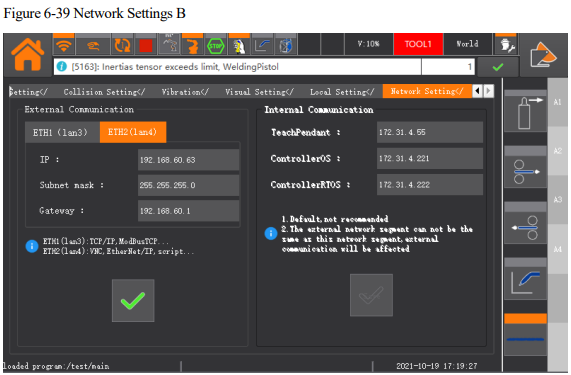
The controller system divides the network into internal and external networks. The internal network is mainly for the effective connection between the programming pendant and the controller, while the external network is for the effective connection with external communication.
Therefore, when wiring the robot group, only ETH1 or ETH2 needs to be modified according to the application.
[Caution]
External communication network addresses cannot be the same as the identification segment of the internal communication network, otherwise normal communication may be affected. (For example, the default factory network segment for the internal network is 192.168.6.x, so the external network is not allowed to be set to 192.168.6.x.)
⚫ External Communication Network Settings:
ETH1(lan3): controller-side lan3 port, supports TCP/IP, ModbusTCP, etc.
ETH2(lan4): controller-side lan4 port, supports VNC, EtherNet/IP, Script, etc.
⚫ Internal Communication Network Settings: (default settings cannot be modified, please contact the manufacturer if necessary)
TeachPendant: IP address of the programming pendant.
ControllerOS: IP address of the controller.
ContollerRTOS: IP address of the controller's real-time system.
6.11.2 IP Scan
⚫ When the controller system is set to type B in the network settings, this function is temporarily unavailable.
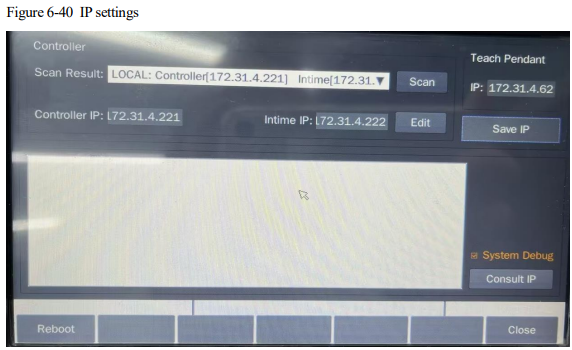
⚫ In some customer sites, there may be multiple controllers on the same LAN. Without clearing the controller IP configuration, the programming pendant may not be able to connect to the correct controller. Therefore, this function enables scanning of all controllers' IPs on the LAN using the teach pendant, allowing the customer to choose which controller to connect to.
⚫ If the teach pendant is unable to connect to the controller after starting up, you can access the IP configuration interface by pressing the following combination shortcut keys: Fn + "Welding Settings/Login" + "Logs" + "Position" + "I/O" + "Variables".
⚫ In the IP configuration interface, the IP can be directly edited, or the "Scan" button can be clicked to automatically search for the IP of the current LAN controllers and their corresponding real-time system IPs.
Selecting from the drop-down list will automatically fill in the configuration field.
⚫ After clicking "Save IP" and successfully saving the changes, click "Restart". After the restart, the programming pendant will be connected to the specified controller.
6.12 Upgrade and Backup of Teach Pendant
6.12.1 Program upgrading
Following two upgrading methods are available:
⚫ ESTOOL operation
Upgrade the program directly to the programming pendant system, without checking the "Upgrade the teach pendant while starting up". Load the program in the teach pendant system directly when it is powered on.
⚫ Upgrading plug-ins through TP
To upgrade the program of the pendant to the controller system, check the "Upgrade the teach pendant whil starting up", and load the program in the controller system directly when it is powered on. When this method is selected, the controller system version will be upgraded, and the pendant will also be upgraded automatically and synchronously.
Settings of update mode
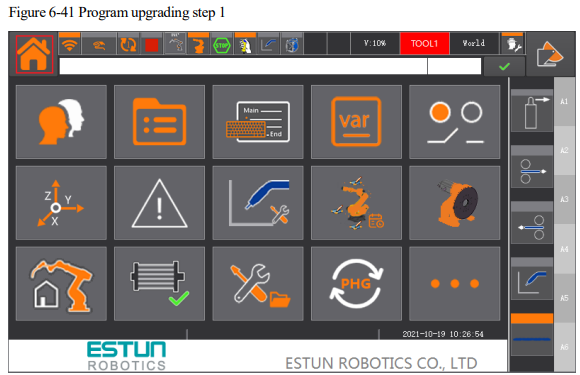
Step 1 Switch the user to the “Administrator”, and click the Advanced Settings plug-in group, as shown in figure below.
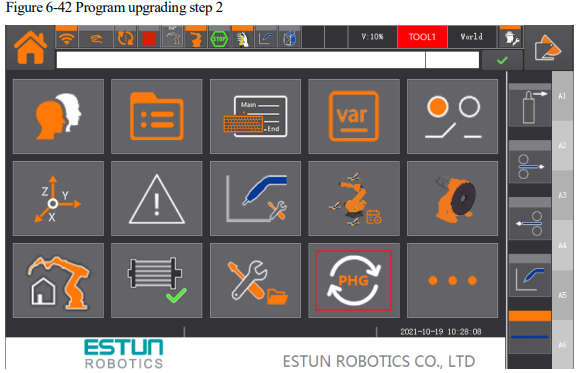
Step 2 Upgrade plug-ins in TP mode, as shown in figure below.
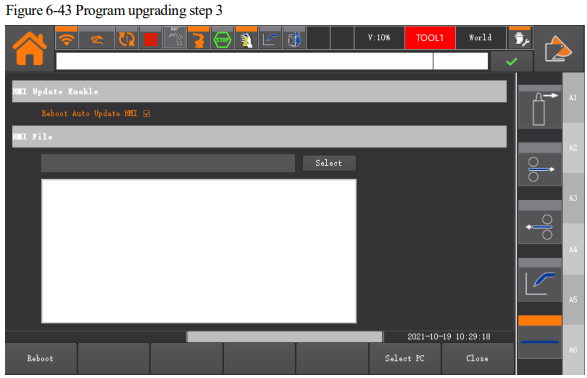
Step 3 Enter the TP update interface, and check the "Upgrade the teach pendant while starting up" to enable the synchronous update of the teach pendant.
ESTool update
Step 1 Start ESTool.
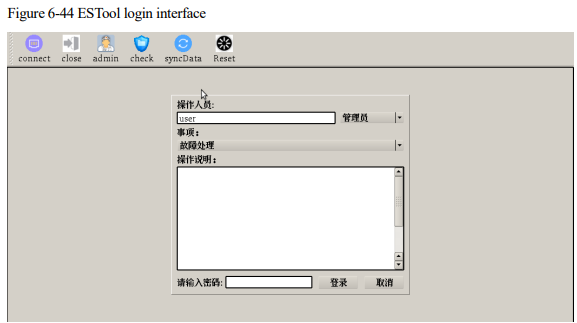
Step 2 ESTool login interface is shown in figure below
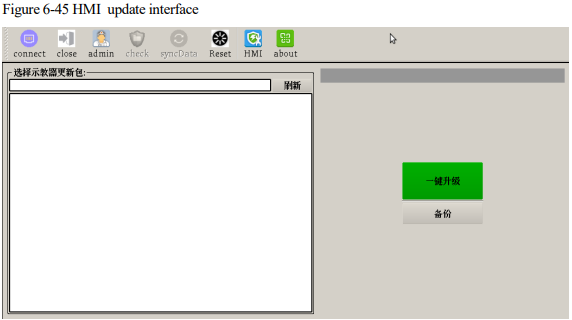
Step 3 HMI update interface after login, as shown in figure below. Select HMI function module, insert USB flash drive into the teach pendant, select the file to be updated on the left, and click the update button to update.
Update plug-ins for HMI
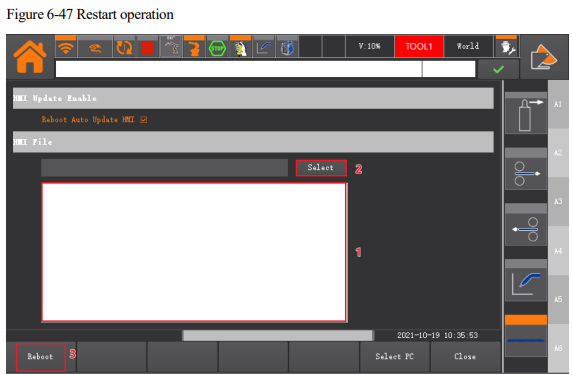
Step 1 Switch the user to the “Administrator”, and enter the TP update plug-ins in the Advanced Settings, as shown in the figure below.
Step 2 Select the pendant program file that needs to be updated in the USB flash drive from the list of pendant programs, and click "Select".
Step 3 A prompt message will pop up after the update is finished, as shown in the figure below.
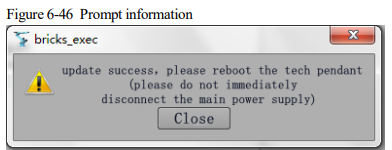
Step 4 Click "Restart", the teach pendant will restart and upgrade to the latest TP version automatically.
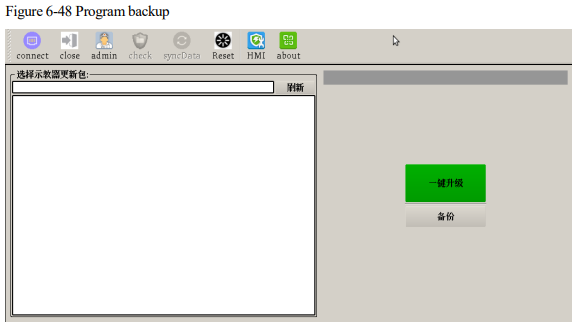
6.12.2 Program backup
Click the Backup button in figure below to export the current teach pendant program to the USB flash drive.
6.13 Update of Controller Operating Programs
6.13.1 Update of controller programs
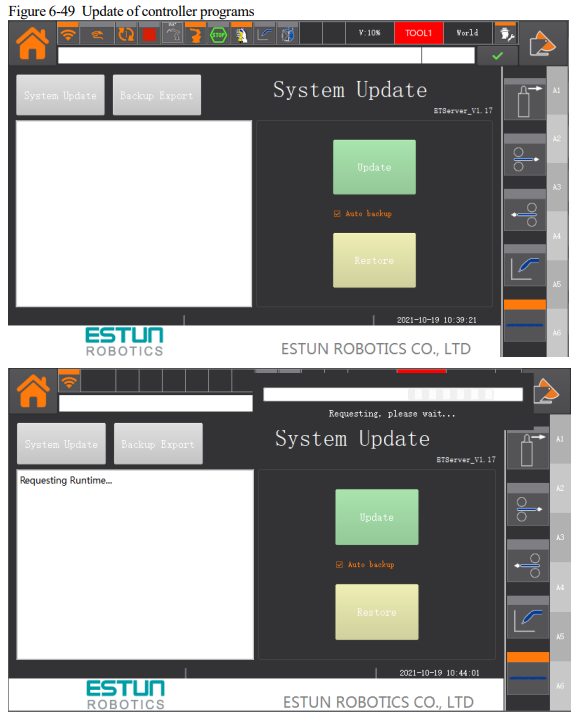
To update the controller running program, you need to follow the procedures below.
Step 1: Put the controller runtime program (.runtime or .patch format file, which is usually provided by the developer) into the root directory of the USB flash drive.
Step 2: Insert the USB flash drive into the Programming pendant USB port, select Advanced Settings on the System Home and click on the controller update interface as shown in figure below.
Step 3: Check the "Auto backup in the background" function if required; if checked, the existing system software will be backed up on the controller side before the update, and the backed up system software will be used to restore the system during the system restore.
Step 4: Click on the [Update] button, enter the administrator password to confirm and then you will be prompted if you need to export the existing runtime. Select "Yes" to export the existing runtime from the controller, and select
"No" to skip this step and continue to the next step.
Step 5: After selecting the update file, it will automatically update, then wait for the completion of the update.
[Note]
⚫ When updating the controller, and "Auto background backup" is checked, then a backup of the runtime process will appear during the update, as shown in the figure below;
⚫ If the actual programming pendant is used and updated from a USB flash drive, then the USB flash drive must be in FAT32 format;
⚫ Whether it's a USB flash drive update or a direct update using the virtual teach pendant, the name of the update package and the path where it is located must not contain Chinese characters;
⚫ Do not power down your system while the system update is in progress, in case the system update is not completed and the system does not function properly.
6.13.2 Controller program restoration
The following steps are used for restoring the controller program:|
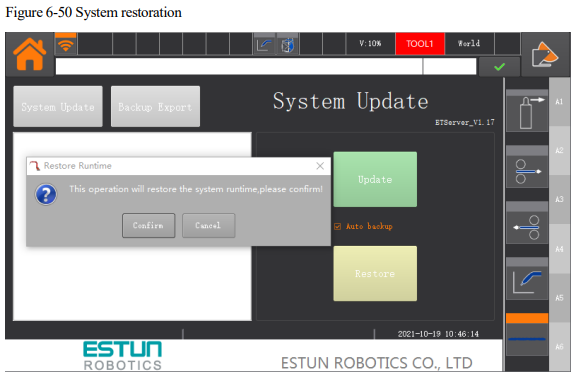
Step 1: Switch to Administrator mode, access the controller upgrade interface, and click "Restore". to enter the administrator password for confirmation. After that, a confirmation dialog box will pop up.
Step 2: Once the controller approves the restoration request, the restoration operation will begin.
Step 3: Wait patiently for some time. The teach pendant will display a message box indicating that the restoration is about to end. To ensure data synchronization, the teach pendant needs to be restarted. For the virtual teach pendant, automatic restart is not possible, so after clicking "OK", the virtual teach pendant will close automatically, and you need to manually reopen and run it. For the physical teach pendant, it will restart automatically after you click "OK".
[Note]
Do not turn off the system power while waiting for the system restoration to complete to avoid system malfunction caused by the restoration failure.
6.13.3 Backup export
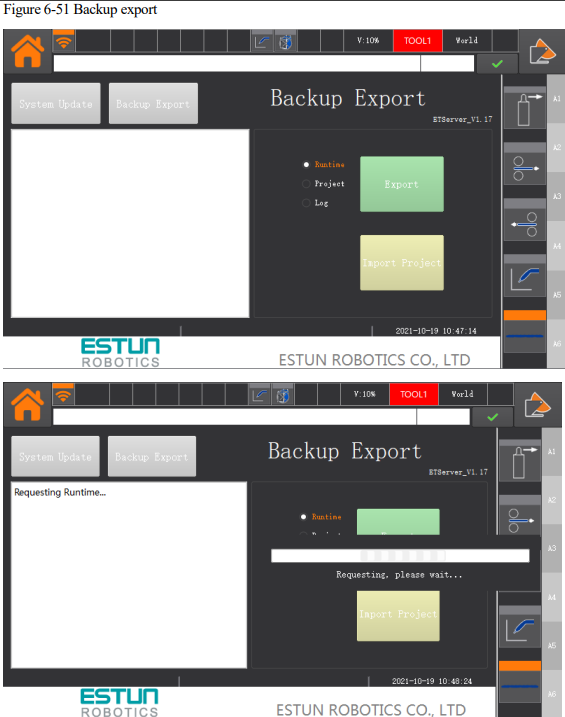
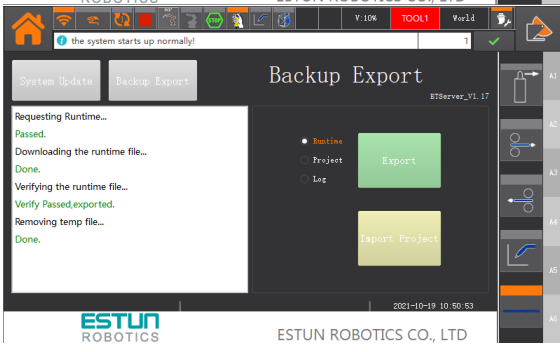
Step 1: Switch to administrator mode, access the "Controller Upgrade" interface, click "Backup Export", and display the backup export interface as shown in figure below.
Step 2: Select the export type as required (including: runtime package, project program, and system log), then click "Export". Enter the administrator password for confirmation (if the actual programming pendant is used and no Udisk is inserted, a prompt to insert the U-disk will appear), and then request export to the controller, as shown in figure below.
Step 3: After the request is approved, the "Export Rename" dialog box will appear. The virtual Programming Pendant also supports selecting the directory to save the export. After setting the export name, click "OK" to begin exporting the corresponding file.
Step 4: After the export is complete, it will be displayed as shown in figure below.
[Note]
If using the physical teach pendant, do not remove the U flash drive before the export is complete, as it may cause the exported files to be nonexistent or damaged;
6.13.4 Project import
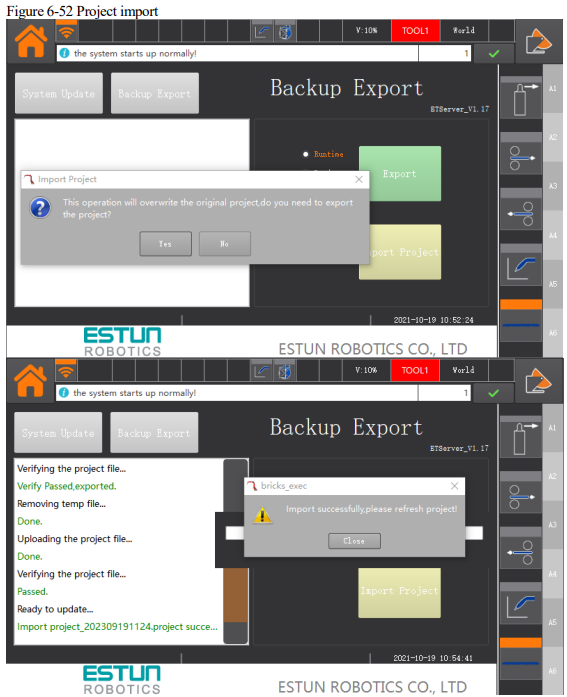
Step 1: Put the prepared project file (.project format file, which can be obtained by using the backup export function to export the project program. If it needs to be made under special circumstances, = please refer to the Operation Manual for ER Series Industrial Robot Controller Upgrade) into the root directory of the USB flash drive and insert the USB flash drive into the programming pendant.
Step 2: Switch to the administrator user and enter the "Controller Upgrade" interface. Click "Backup Export" and then click "Import Project". After entering the administrator password to confirm, the interface shown in figure below will be displayed, prompting that importing the project will overwrite the existing project. You can choose to export the existing project by clicking "Yes". The process is the same as exporting the project program. After the export is completed, the project program file dialog box will be entered. If you click "No", you will directly enter the dialog box for selecting the project program file.
Step 3: Select the imported project program, and the import will begin. After the import is completed, the prompt "Import successful" will be displayed. Please refresh the project, as shown in figure below.
Step 4: Click the project button on the right to enter the project interface. Click "Refresh" to display the imported project.
6.14 Reach by One-Click
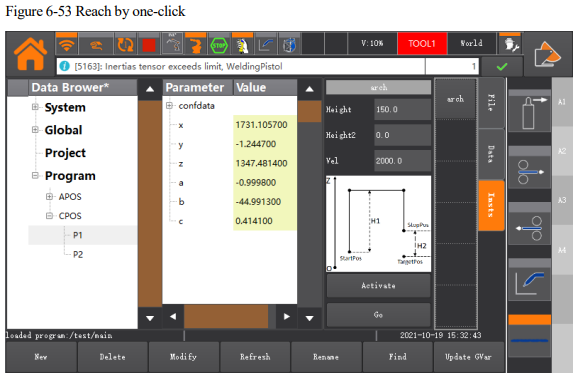
Reach by one-click. With this function, the robot moves from the current point to the target point in an arched path. The user interface is shown in figure below.
[Note]
⚫ This function is currently available only on SCARA models.
⚫ Reach by one-click. It is applicable only to position variables in the world coordinates.
⚫ When being activated, the parameter configuration of Reach by One-click will become valid.
⚫ To use this function, press and hold the hand switch in manual mode before performing motion operations.
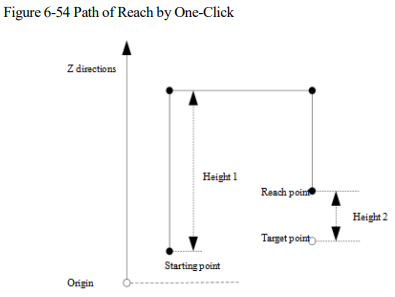
⚫ By pressing and holding the button, the robot will stop after moving to the target point. If the button is released halfway, the robot will stop motion immediately, and continue to move toward the target point by pressing such button again. Where: Height 1 represents the height of the vertical lift from the starting point along the z-axis;
Height 2 represents the vertical height of the target point. The arched path is shown in figure below.
6.15 Laser Welding Calibration
6.15.1 Calibration steps
The calibration involves establishing the conversion relationship between the laser coordinates and the robot coordinates, enabling the conversion of weld seam positions detected by the laser into robot coordinates, which are then communicated to the robot.
Preparations and considerations before calibration are as follows:
1. The robot must have undergone calibration to ensure accuracy and correctness of the tool and robot coordinates.
2. The laser must be securely and correctly mounted according to the laser's operational instructions.
3. Personnel performing the calibration should wear protective eyewear and avoid prolonged direct exposure to the laser.
4. Throughout the calibration process, the robot should be switched to the tool coordinate system. Conditions for Laser Calibration:
1) The robot must have undergone calibration to ensure accuracy and correctness of the tool and robot coordinates.
2) The laser must be securely and correctly mounted according to the laser's operational instructions.
3) Personnel performing the calibration should wear protective eyewear and avoid prolonged direct exposure to the laser.
4) TCP calibration (as illustrated with TOOL0 in the diagram below) should be performed first, followed by laser calibration.
Click  in the laser calibration interface to enter the interface, as shown in figure below.
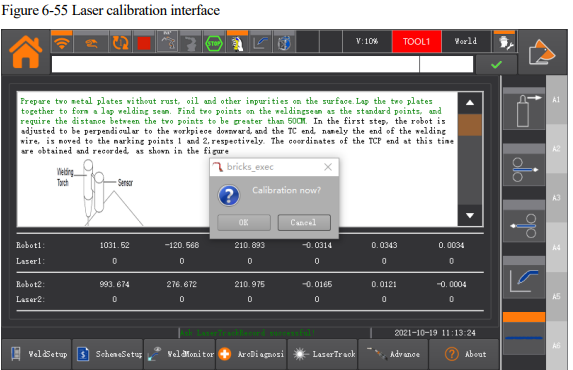
Click "OK" to proceed with the laser calibration or click "Cancel" to abort the calibration. You can review the points and calibration matrix recorded from the previous calibration.
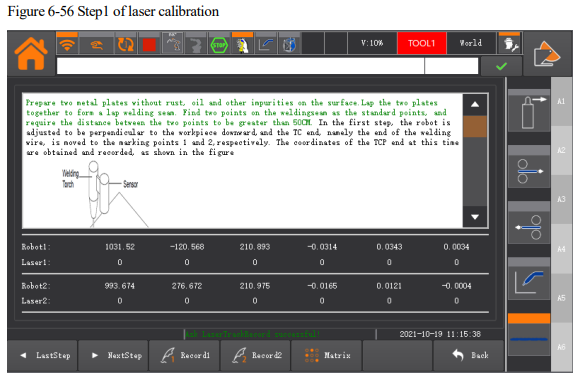
Prepare two metal plates with surfaces free of rust, oil, or impurities. Overlap these two plates to create a lap joint, forming a weld seam. Select two points on this weld seam as calibration points, and make sure that the two points are at least 30CM apart. Before starting the calibration, ensure that the laser is turned on, which requires executing the "ConnectLaser" command in the
program.
Step 1: Adjust the robot's posture to be vertical above the workpiece and move the TCP end effector to calibration points 1 and 2. Record the coordinates of the robot's TCP end effector at these positions, as shown in the diagram.
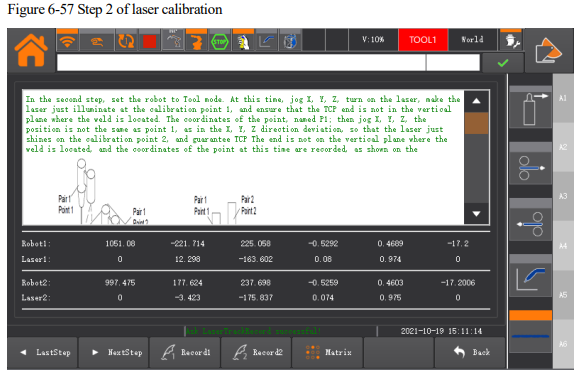
Step 2: Set the robot to Tool mode. In this mode, you can jog the robot's TCP in the X, Y, and Z directions to turn on the laser and position it to shine directly onto calibration point 1. Ensure that the TCP end effector is not in the same vertical plane as the weld seam. Record the coordinates of this point and name it as "P1"; next, jog the TCP in the X, Y, and Z directions to make sure it is not in the same position as point 1. If there’s deviation in the X, Y, or Z direction, position the laser to shine directly onto calibration point 2. Again, ensure that the TCP end effector is not in the same vertical plane as the weld seam. Record the coordinates of this point and name it as "P2," as shown in the figure below.
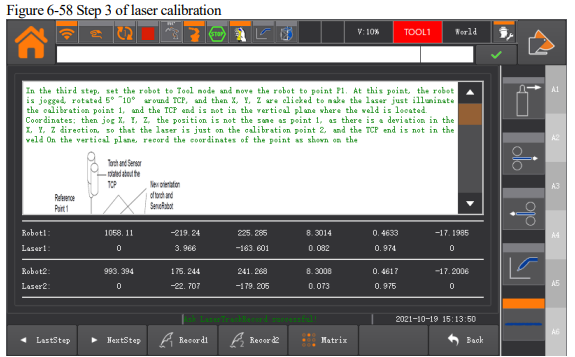
Step 3: Set the robot to Tool mode and move it to point P1. In this position, jog the robot to rotate around the TCP by 5° to 10°. Then, jog the robot in the X, Y, and Z directions until the laser is shining directly onto calibration point 1. Ensure that the TCP end effector is not in the same vertical plane as the weld seam, and record the coordinates of this point. Next, jog the robot in the X, Y, and Z directions, making sure it is not in the same position as point 1. If there’s deviation in the X, Y, or Z direction, position the laser to allow it to emit directly onto calibration point 2. Again, ensure that the TCP end effector is not in the same vertical plane as the weld seam.
Record the coordinates of this point, as shown in the figure below.
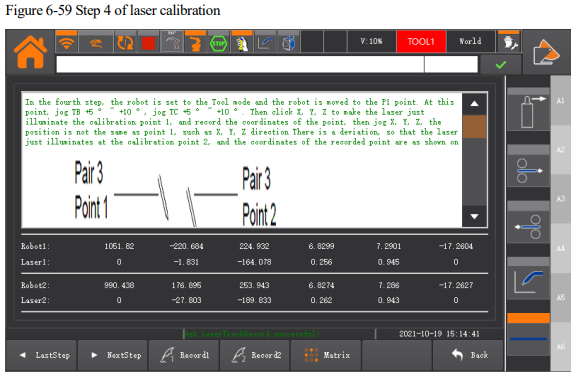
Step 4: Set the robot to Tool mode and move it to point P1. In this position, jog TB by +5° to +10° and TC by +5° to +10°. Then, jog the robot in the X, Y, and Z directions until the laser is emitting directly onto calibration point 1.
Record the coordinates of this point. Next, jog the robot in the X, Y, and Z directions, to ensure that it is not in the same position as point 1. If there’s deviation in the X, Y, or Z direction, position the laser allow it to emit directly onto calibration point 2. Record the coordinates of this point, as shown in the figure below.
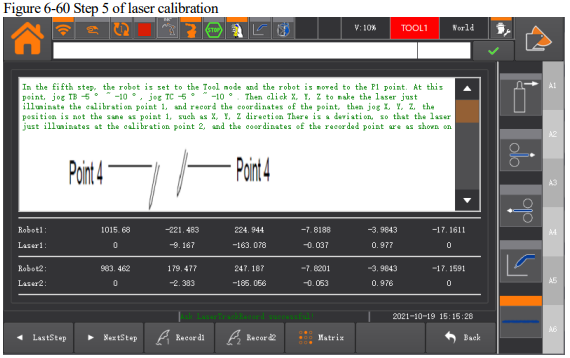
Step 5: Set the robot to Tool mode and move it to point P1. In this position, jog TB by -5° to -10° and TC by -5° to - 10°. Then, jog the robot in the X, Y, and Z directions until the laser is emitting directly onto calibration point 1.
Record the coordinates of this point. Next, jog the robot in the X, Y, and Z directions, to ensure that it is not in the same position as point 1. If there’s deviation in the X, Y, or Z direction, position the laser allow it to emit directly onto calibration point 2. Record the coordinates of this point, as shown in the figure below.
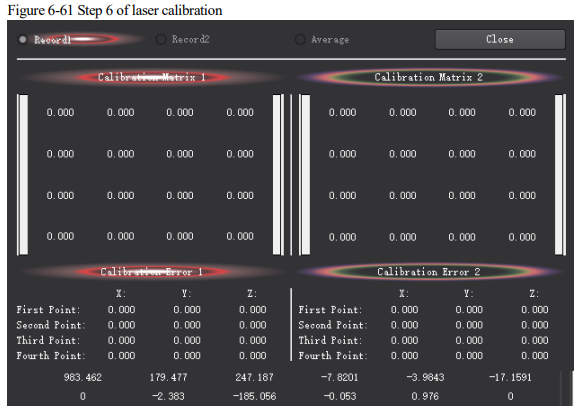
Step 6: Finally, click on "Next" after completing the Step 5. This will display the calibration matrix and error data.
Set the matrix to be used for calculations.
6.15.2 Laser Searching
Laser Searching refers to the process of using a laser to get the coordinates of a specific feature point and guiding the robot to reach that feature point.
You can perform laser searching tasks using the following two examples.
Example 1:

Example 2:

6.15.3 Laser Tracking
Laser Tracking refers to process of using a laser to get the position of a feature point on a section of a weld seam and directing a robot to weld that section.
Example:

Note:
In the example, as the robot moves to point P2, the laser system is already capturing welding seam
feature points. Once the robot reaches point P2, it begins to access the stored welding seam feature
points and continuously executes the welding operation until the laser system cannot detect feature
points or until it has completed the welding distance between P0 and P1.
6.15.4 Welding Adaptation
SetwelderThoughGap(3, 1, REAL0) //Plate thickness 3, and get the corresponding gap REAL0
By using the SetwelderThoughGap command, you can predict and measure various gap values along a weld seam. In the teach pendant's welding adaptation interface (refer to Figure 4-13), you can configure welding parameters based on these measured gap values. During the actual welding process, the system will automatically adapt the welding parameters according to the specific gap measurement, and get the appropriate welding scheme for each gap.
6.16 Calibration of User Coordinates/External Tool Coordinates
[Note]
In this section, the calibration operation of the user coordinates is illustrated. The calibration method for external tool coordinates is the same as the user coordinates. When modifying, the default name of the user coordinates is USERCOOR, while the default name of the external tool coordinates is EXTTCP.
Perform calibration to a user coordinate system by following the procedures below.
Step 1 Enter the program data interface, and click the user coordinates to be calibrated in the global scope, e.g. USERCOOR1, as shown in figure below.
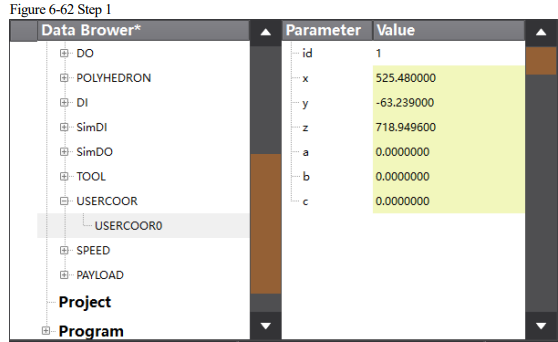
Step 2 Click "Modify" to enter the preview interface of user coordinates, as shown in figure below.
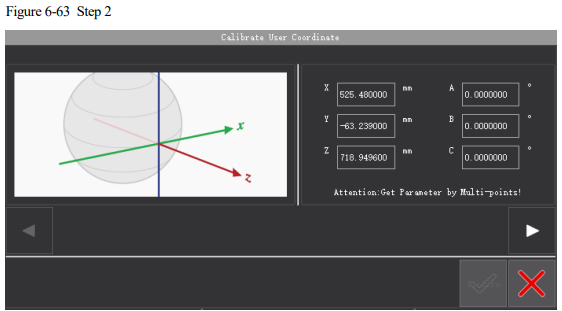
Step 3 Click "Settings" to enter the calibration method selection of user coordinate system.
There’s only the "3-point calibration method" available currently, as shown in figure below.
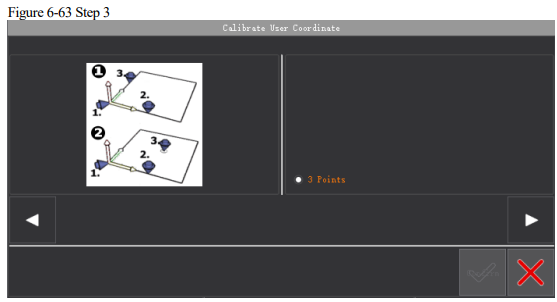
Step 4 Click "Next" to start teaching the coordinates at the origin, and move the robot to the origin of the user coordinates. By clicking "Teach", the interface will record the coordinates of the origin (the first point), as shown in figure below.