
4. Introduction to System Functions
The interaction between the robot controller and the user is performed through the programming pendant.
Programming pendant is an important part of the robot control system. The operator manually teaches using the programming pendant, controls the robot to produce the different poses, and records the coordinates of each pose; use the robot language to program online, realize the program playback, and enable the robot to move along the path required by the program. Programming pendant consists of the following functional component:
The programming pendant we use provides functional components including:
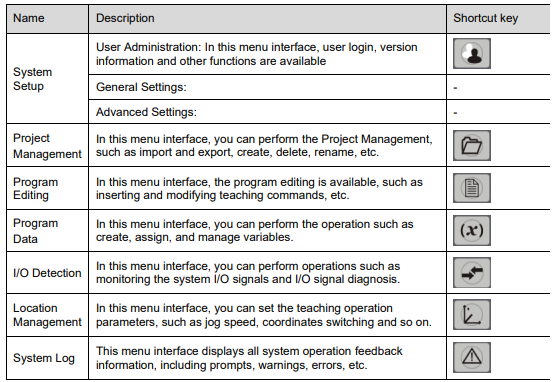
4.1 Project Management
Press  or click on "Project Management" on the main screen to enter the Project Management interface, which consists of a status bar, function keys at the bottom and function keys on the right, as shown below:
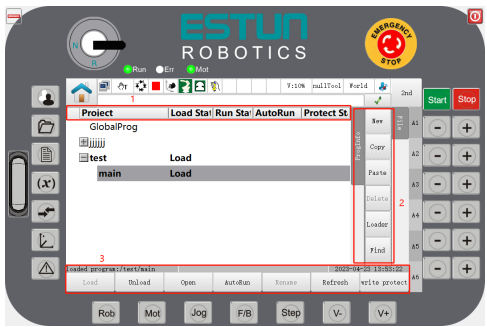
1. Status Display Bar:
Project List: Displays the project name, click on to expand all program files under the project directory.
Load Status: Displays whether the project or program is "loaded", the default display is blank, then "loaded".
Running Status: Displays whether the project or program is running, with "running", "paused" or "stopped" available under running status.
Self-trigger: Displays whether the program is set to "Self-trigger". The default display is blank, and when enabled, the display shows "Self-starting".
Write Protection: Displays whether the program is set to "Write Protection". The default display is blank, "read-only" appears when switched on.
2. Function Keys at the Bottom
Load: Loads a project or program from an existing project, allowing you to load the program directly.
Logout: Used in conjunction with Load, the button is greyed out when the file is not loaded.
Open: can only open program files. you need to load the project before opening; opening is not the same as loading, when running you will be prompted to import the program first.
Self-trigger: Automatically loads the program file set in remote mode; a pop-up window will appear if the program is not compatible with the self-trigger.
Rename: Rename the project or program name, not case sensitive.
Refresh: Refreshes the current interface.
Write Protection: Read-only program, which cannot be modified.
Turn ON: Select the desired program, click on the "Write Protection" button. After turning on "Write Protection" according to the prompts on the interface, the user cannot modify the contents of the program, as the global variables, project variables and program variables in the program cannot be changed.
Cancel: Select the program again and click on the "Cancel Write Protection" button, and user can change the program after cancel the write protection according to the prompts.
If this button is greyed out, it means that the current user does not have access to the program. This function can only be operated by "Admin" and "Factory Personnel".
3. Function keys on the right
Create: to create a new project or a new program file under an existing project;
Copy: to copy an existing project or program file and prompt for renaming of the copied project or program after clicking Paste;
Paste: used in conjunction with the copy function;
Delete: to delete a project or program that is not needed;
Admin: to import and export a project;
Find: to find a program;
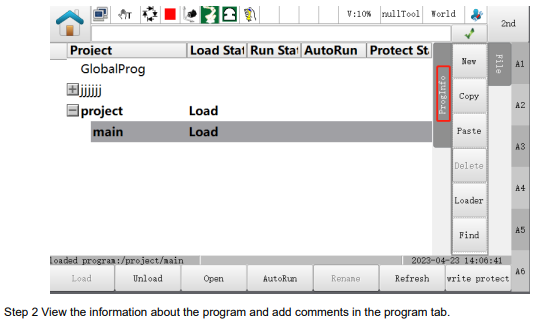
Program Information: to view the status information of the selected program and add notes.
4.1.1 Creating a New Project or Program
Create a new project or a program by following the procedure below.
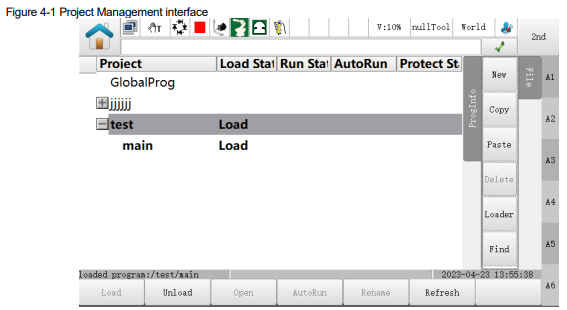
Step 1 Click  , or the “Project Management” on the main interface to enter Project Management interface, as shown in Figure 4-1. In the Project Management interface, click "Refresh" below to update the list of project.
Step 2 Select "File→Create" on the right, and the "Create a Program" dialog box will pop up, as shown in Figure 4-2.
 In other interfaces, select "File→Create" on the right to perform the operation of creating a new project.
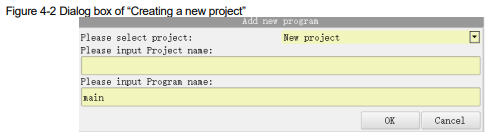
Step 3 To create a new project, select "Create a New Project" from the drop-down list on the right of "Select a Project".
If you want to create a new job in a project, select the desired project name in the drop-down list and skip to Step 5.
Or, select a desired project in the project list in advance, and then click "Create".
If there is no program in the project list, the option "Create a Project” is in default.
Step 4 Click the input box of "Please enter the project name", and enter the name of the project to be created in the soft keyboard popped up, for example, project0.
Step 5 Click the input box of "Please enter the program name", and enter the name of the program to be created in the soft keyboard popped up, for example, program0.
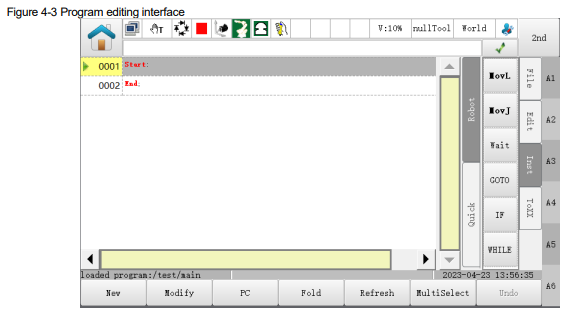
Step 6 Click "OK", a new project or program is then created. The interface jumps directly to the program editing interface, as shown in Figure 9-3.
----END
4.1.2 Deleting a New Project or Program
Delete a project or a program by following the procedure below.
Step 1 Click the project or program to be deleted in the Project Management interface, for example, project0.

1. To delete a project that has been "loaded", you need to click "Cancel" below before performing the normal delete operation.
2. To delete a program, you must ensure that the project in which the program is located is logged out before deleting.
Step 2 Click "Delete" on the right, and a prompt box will pop up, as shown in Figure 4-4.
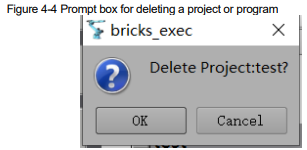
Step 3 Click "OK" to delete the project.
----END
4.1.3 Renaming a Project or Program
Rename a project or a program by following the procedure below.

1. To rename a project that has been "loaded", you need to click "Cancel" below before performing the renaming operation.
2. To rename a program, the project in which the program is located cannot be "loaded" and must be "logged off" before the program can be renamed.
Step 1 Click the project or program to be renamed in the Project Management interface, for example, project0.
Step 2 Click the "Rename" below.
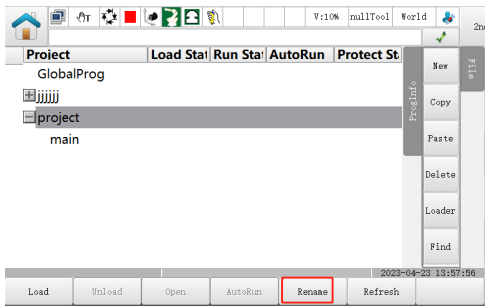
Step 3 Click "Enter a new project name", and enter the new name in the pop-up soft keyboard.
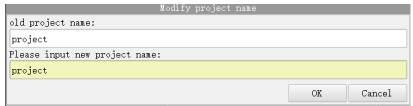
Step 4 Click "OK", and the rename operation is done.
----END
4.1.4 To copy/paste a project or program
Copy and paste a project or a program by following the procedure below.
Step 1 Click a project or program to be copied in the Project Management interface, for example, project0.
Step 2 Click "Paste".
The same program cannot be copied and pasted into different project directories.
When a program is to be copied, if the pasted path is under another project, the prompt message "Unable to copy the program to another project!" will pop up. Please click and select the correct project before proceeding.
Step 3 Click "Please enter a new project name", and enter the new project name in the soft keyboard.
Step 4 Click "OK" to finish the copy/paste operation.
----END
4.1.5 Load/Cancel a New Project or Program
In the project list, the "Loading Status" column already shows the project or program being loaded.
Only one project or program can be loaded. When another project or program is loaded, the previously loaded project or program will be automatically cancelled.
To load or log off a project or program, click the project or program you want, and then click "Load" or "Cancel".
4.1.6 Self-triggered Program
The self-trigger function can only be set for programs, not for projects. If a program is set to " selftriggered", it will be loaded automatically when the remote mode is enabled.
Step 1 Select the program that needs to be self-triggered in the project list.
Step 2 Click on the "Self-trigger" button below.
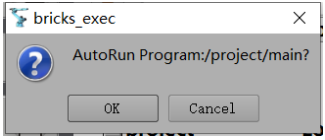
Step 3 Click on "OK" in the pop-up dialog box to complete the self-trigger operation of the program.
4.1.7 Write Protection
The Write Protection function can only be set for the program, not the project. If a program is "writeprotected", the user cannot make any changes to the program files or variable files in the project. This function can be cancelled manually, which guarantees the security of the program files.
Step 1 Select the program that needs to be write-protected in the project list.
Step 2 Click on the "Write Protection" button below.
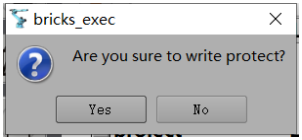
Step 3 Click "Yes" in the pop-up dialog box to complete the write protection of the program.
Step 4 Click on "Remove Write Protection" below and follow the pop-up box to remove the write protection from the program.
4.1.8 Administration (Project Import/Export)
Before performing the project import/export operation, the user needs to prepare a readable and writable USB flash drive, and then perform the following procedures.
Project Import: To import the project or program file in the USB flash drive to the controller.
Project Export: To export the project or program file in the controller to the USB flash drive.
The following operations are the procedures for project import, which is similar to project export.
Step 1 Insert the U disk into the USB interface of the teaching pendant.
Step 2 Click  , and enter the Project Management interface.
Step 3 Click "Manage" in the right menu to enter the interface, as shown in Figure 4-5
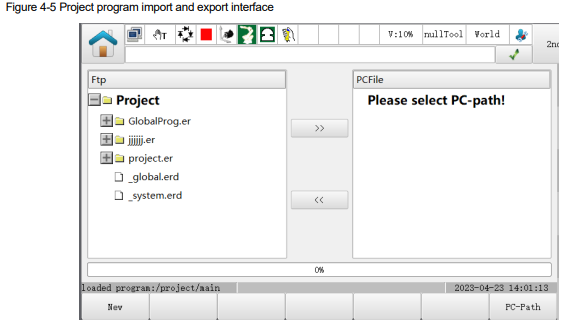
Click on "USB path" at the bottom right.
Supports the export of project and data files from the controller to a USB flash drive.
Supports importing the project and data files from the USB flash drive into the controller.
Supports the creation of a new project folder under the project root folder in the controller.
Supports deleting files and folders under the project root folder in the controller.
Supports the creation, deletion, copying, pasting, renaming and opening of folders in the USB flash drive.
Project Export
1. Click on the "USB flash drive path" at the bottom right to access the USB flash drive.
2. Select the program file to be exported from the list of "Project File" on the left.
3. Click ">>" in the middle of the interface to export the program file selected to the USB flash drive.
Project Import
1. Select the program file to be exported from the "Project File" list on the right.
2. Click on "<<" in the middle of the interface to import the selected program file to the controller.
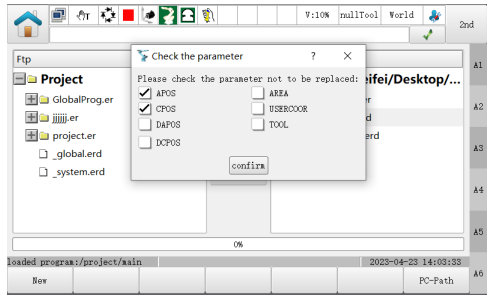
3. If the selected file is _global.erd, then a pop up will appear asking you to check the files that will not be overwritten. The following variable types are currently available: APOS, CPOS, DAPOS, DCPOS, AERA, USERCOOR, TOOL (in line with EStunEdit).
Note
When importing the _global.erd file, data types that are checked in the interface will not be replaced into the robot controller; data types that are not checked or do not exist in the interface will be removed and replaced with the _global.erd data as checked on the right hand side of the interface.
Create
1. Click "Create" below, and the project create dialog box as shown in Figure 4-6 will appear.

2. Click the input box of "Enter a new project name", and enter the name of the project to be created in the soft keyboard, for example, project0.
3. Click "OK" to produce a new project, prompting "Please reload the project". You can view the new project in the project file list in the teaching box on the left.
----END
4.1.9 Search for a Project/Program
Locate a project or program by following the guidance steps below.
Step 1 Click the "Search" button in the Project Management interface to bring up the "Search for a Program" interface, as shown in Figure 4-7.

Step 2 Enter the text you are looking for in the "Name" input box and click the "Search" button to search.
Note
On the left side of the Search screen, there are three filtering criteria including project name (checked by default), case-sensitive and all-word match checkboxes, which can be freely checked according to your needs. You can also enter some of the consecutive characters in the name to be located
Step 3 The search result will be displayed, divided into three types: not found, one found, and multiple found. When multiple found, you can click on the "Previous" and "Next" buttons to switch the search result, and the project list will locate to the line with the search result, as shown in the figure below.
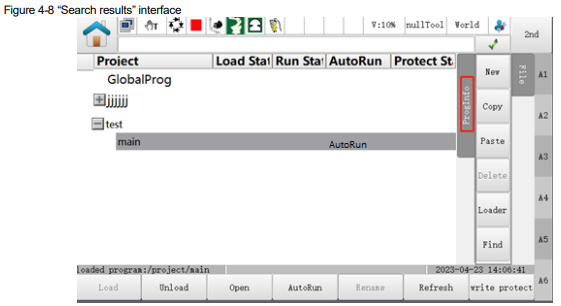
Step 4 Click "Close" to exit the Search function.
----END
4.1.10 Program Information
You can quickly view basic information about the current program or add comments.
Step 1 Select the program to view and click on the "Program Information" button on the right to switch to the Program Information tab.
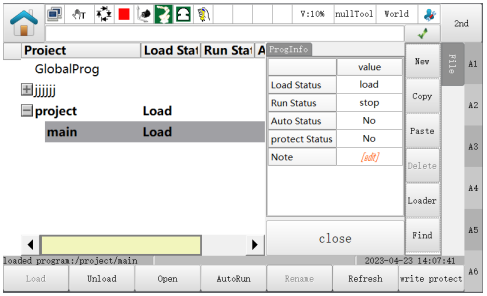
Load Status: Loaded, Not loaded, Called, /
Running Status: running, paused, stopped, parallel, execution interrupted, parallel interrupted, invoked interrupted
Self-trigger: Yes, No
Write Protection: Yes, No
Comments: red font [editable] is displayed when no comments are available, click on the comments field to fill in the comments.
The maximum length of a comment can be 35 characters.
4.2 Program editing