9. Device Settings
9.1 Feature Tree Introduction
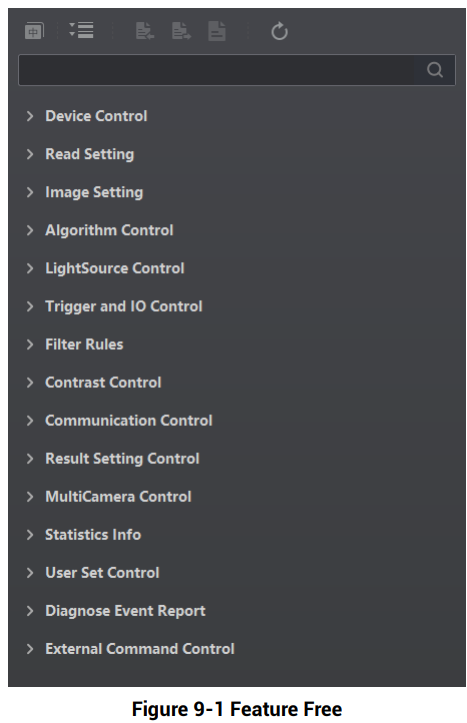
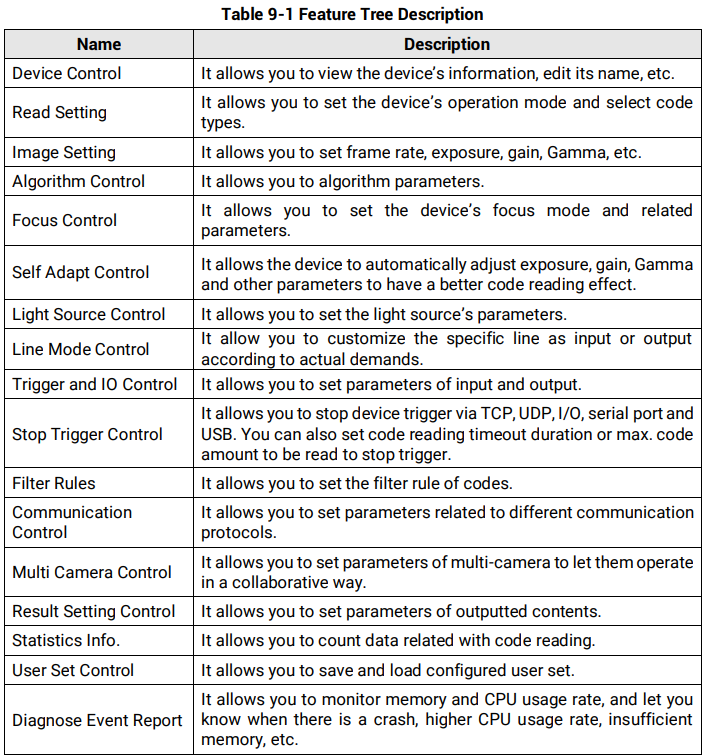
After the device is connected to the client software, and you can right click the device in Device Connection, and click Feature Tree.

9.2 Code Reading Mode Settings
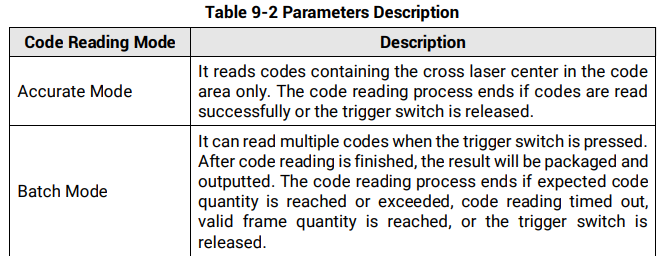
The device supports different code reading modes, including accurate mode and batch mode.
Steps
1. Right click the device in Device Connection, and click Feature Tree.
2. Go to Trigger and IO Control → Accurate Mode Enable, and enable Accurate Mode Enable.


9.3 Image Quality Settings
This section introduces how to set image related parameters of the device via client software.

9.3.1 Set Image
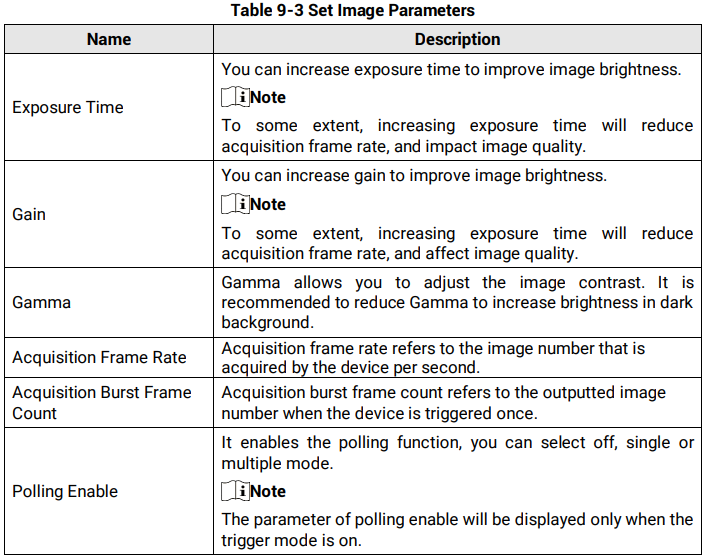
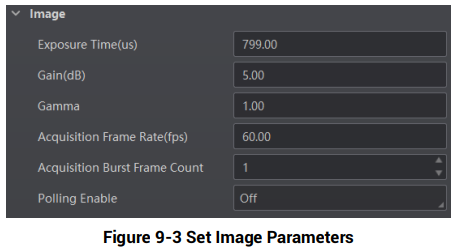
You can set parameters like exposure time, gain, Gamma, acquisition frame rate, acquisition burst frame count, etc. in Image Settings area.
9.3.2 Set Polling
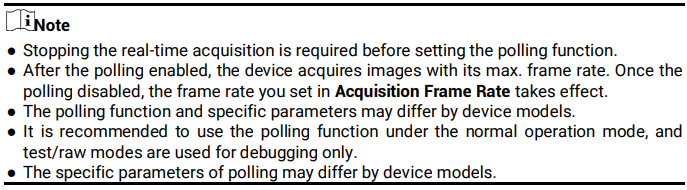
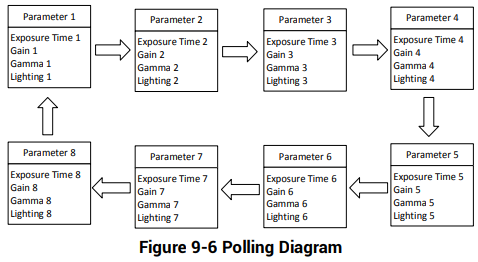
The polling function allows the device to acquire images based on the parameters you set, including exposure time, gain, Gamma, light source, focus position, etc. Currently, two types of polling modes are available, including single mode and multiple mode.
Single Mode
Steps
1. Right click the device in Device Connection, and click Feature Tree.
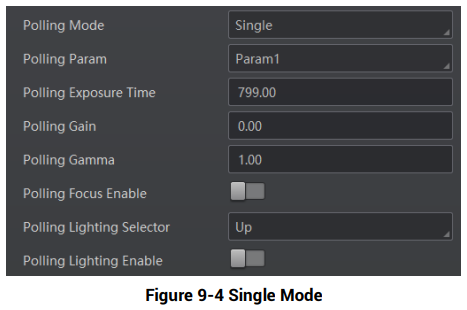
2. Go to Image Setting → Polling Mode, and select Single as Polling Enable.
3. Select one parameter (e.g. Param1) from Polling Param.

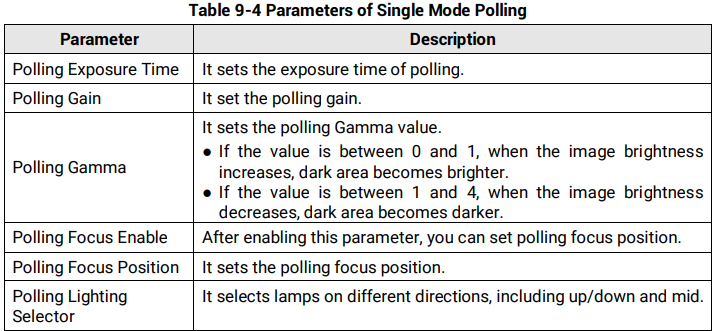
4. Set parameters participating the polling like Polling Exposure Time, Polling Gain, Polling Gamma, etc. according to actual demands.

Multiple Mode
Steps
1. Right click the device in Device Connection, and click Feature Tree.
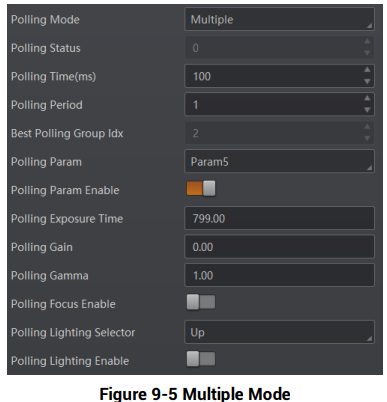
2. Go to Image Setting → Polling Mode, and select Multiple as Polling Enable.
3. Set Polling Time and Polling Period according to actual demands.
● Polling Time is used to determine whether the polling is finished or not, and it ranges from 100 to 2147482.
● Polling Period is whole period from Param1 to Param8, and it ranges from 1 to 5000.
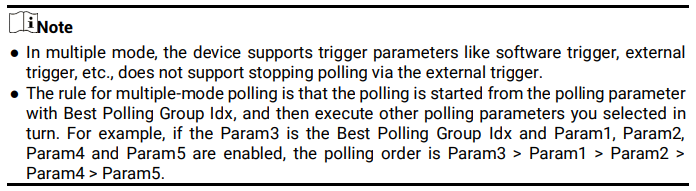
4. Select 2 to 8 sets of parameters (e.g. Param1 and Param2) from Polling Param, and enable Polling Param Enable to let them take effect.
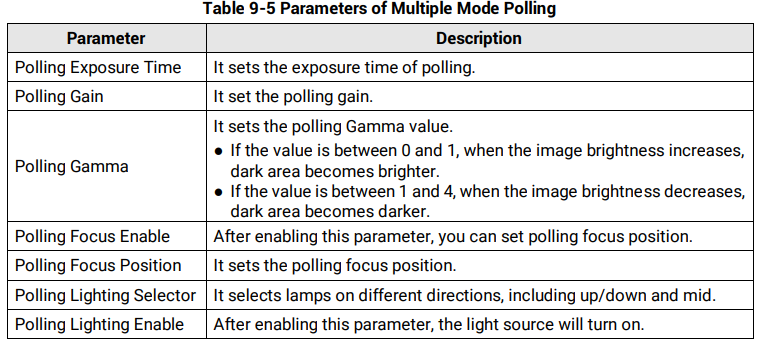
5. Set parameters participating the polling like Polling Exposure Time, Polling Gain, Polling Gamma, etc. according to actual demands.
6. Repeat step 4 and step 5 to set other parameters from Polling Param.
7. (Optional) View Polling Status and Best Polling Group Idx.
● Polling Status: It displays the current polling status. 0 stands for polling ended, and 1 stands for polling started.
● Best Polling Group Idx: It is used to display the polling parameter number when the device recognizes codes after enabling polling. If the polling is disabled or polling parameters are edited, it displays 1 by default.
9.3.3 Set Light Source
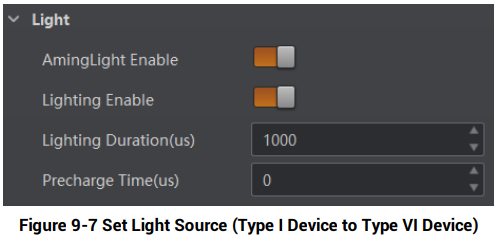
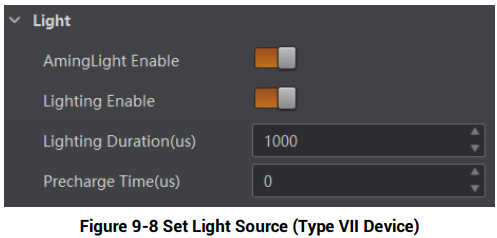
Light source control allows you to enable the device’s aiming system and light source, and set related parameters according to actual demands.

Type I Device to Type VI Device
Steps
1. Go to Image Settings → Light, and enable Aiming Light Enable according to actual demands.
2. Enable Lighting Enable to enable the light source according to actual demands.
3. (Optional) Set Lighting Duration and Precharge Time if Lighting Enable is enabled.
Type VII Device
Steps
1. Go to Image Settings → Light, and select Lighting Mode according to actual demands.
2. Enable Laser Enable according to actual demands.
3. Enable Laser Delay Enable, and enter Laser Delay Duration to delay the close time of the laser after the device stops triggering.
9.3.4 Set Smart Tune
The smart tune function allows you to adjust the device’s focus position, exposure, gain, etc. by one-key operation, and supports self-adaptive adjustment.
The smart tune function has two methods to be realized, including smart tune by pressing tune button and smart tune via the client software.
Smart Tune by Pressing Tune Button

Steps
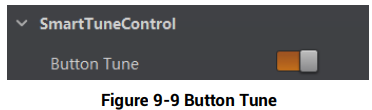
1. Go to Image Settings, click All Features on the right corner, and find Smart Tune Control.
2. Enable Button Tune, and disconnect the device from the client software.

3. Hold the tune button for 3 sec and the device starts smart tune.
● During smart tune process, the status indicator flashes in green and red colors alternatively.
● If smart tune succeeds, the status indicator is solid green lasting 3 sec and then restores.
● If smart tune fails, the status indicator is solid red lasting 3 sec and then restores.
4. (Optional) Hold the button for 3 sec again during smart tune process, and the smart tune will be cancelled.
Smart Tune via Client Software
Apart from pressing tune button to realize smart tune, you can also configure parameters via the client software to realize it.
Before You Start: Make sure that the device is not in trigger mode, and its operation mode is test.
Steps
1. Go to Image Settings, click All Features on the right corner, and find Smart Tune Control.
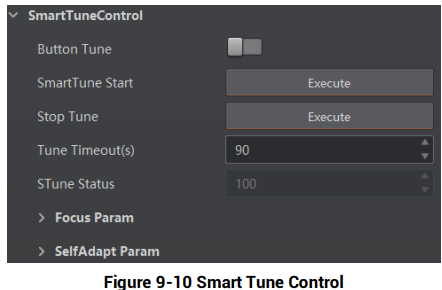
2. (Optional) Set Tune Timeout. If the self-adaptive adjustment exceeds configured value, and it will stop automatically.
3. Click Execute in Smart Tune Start to let the device start smart tune, and a window of smart tune will be displayed for you to view the effect.
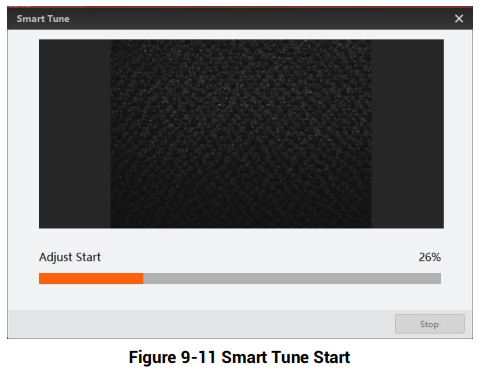
4. (Optional) View smart tune process via Smart Tune Status.
5. Click Execute in Stop Tune to stop smart tune process.
9.3.5 Set Focus
The device supports the focus function according to the code position in the field of view. Currently, three types of focus are supported, including global auto focus, global manual focus, and ROI focus.

Global Auto Focus
The global auto focus allows you to adjust lens focus in a global field of view just by once.
Steps
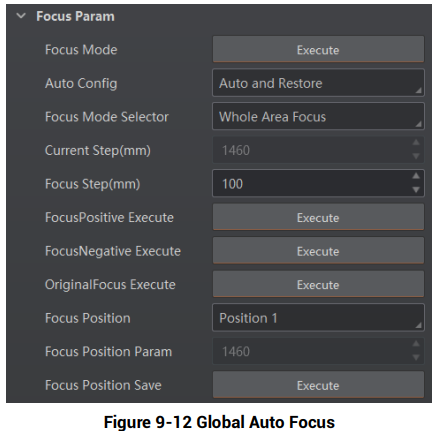
1. Go to Image Settings → Smart Tune Control → Focus Param → Focus Mode Selector, and select Whole Area Focus as Focus Mode Selector.
2. Click  in the live view window, and click it again to stop acquisition and make sure there is an image in the window.
3. Select the focus mode in Auto Config:
● Full Auto: In this mode, the device will automatically change parameters like focus position, exposure, gain, Gamma and light source when adjusting focus.
● Motor Only: In this mode, the device will change focus position only when adjusting focus.
● Auto and Restore: In this mode, the device will automatically change parameters like focus position, exposure, gain, Gamma and light source when adjusting focus, and keep focus position and restore other parameters after completing focus adjustment.
4. Click Execute in Focus Mode, and the device starts to adjust focus automatically.

5. (Optional) Select the position parameter from Focus Position, and click Execute in Focus Position Save to save the focus position after adjusting focus.
Global Manual Focus
The global manual focus requires manual focus according to the images displayed in the live view window.
Steps
1. Go to Image Settings → Smart Tune Control → Focus Param → Focus Mode Selector, and select Whole Area Focus as Focus Mode Selector.
2. Click in the live view window, and click it again to stop acquisition and make sure there is an image in the window.
3. Select Focus Position according to actual demands and Focus Position Param.
4. Set Focus Step according to actual demands.
5. Click Execute in Focus Positive Execute and Focus Negative Execute to adjust focus position.
6. (Optional) View Focus Score to know the score of the focus adjustment.
7. (Optional) Select the position parameter from Focus Position, and click Execute in Focus Position Save to save the focus position after adjusting focus.
8. (Optional) Click Execute in Original Focus Execute to let the focus back to its original position.
ROI Focus
The ROI focus allows you to adjust lens focus regarding the ROI area by drawing specific area.

Steps
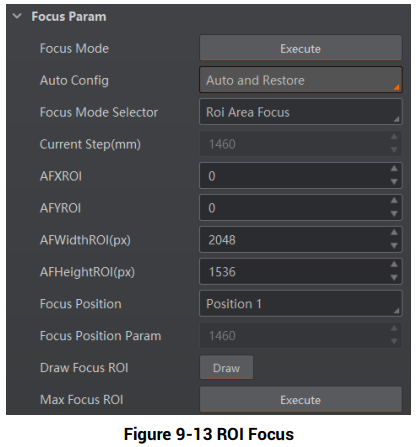
1. Go to Image Settings → Smart Tune Control → Focus Param → Focus Mode Selector, and select ROI Area Focus as Focus Mode Selector.
2. Click  in the live view window, and click it again to stop acquisition and make sure there is image in the window.
3. Click Draw in Draw Focus ROI, and draw ROI by dragging the mouse in live view window.
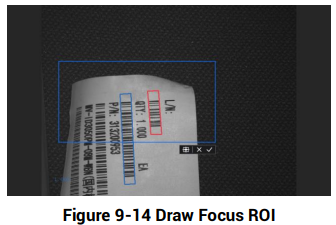
4. (Optional) Set following parameters to adjust ROI size and position.
● AF Offsex X: It is X coordinate of the upper left corner in ROI where executes auto focus.
● AF Offsex Y: It is Y coordinate of the upper left corner in ROI where executes auto focus.
● AF Width ROI: It refers to the width in ROI where executes auto focus.
● AF Height ROI: It refers to the height in ROI where executes auto focus.
5. (Optional) Click Execute in Max. Focus ROI to have a global focus.
6. (Optional) Repeat step 3 if you want to set multiple ROIs.
9.3.6 Set Self-Adaptive Adjustment
The function of self-adaptive adjustment can automatically adjust exposure, gain, Gamma and other parameters to have a better code reading effect.

Steps
1. Go to Image Settings → Smart Tune Control → Self Adapt Adjust, and unfold Self Adapt Adjust.
2. Select Adjust Source according to actual demands.
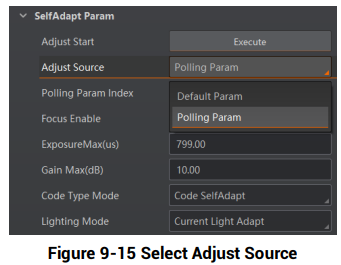
● Default Param: It adjusts the default parameters.
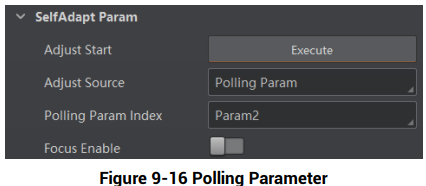
● Polling Param: It adjusts parameters configured in polling. After Polling Param is selected as Adjust Source, you should select a polling parameter group from Polling Param and enable or disable Focus Enable.
3. Set Exposure Max or Gain Max according to actual demands.
● Exposure Max: It sets the max. exposure during the self-adaptive adjustment.
● Gain Max: It sets the max. gain during the self-adaptive adjustment.
4. (Optional) Set self-adaptive code type in Code Type Mode.
● Code Self-Adaptive: All code types added in field of view will be self-adaptive.
● 1D Code: 1D code types added in field of view will be self-adaptive.
● 2D Code: 2D code types added in field of view will be self-adaptive.
● Stacked Code: Stacked code types added in field of view will be self-adaptive.
5. (Optional) Set light source parameters in Lighting Mode.
● Light Adapt: The client software will select the best one from all lighting options during the self-adaptive adjustment.
● Current Light Adapt: The client software will use the current configured light source.
● All Light Disable: All light sources will be turned off during self-adaptive adjustment process.
6. Click Execute in Adjust Start. The device will automatically acquire images and perform self-adaptive adjustment, and stop acquisition after adjustment is completed.

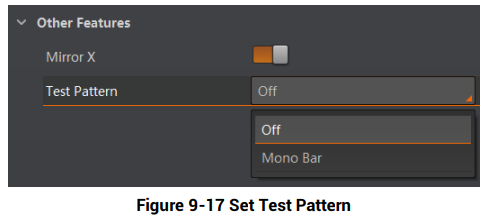
9.3.7 Set Test Pattern
Test pattern helps troubleshooting image problems and images in the test pattern are only for test. When exceptions occur in images acquired by the device in real time, you can check if images in the test pattern have similar problems to determine the cause of an exception.

Go to Image Settings, click All Features, find Test Pattern in Other Features, and set Test Pattern according to actual demands.