
6. CANopen Communication
6.1 Wiring and Connection
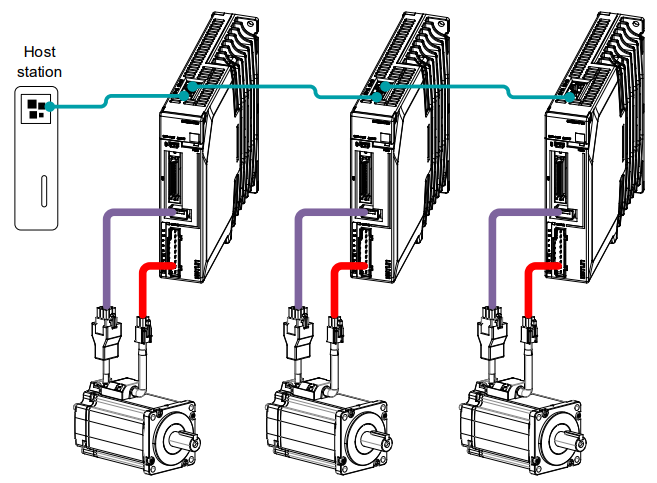
Connection diagram
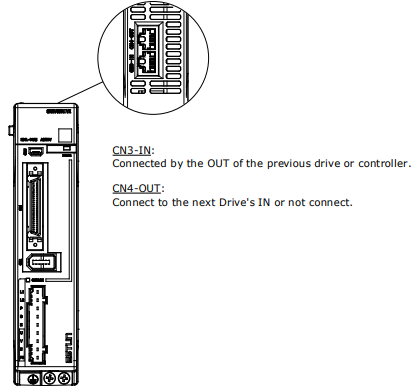
Terminal arrangement
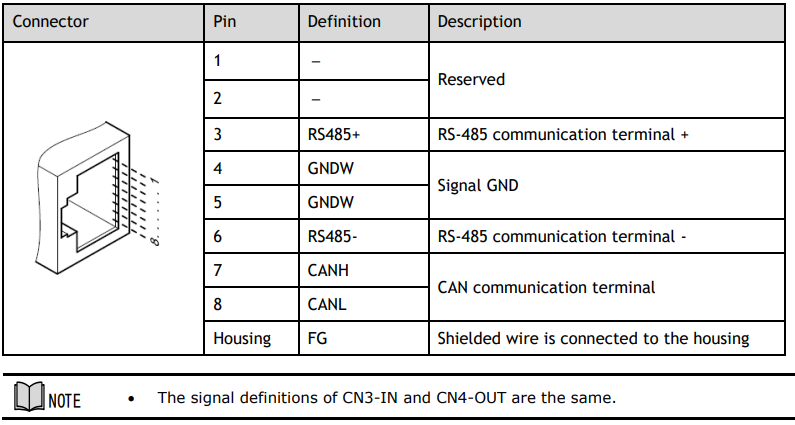
Signal Definition
The external communication connection terminals (CN3-IN and CN4-OUT) are of RJ45 connectors. The interface line as the master or controller is connected from CN3-IN, and CN4-OUT is connected to the CN3- IN terminal of next drive (slave).
Wiring Instructions
When wiring the CANopen communication, following precarious shall be taken.
⚫ Do not short connect pin 1 and pin 2.
⚫ Use UTPs (at least 2 pairs) with shielding layer.
One pair of UTPs is connected to CANL and CANH; the other is connected to ISO_GND.
⚫ The shielding layer is generally grounded reliably at a single point.
⚫ To prevent signal reflection, it is recommended to connect two 120Ω (1%, 1/4W) terminal matched
resistors at both ends of the bus.
⚫ It is recommended that the CAN bus networking node is ≤16.
The wiring diagram is shown below.

6.2 CANopen Overview
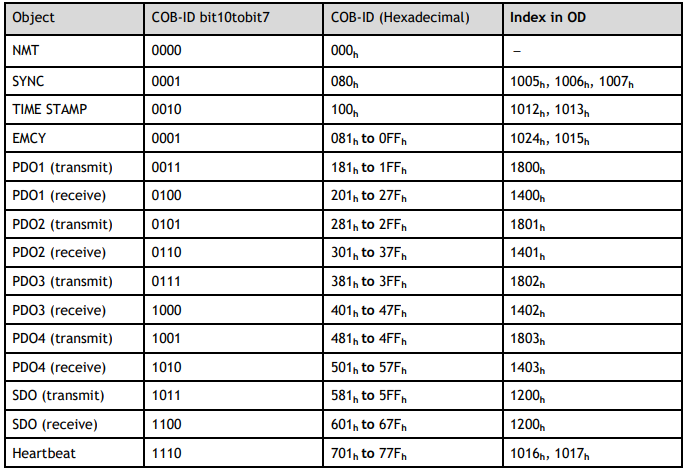
6.2.1 CAN Identifier List
6.2.2 Service Data Objects (SDO)
SDO is used to visit the object dictionary of a device. A visitor is called a client. The CANopen device whose object dictionary is visited and required to supply the asked service is called server. CANopen messages from a client and servo all contain 8 bits (not all of them are meaningful). A request from a client must be confirmed by a server.
There are 2 methods of transferring SDO:
⚫ Expedited transfer contains 4 bytes at maximum
⚫ Segmented transfer: contains more than 4 bytes
Basic structure of SDO:

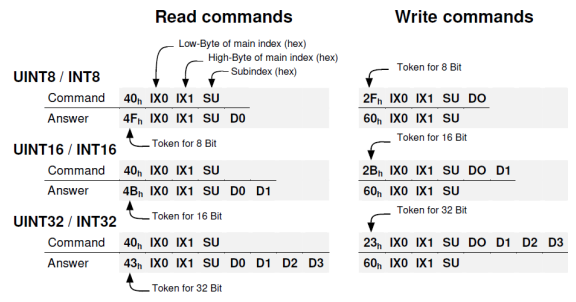
SDO read/write structure:
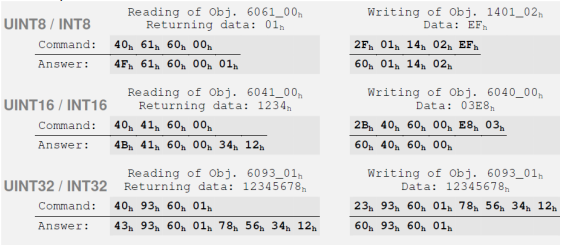
SDO message format for parameter read/write operation:
For example:
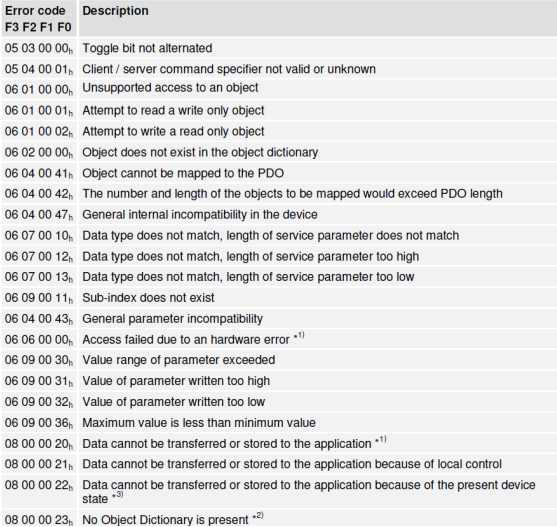
Format of SDO read/write error message:

Error code is defined as follows:
6.2.3 Process Data Objects (PDO)
PDO is applied to transferring real time data which will be conveyed from a producer to one or multiple clients. Data transferring will be limited to 1 to 8 bytes. There is no hand-shake restriction in PDO communication, which means data has been redefined, so clients could process the received data for a very short time. PDO content will be only defined by its CAN ID, assuming producers and clients know PDO content from its CAN ID.
2 objects in the object dictionary are used for each PDO.
⚫ PDO communication parameter: It contains COB-ID, transferring type, restriction time and cycle of timer used by PDO.
⚫ PDO mapping parameter: It contains a list of objects in the object dictionary. These objects are mapped into PDO, including their data length in bits. Producers and clients must know this mapping to explain the content of PDO.
The content of PDO’s message is predefined or configured when the network initializes. Mapping application objects into PDO is described in object dictionary. If a device (producer and client) supports dynamic mapping, SDO could be used to configure PDO’s mapping parameter. Our servo drive supports dynamic PDO mapping. There are 2 rules for PDO mapping to follow:
⚫ Each PDO could be mapped into 4 objects.
⚫ The length of each PDO will be no more than 64 bits.
PDO mapping process
1. Set the sub-index of PDO coordinated mapping parameter (e.g., 1600 h or 1A00 h) as o.
2. Revise the sub-index from 1 to 4 of PDO coordinated mapping parameter (e.g., 1600 h or 1A00 h).
3. Set the sub-index 0 of PDO coordinated mapping parameter (e.g., 1600 h or 1A00 h) as legal Number (number of PDO’s mapping objects)
4. PDO mapping completed.
Ways to transmit PDO
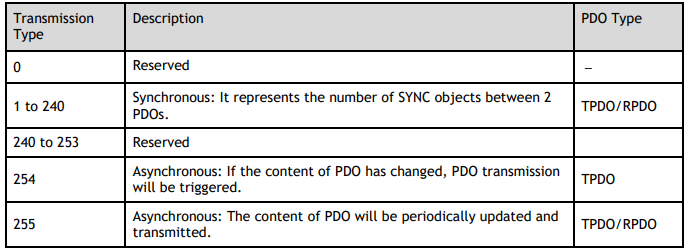
⚫ Synchronous (synchronization by receiving SYNC object)
Cycle: Transmission triggered after every 1 to 240 SYNC messages.
⚫ Asynchronous
Transmission triggered by special object event regulated in sub-object protocol.
Definition of transmission type of PDO
One PDO could set a frozen time which is the shortest time interval between 2 continuous PDO. It could prevent the bus from being occupied by amount of data with high priority. Frozen time is defined by 16-bit unsigned integer number and its unit is 100us
One PDO could set a timing period. When the regulated time is violated, a PDO transmit could be triggered without a trigger bit. Object timing period is defined as 16-bit unsigned integer and its unit is 1ms.
PDO mapping example
Map the 3 objects to PDO1 (transmit). PDO1 (transmit) is required to be asynchronous periodic type with period time as much as 10ms and frozen time as much as 2ms.

Step 1 Clear number_of_mapped_objects
number_of_mapped_objects(1A00 h: 00 h)= 0
Step 2 Set the parameter for mapping objects
Index =6041 h Subin. = 00h Length = 10 h ⇒ 1st_mapped_object(1A00 h: 01 h)= 60410010 h
Index =6061 h Subin. = 00h Length = 08 h ⇒ 2nd_mapped_object(1A00 h: 02 h)= 60610008 h
Index =60FD h Subin. = 00h Length = 20 h ⇒ 3rd_mapped_object(1A00 h: 03 h) = 60FD0020 h
Step 3 Set number_of_mapped_objects
number_of_mapped_objects(1A00 h: 00 h)= 3
Step 4 Set PDO communication parameter
PDO1 (transmit) is asynchronous periodical type ⇒ transmit_type (1800 h: 02 h)= FF h
Frozen time 2ms(20×100us) ⇒ inhibit_time (1800 h: 03 h)= 14 h
Period time 10ms(10×1ms) ⇒ event_time (1800 h: 05 h)= 0A h
Step 5 PDO mapping completed.
PDO Parameters
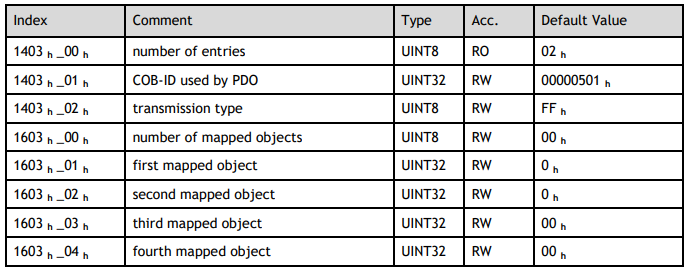
Drive contains 4 transmit PDOs and 4 receive PDOs. The detailed communication parameter and mapping parameter of the first transmit/receive PDO is as below and those of the rest 3 transmit/receive PDO are the same as the first PDO.

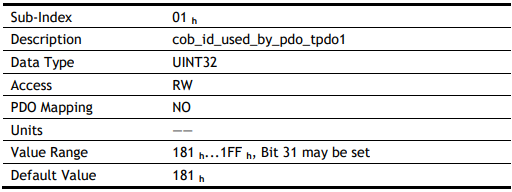
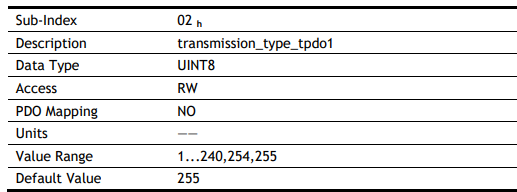
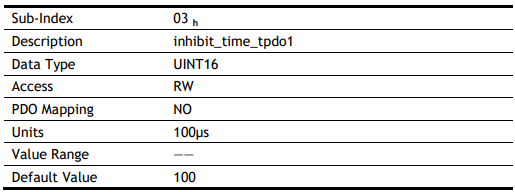
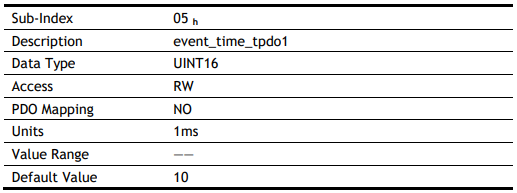

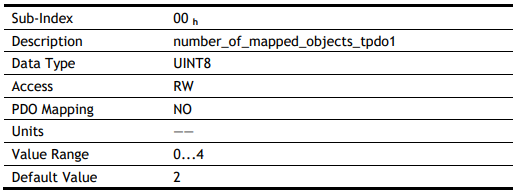
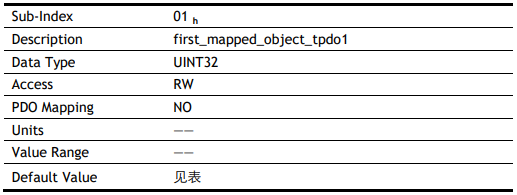
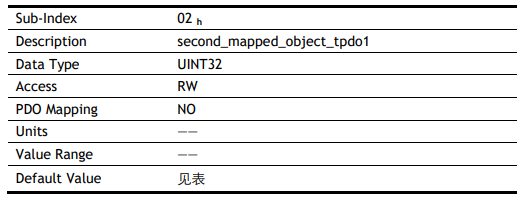
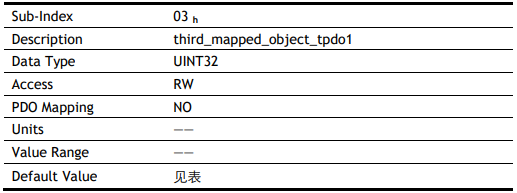
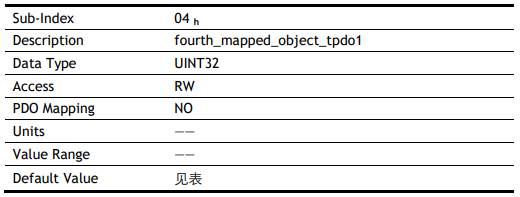
T-PDO1
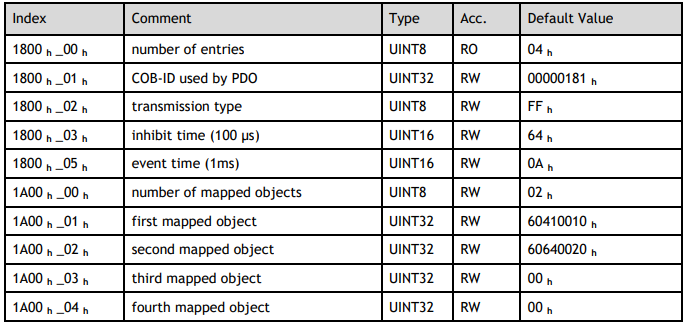
T-PDO2
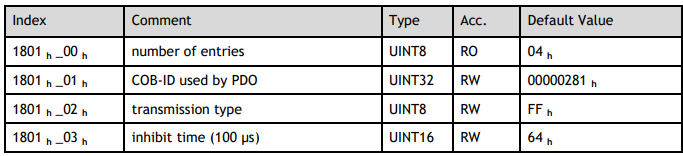
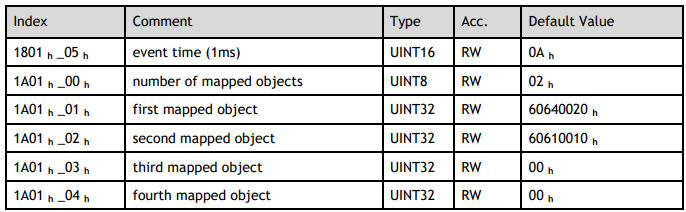
T-PDO3
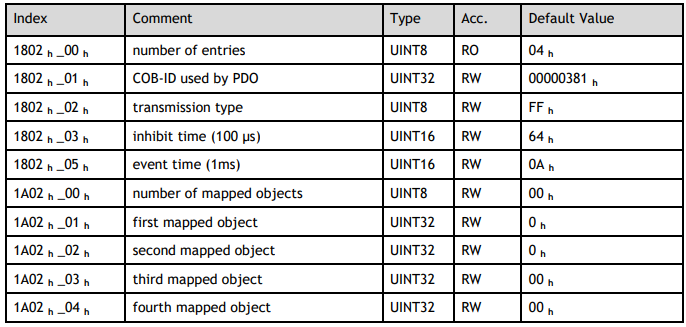
T-PDO4
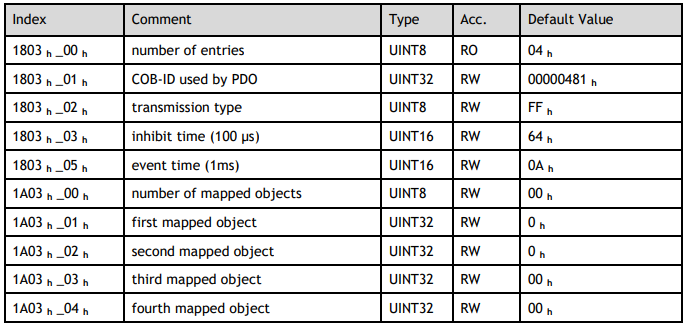
If transmit type is 254 (if PDO content has changed, such PDO is triggered to send), use of the following object can shield parts of PDO changers. Only when the un-shield bit has changed, PDO occurs. If you want shielding any bit, the corresponding bit of object write to 0.
tpdo_1_transmit_mask

tpdo_2_transmit_mask

tpdo_3_transmit_mask

tpdo_4_transmit_mask

R-PDO1
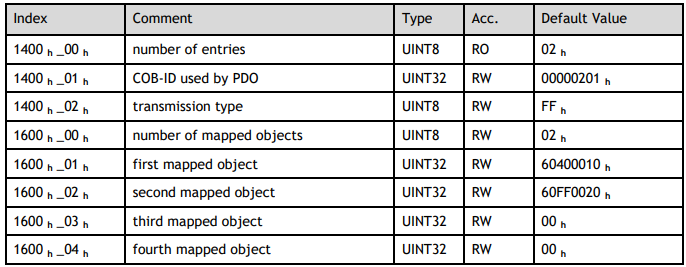
R-PDO2
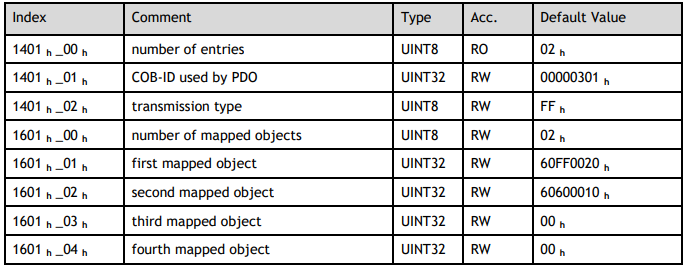
R-PDO3
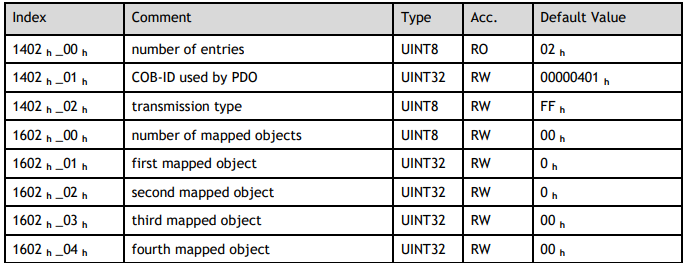
R-PDO4
6.2.4 SYNC Message
Synchronization object is used for controlling data synchronize transmit. For example, starting synchronously several axes. The transmission of synchronous message is based on Producer Customer model.
All the nodes of synchronous PDO can receive (at the same time) the message as customer and synchronize other node.
The general mode is that the SYNC master node sends the SYNC object regularly, and the SYNC slave node executes the task synchronously upon receiving it.
CANopen suggests a COB-ID with highest priority to ensure that synchronized signal could be transmitted properly. Without transferring data, SYNC message could be as short as possible.
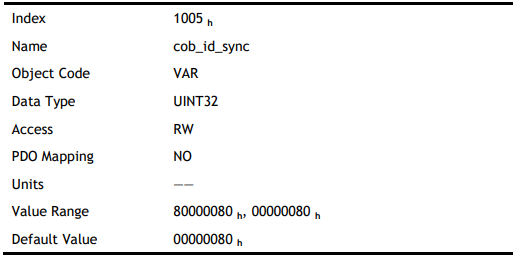
The COB-ID of the SYNC message is fixed at 080h, and the COB-ID can be read from 1005 h in the object dictionary.
6.2.5 Emergency Message
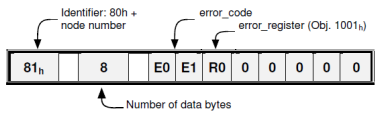
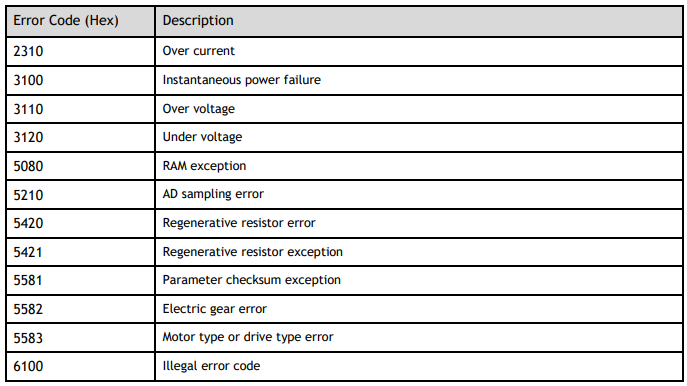
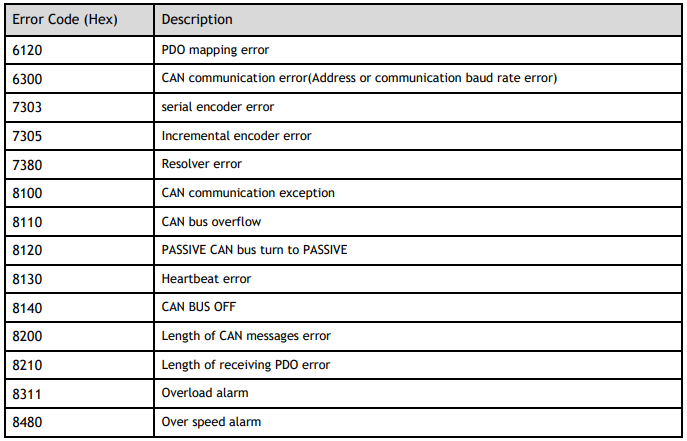
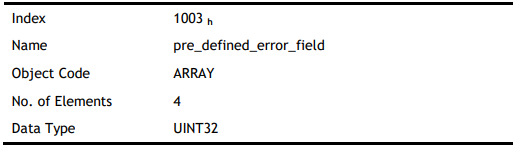
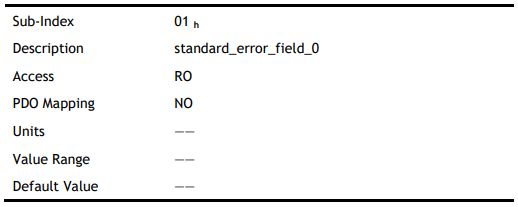
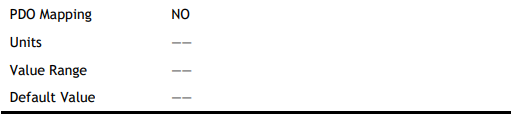
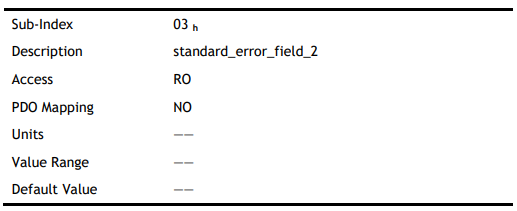
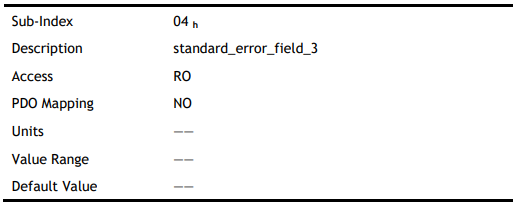
When an alarm occurs in the Drive, CANopen will initiate an emergency message to inform the current drive type and error code to clients. Error code displayed on the panel can be read on low byte of 603Fh object.
Structure of Emergency Message:

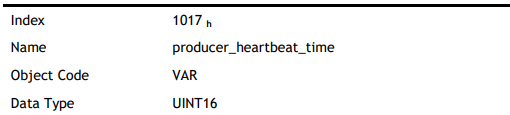
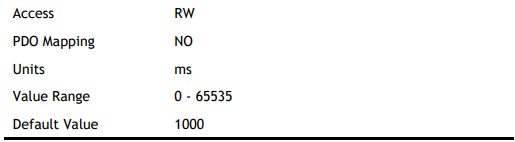
6.2.6 HEARTBEAT Message
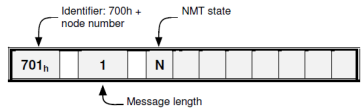
Structure of Heartbeat Message
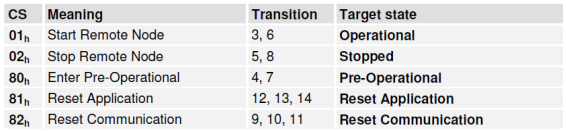
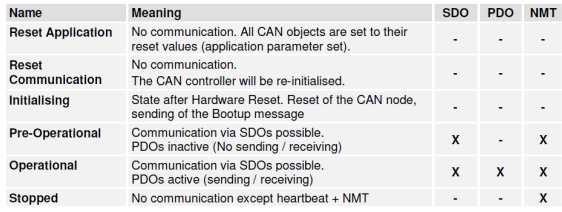
6.2.7 Network management (NMT service)
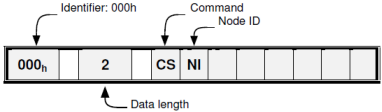
Structure of Message
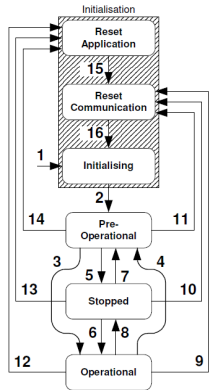
NMT state transition diagram
6.3 Unit Conversion
Default user unit of the drive:
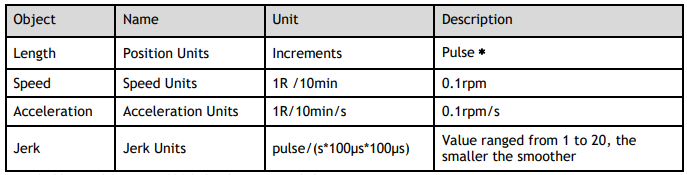
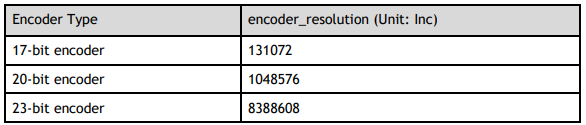
﹡ 17-bit encoder outputs 131,072 pulses per revolution
20-bit encoder outputs 8,388,608 pulses per revolution
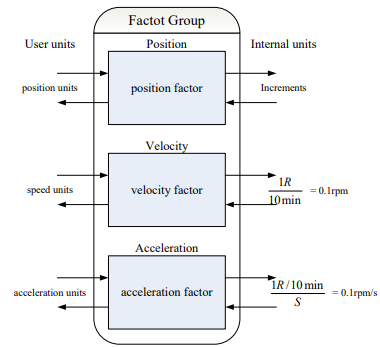
6.3.1 Parameters for Unit Conversion


6.3.2 Position factor
Position factor module converts all the measuring units of client into internal unit of servo drive (pulse) and at the same time converts the unit (pulse) of all the output from the drive into the measuring unit of clients (position units). Position factors include numerator and division.
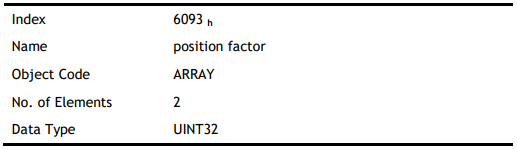
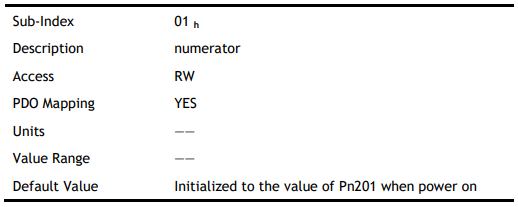
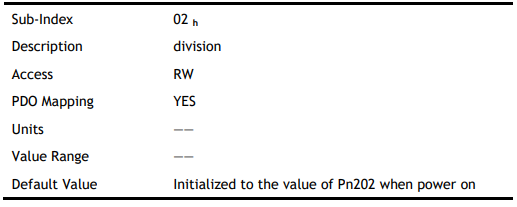
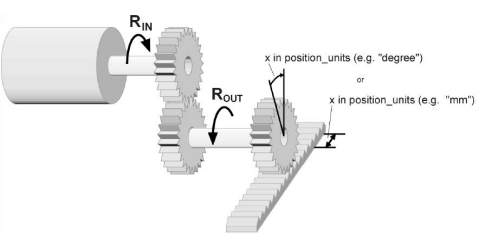
For calculating the position factors easily, 2 parameters as below are defined:
⚫ gear_ratio: Reduction ration between the load shaft and the motor shaft. (When motor’s revolution is n and load’s revolution is m, then gear_ratio = m/n)
⚫ feed_constant: the distance of position units’ movement when load shaft rotates for one revolution. position factor is calculated according to:

6.3.3 Velocity factor
Velocity factor module converts all the speed measuring units at customer side into drive’s internal measuring unit as much as 0.1rpm. And at the same time, it converts the drive’s output velocity unit (0.1rpm) into user’s velocity units. Velocity factor parameters include a numerator and a division.
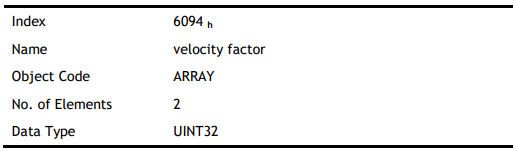
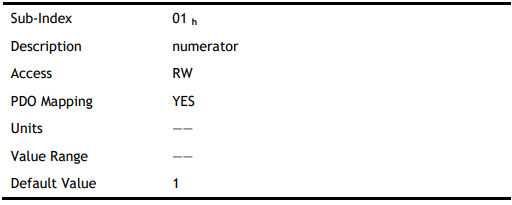
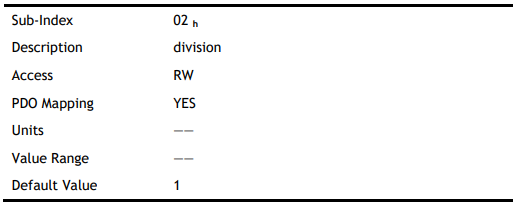
For calculating the velocity factor easily, 3 parameters are defined as below:
⚫ time_factor_v: drive’s internal time unit and user’s time unit. (For example: 1min = 1/10 10min)
⚫ gear_ratio: the reduction ratio between the load shaft and the motor shaft. (When motor’s revolution is n and load’s revolution is m, then gear_ratio = n/m)
⚫ feed_constant: the distance of position units’ movement when load shaft rotates for one revolution.
The velocity factor is calculated according to:

6.3.4 Acceleration factor
The acceleration factor module converts all the acceleration units from the perspective of clients into the drive’s internal unit (0.1rpm) and at the same time converts the output acceleration units (0.1rpm) from the drive into acceleration units at the perspective of clients. Acceleration factor parameters contain numerator and division.
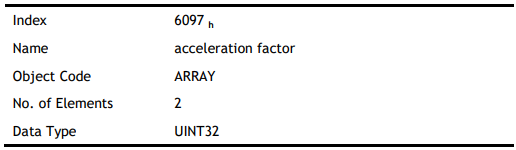
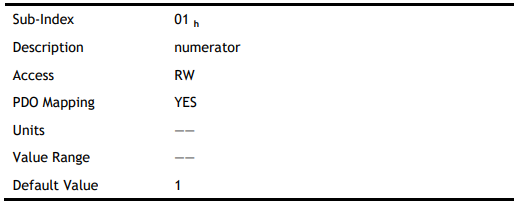
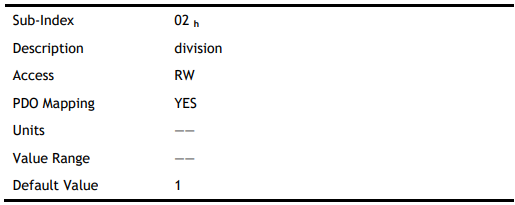
For calculating velocity factor easily, we could define 3 variables as below:
⚫ time_factor_a: The ratio between drive’s internal time square and clients’ time square. (For example: 1min2 = 1min*min = 60s*1min =60/10 10min/s)
⚫ gear_ratio: the reduction ratio between the load shaft and the motor shaft. (When motor’s revolution is n and load’s revolution is m, then gear_ratio = n/m)
⚫ feed_constant: the distance of position units’ movement when load shaft rotates for one revolution. acceleration factor is calculated according to:

6.4 Position Control Function
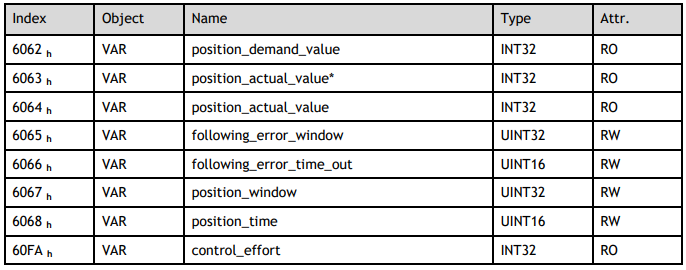
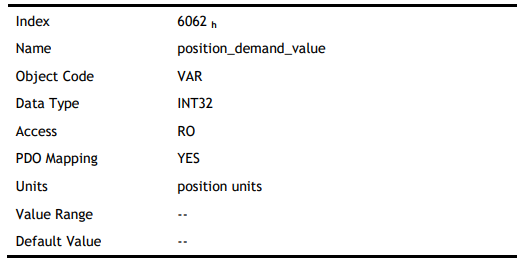
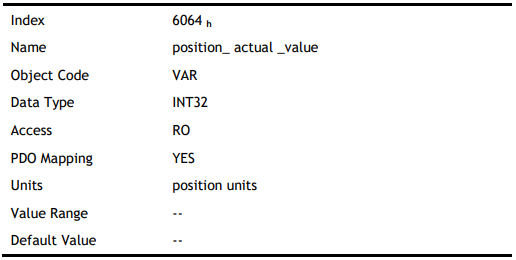
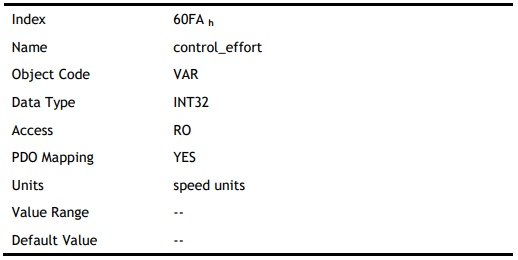
The demanding position (position_demand_value) output from Trajectory unit is the input of drive’s position loop. Besides, the actual position( position_actual_value) is measured through the motor’s encoder. Position control is influenced by parameter settings. To ensure the stability of the control system, we have to limit the output of postion loop (control_effect). This output becomes the given speed for speed loop. In the Factor group, all the input and output are transformed into the internal measuring unit of the servo drive.
Following Error
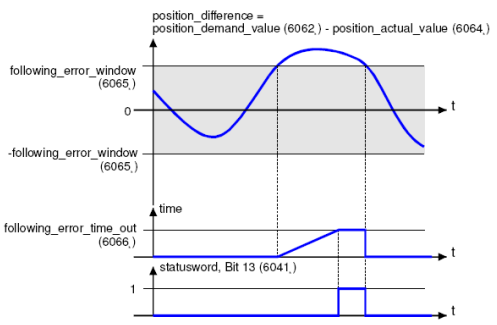
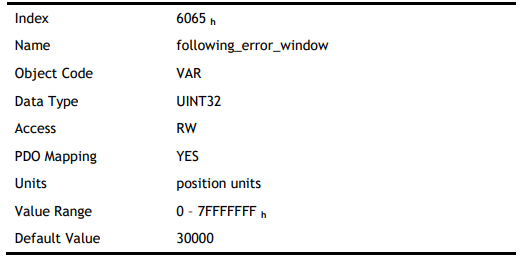
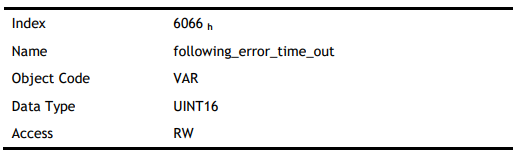
The deviation of the actual position value (position_actual_value) from the desired position value (position_demand_value) is named following error. As shown in the figure above, if for a certain period of time this following error is bigger than specified in the following error window (following_error_window) bit 13 (following_error) of the object statusword will be set to 1.
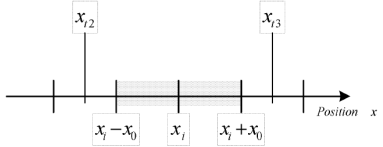
The figure above shows how the window function is defined for the message "following error". The range between xi-x0 and xi+x0 is defined symmetrically around the desired position (position_demand_value) xi.
For example, the positions xt2 and xt3 are outside this window (following_error_window). If the drive leaves this window and does not return to the window within the time defined in the object following_error_time_out, then bit 13 (following_error) in the statusword will be set to 1.
Position Reached
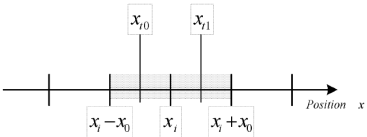
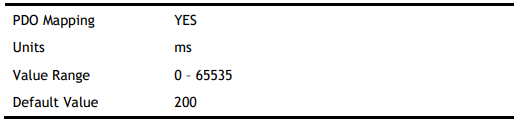
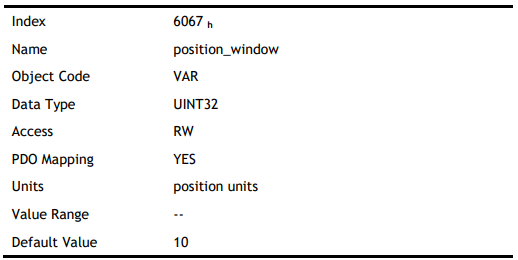
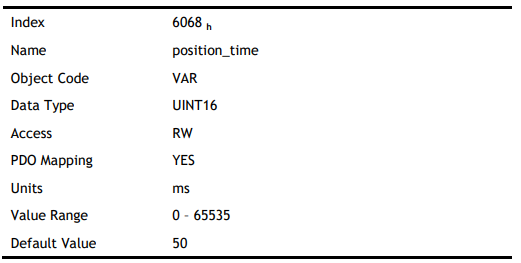
This function offers the chance to define a position window around the target position (target_position). If the actual position of the drive is within this range for a certain period of time – the position_window_time – bit 10 (target_reached) will be set to 1 in the statusword. As shown in the figure below.
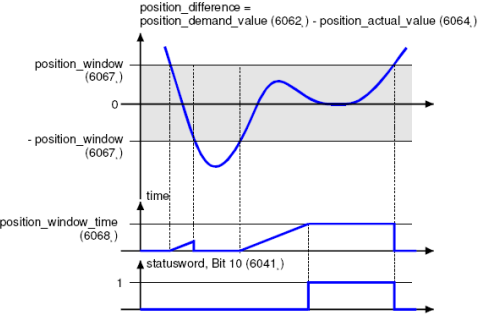
The figure below shows the position_windows are symmetrically distributed around the target_position), i.e., the range from xi-x0 to xi + x0. For example, the positionsxt0 and xt1 are in the position windows. If the drive is in the window, a fixed period starts timing. If the fixed period reaches the position_ window_ time and the drive position is always in the window during the time, then bit10 (target_reached) in the statusword_will be set to 1. As soon as the drive position leaves the window, bit10 (target_reached) in the statusword will be cleared to zero immediately.
6.5 Device Control
6.5.1 Control State Machine
The master controls the drive through the controlword and knows the status of the drive by reading the statusword of the drive.