
5. CHECK AND MAINTENANCE
Before performing any maintenance, be sure to read SAFETY PRECAUTIONS and understand the content.

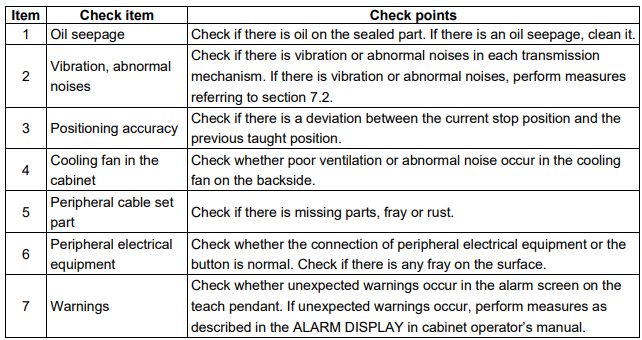
5.1. DAILY CHECKS
Check the items below before daily operation as occasion demands.
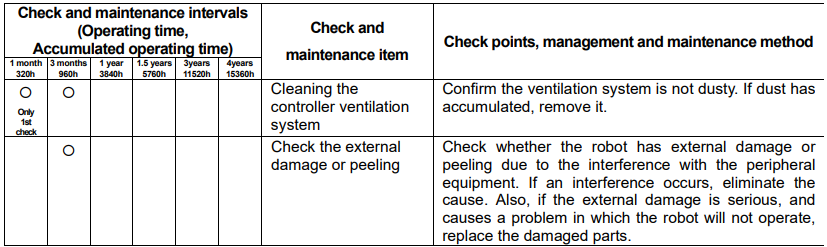
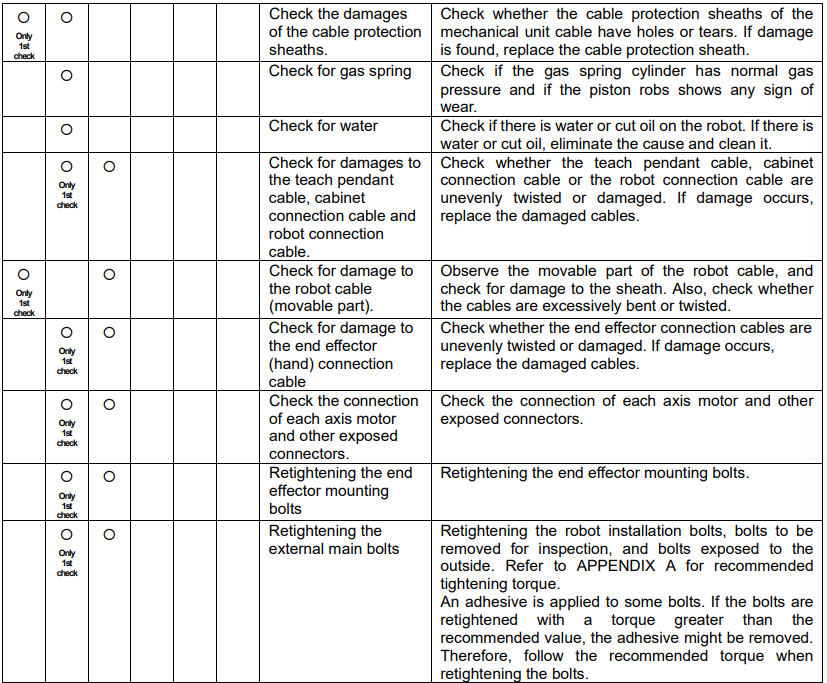
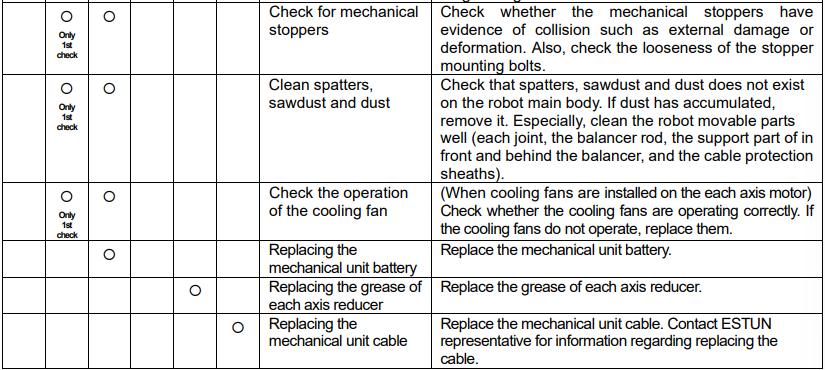
5.2. PERIODIC CHECKS AND MAINTENANCE
Check the items at the intervals recommended below based on the total time or the accumulated operating time, whichever comes first. Periodic checks keep the performance of the robot. The items below can be performed by yourself, or you can contact ESTUN for maintenance service.
5.3. ADJUST THE BELT
J5-axis of the robot (ER20-2300,ER50B-2100 and ER70B-2100) are drove by timing belt. The belt tense tends to reduce after a period of operation. This section describes how to strain the belt.

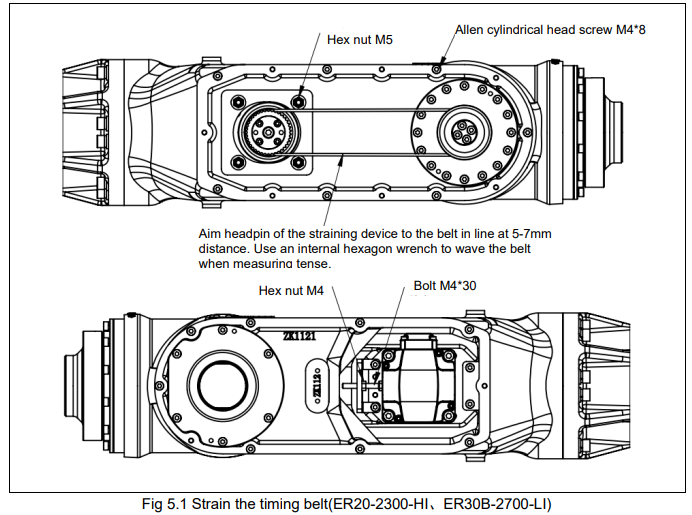
ER20-2300-HI, ER30B-2700-LI J5 shaft tensioning timing belt steps:
1. Disassemble the hexagonal cylindrical head screw M4×8 inside the left and right cover plates of the forearm, remove the left and right covers of the forearm and place them in the storage area;
2. Loosen the hex nut M5 that fixes the J5 shaft motor;
3. Adjust the adjustment device on the left side of the motor, mainly adjust the bolt M4×30, so that the bolt head is tight J5 shaft motor flange;
4. Test the timing belt tension on the side of the timing belt to make the timing belt tension appropriate (see the table below for the specific range);
5. Tighten the hexagonal nut M5 that fixes the J5 shaft motor, and tighten the hexagonal nut M4 that fixes the bolt at the same time;
6. Install the left and right covers of the forearm to the wrist connector through the hexagonal cylindrical head screw M4×8, and the left and right covers of the forearm are evenly coated with Loctite 5910 silicone, and the screws are tightened symmetrically.

ER50B-2100, ER70B-2100-LI J5 Axis Tensioning Timing Belt Steps:
1. Disassemble the hexagonal cylindrical head screw M5×10 inside the J5 shaft cover plate, remove the J5 shaft cover plate and place it in the storage area;
2. Loosen the hexagonal cylindrical head screw M6×25 on the J5 axis motor adapter plate;
3. Adjust the adjustment device on the left side of the adapter plate, mainly adjust the bolt M6×25, so that the tail of the bolt is pressed against the J5 axis motor adapter plate;
4. Test the timing belt tension on the side of the timing belt to make the timing belt tension appropriate (see the table below for the specific range);
5. Tighten the hexagonal cylindrical head screw M6×25 that fixes the motor adapter plate, and tighten the hexagonal nut M6 that fixes the bolt at the same time;
6. Install the J5 axis cover plate to the small arm rod through the Allen cylindrical head screw M5×10, the J5 axis cover plate is evenly coated with Loctite 5910 silicone, and the screws are tightened symmetrically.
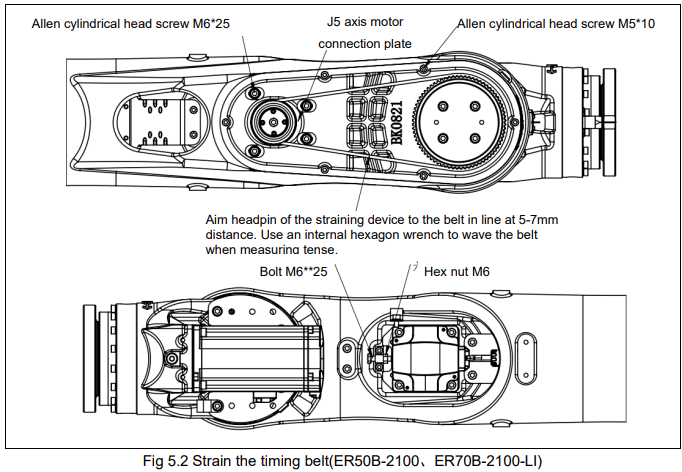

Measure the belt tense according to frequency, as internal parameter set is not required.
5.4. REPLACING THE BATTERY
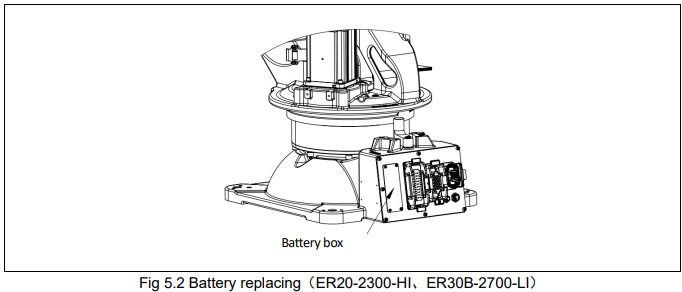
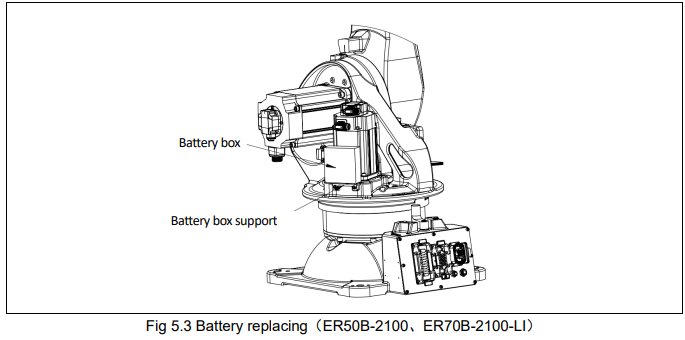
The position data of each axis is preserved by the backup batteries. The batteries need to be replaced every one year. Also use the following steps to replace the batteries when voltage drop alarm occurs.
Procedures of replacing the battery:
1.Press the emergency stop button to avoid any dangerous situation.
2.Remove the cover of the battery box.
3.Take out the old battery from the box.
4.Fix the new battery into the battery box. Make sure the direction is correct.
5.Fix the cover of the battery box.

5.5. GREASING
Greasing is required to each part every 3 years, or for a cumulative operation time of 11520 hours, whichever occurs first, according to the following steps. Refer to the table below for the brand and quantities of the grease applied to each joint.

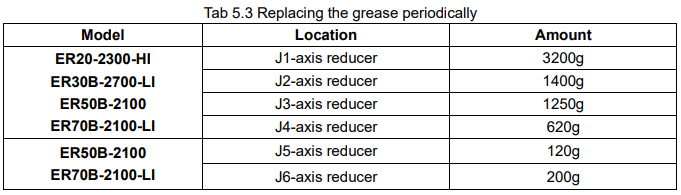
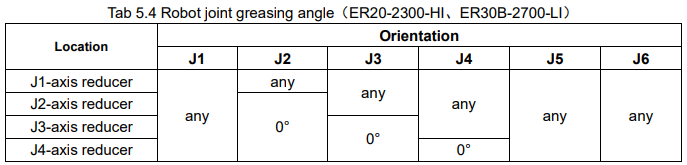
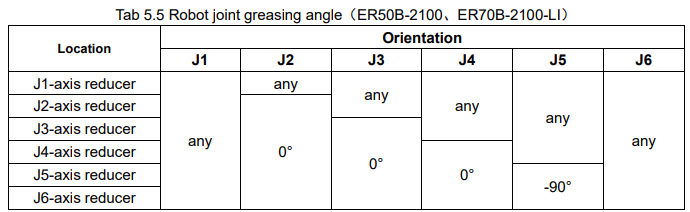
Recommend greasing gesture is list below.
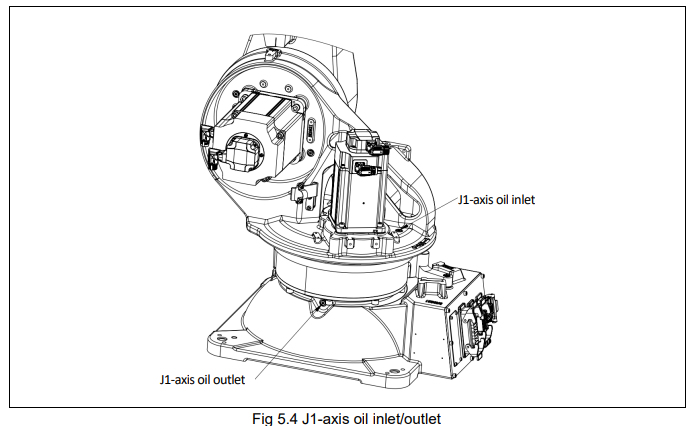
5.5.1.Inlet/outlet of each axis

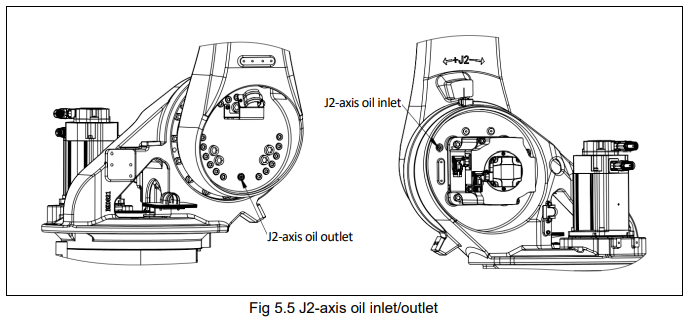
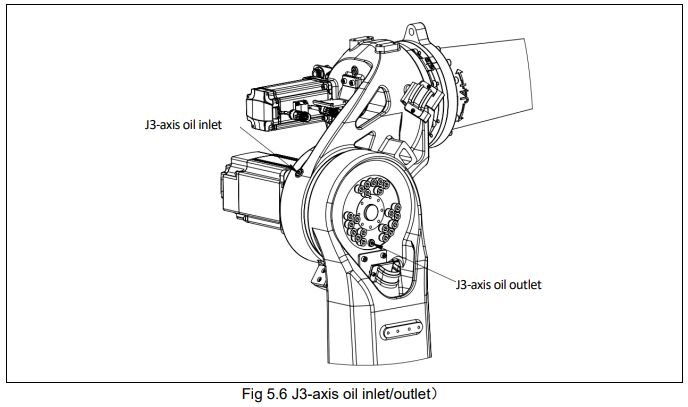
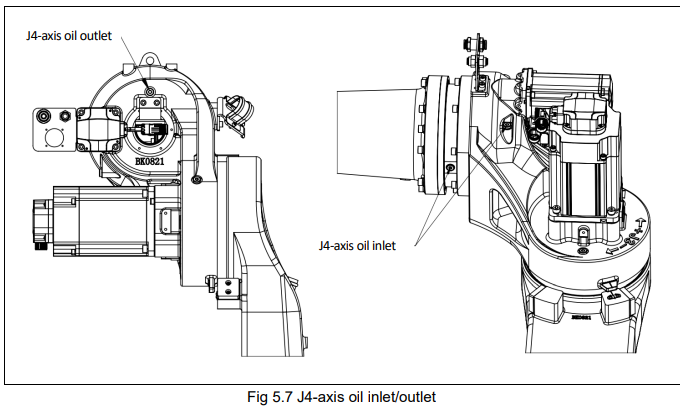
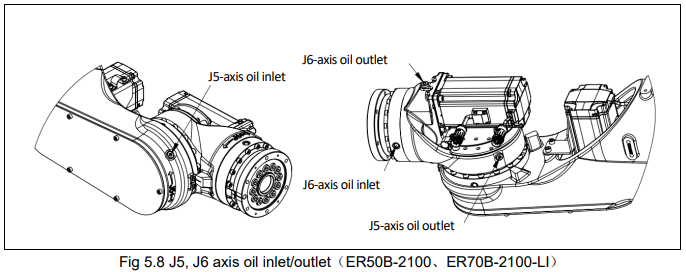
5.5.2.Procedure of greasing
The grease replacement procedure of each shaft reducer is as follows:
a) All joints of the teaching robot run at 100% speed for 10-20min, so that the internal grease becomes a lower viscosity oil;
b) Run the robot to the angle of the robot to lubricate the joints and cut off the power supply;
c) Place grease recovery containers under the oil drain;
d) Remove the screw plug corresponding to the joint oil outlet and oil injection port;
e) Inject new grease from the oil injection port until the grease discharged from the oil outlet becomes a newly added grease, adjust the injection amount, and use the measuring instrument to ensure that the amount of oil filled is consistent with the amount of oil flowing out (including the amount released after the heat engine);
f) release the residual pressure in the grease bath according to the steps in 5.5.3;
g) Install the screw plug to the oil injection port and oil outlet with a tightening torque of 13.7 Nm.
If the operation is not properly lubricated, the internal pressure of the lubrication chamber may suddenly increase, which can damage the sealing part, resulting in grease leakage and abnormal operation. Therefore, when performing lubrication operations, observe the following precautions:
Before performing the lubricating oil filling operation, open the lubricating oil vent (remove the screw plug at the lubricating oil outlet).
Inject the lubricating oil/grease slowly, without too hard.
Whenever feasible, the use of compressed gas pumps (driven by the plant gas source) should be avoided.
Only use lubricating oil/grease with the specified type, if other lubricating oil other than the specified type is used, it may damage the reducer or cause other problems.
After the lubrication is completed, confirm that there is no lubricating oil/grease leakage at the lubricating oil outlet and that the lubricating chamber is not pressurized, and then close the lubricating oil/grease outlet.
In order to avoid accidents such as slipping or fire, excess lubricating oil/grease should be completely removed from the ground and robot
5.5.3.Procedure for releasing remaining pressure within the grease bath
Release remaining pressure with the following procedures. Attach bags under the oil outlet to prevent spilled oil/grease from splattering.
a) Power the robot, and operate at a 100% speed with full load for 4 hours continuously.
b) Stop the running program of the robot at zero position, turn off the servo power with the teach pendant.
c) Disassemble the screw at oil inlet of each axis after safety confirmation. Do not face the screw when removing it, in case that oil with high pressure and high temperature ejects, resulting personnel injury.
d) Retighten the screw 3% seconds later after removing it, and clean up the oil around the screw with a clean cloth.
e) Be sure to complete pressure releasing of a robot (step c and step d) in 15 minutes. Otherwise, it should be repeated from step 1.
5.6. Oil leakage inspection
Maintenance Area
Insert a cloth or similar material into the gaps of each joint to check for any oil leakage from the oil seals. If oil leakage is observed, please wipe it clean.
Depending on the operating conditions and surrounding environment, oil may leak from the outer lip of the oil seals. When accumulated oil forms droplets, it may drip during certain movements. Prior to operating the robot, please wipe off any oil accumulation on the underside of the oil seals.
Additionally, if the temperature during operation is excessively high, the internal pressure in the joint chambers may increase. In such cases, after the operation, please open the oil filling port once to restore the internal pressure. (Do not open or close the oil filling port while the machine is in a cooled state)
If oil leakage persists even after frequent wiping, please refer to 7.2 Troubleshooting.

No comments to display
No comments to display