
12. Operation Management
In Operation Management, you can search, view, and operate camera logs, software logs, acquired images, and imported images.
12.1 Camera Log Management
Supports searching and exporting the camera logs.
The SC2000E and SC2000E(mini) series devices cannot store logs in the camera, and thus they do not support camera logs management.
Steps
1. Click Operation Management → Camera Logs.
2. Filter the log type by Info, Warning, Error, and All.
3. Optional: Click Extend to customize the period. For detailed information, refer to Check Time. The default period is the 24 hours prior to the current system time.
Note
If you Pick up the period, all logs will be displayed.
4. Click Search and you can search logs as shown below.
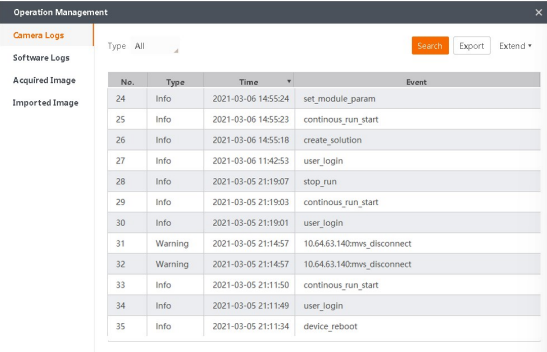
Figure 12-1 Camera Log Management
5. Optional: Click Export to save the searched logs as files in JSON format to your PC.
12.2 Software Logs Management
You can search for software logs and export them to your PC.
As the steps to manage software logs are highly similar to those to manage camera logs, you can see Camera Log Management for more details.
The log types that can be selected are as follows: track, debug, information, alarm, and error.
12.3 Acquired Image Management
You can search for, export, and delete the pictures stored in camera projects. The SC2000E series and SC2000E (mini) series cameras cannot store images in the camera, and thus they do not support acquired image management.
Steps
1. On the menu bar, click Operation Management → Acquired Images.
2. Select the image state type from All, OK, and NG. The image state type corresponds to the Output Condition (OK, NG) in the Save Image settings of an project.
3. Select the image format from ALL, BMO, and JPG.
4. Optional: Enter key words of the image name in the Name field.
5. Optional: Click Extend to set a period during which the images are acquired, see Check
Time for how to set the time period. The default time period for a search is the 24 hours before the current time of the PC.
Note
If you click Pick up, the software will search the images acquired in all periods.
6. Click Search.
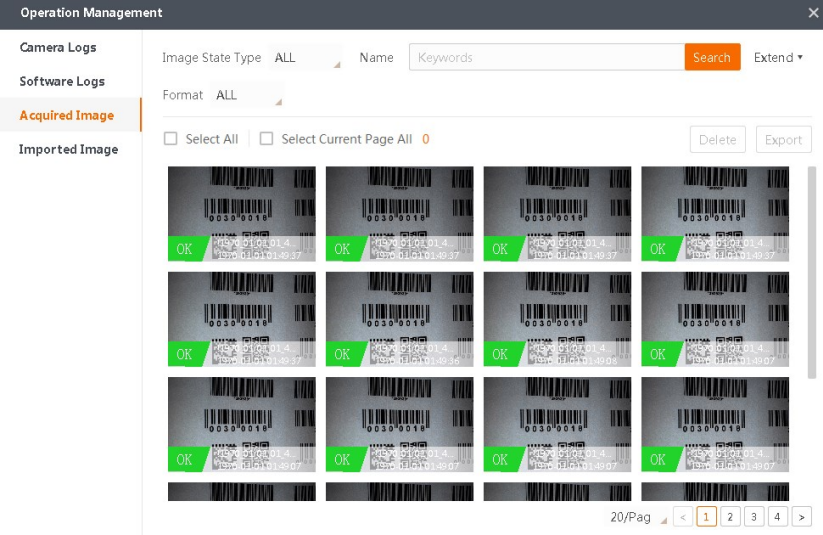
Figure 12-2 Acquired Image Management
7. Double-click an image to zoom it in.
8. Optional: Check one or multiple images, and click Delete to delete the image(s).
9. Optional: Check one or multiple images, and click Export to export the image(s) to your PC.
12.4 Imported Image Management
You can search for, export, and deleted the pictures imported to cameras from your PC.
Note
The pictures are imported into cameras via the image-mode preview window, see Live View Panel for more details.
As the steps to manage imported images are highly similar to those to manage acquired images, you can see Acquired Image Management for more details. The imported images can be in BMP, JPG, or PNG format.
12.5 Export Data
Save the following data of the running project to your local device: project name, total project running times, OK times, NG times, module ID, module name, OK condition, and running results.
Select the File Saving Path, and then enable the Export Data to save the data to the PC in
CSV format.
No comments to display
No comments to display