
9. Camera Monitoring
Click Camera Monitoring on the Software main interface to enter the Run Monitoring
interface. There are two parts of Run Monitoring: monitoring interface and camera management.
9.1 Manage Cameras
Click Camera Management on the top right to open the Camera Management window.
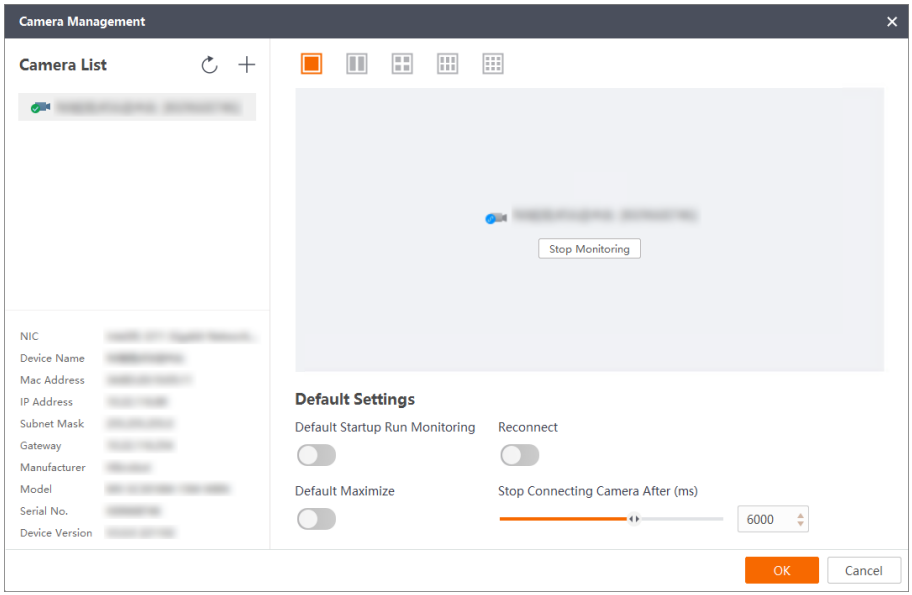
Figure 9-1 Camera Management
Default Settings
9.1.1 Camera List
The Camera List supports viewing camera status and the basic information about the cameras, logging into/out cameras, and changing IP address, and sticking a camera to the top. See Camera List and Log Into Camera for details.
9.1.2 Window Division Settings
The Camera Management supports setting the division of the monitoring window and selecting cameras to display images on specified windows. Click the icons above the window to select a division mode. No more than 9 cameras can be monitored at the same time.
After logging into a camera, drag the camera to a window to link the camera to the window. Click Stop Monitoring to unlink the camera from the window. If you switch the division mode, the monitoring will stop automatically and the linkage will expire.
9.1.3 Default Settings
In this area, you can configure default settings of Camera Monitoring, including displaying the camera monitoring page by default after launching the Client, maximizing the monitoring page by default, reconnecting the camera after it goes offline, and setting the time period (sec) after which the auto connecting will stop.
9.2 Monitoring Interface
Run Monitoring is to view the status of a single or multiple cameras, you can make some simple operations. When there is no camera on the monitoring interface, you can click Camera Management to add and link cameras. When there are linked cameras on the monitoring interface, you can view their real-time status and operate them. The monitoring interface of the single-screen layout mode is shown below.
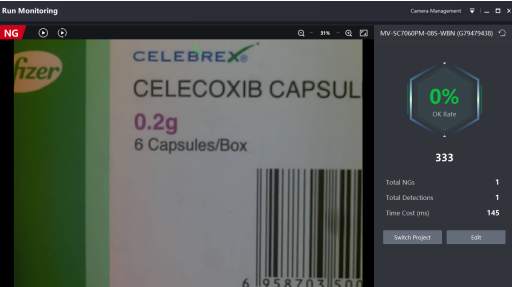
Figure 9-2 Monitoring Interface (Single Screen)
The monitoring interface of the 1x2-screen layout mode is shown below.
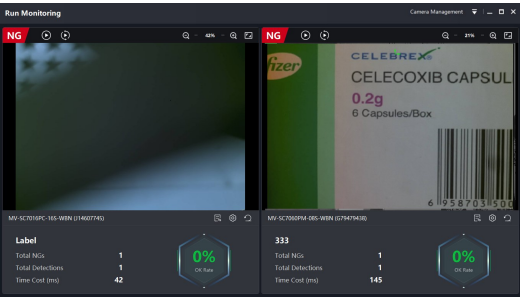
Figure 9-3 Monitoring Interface (Dual Screen)
Note
The functions and operations of different layout modes are basically the same. The project execution result (OK or NG) is displayed on the upper-left corner. Meanwhile, the linked camera information, including the project name, OK rate, total NGs, total detections, and time cost is displayed.
Note
In 3x3 screen mode, only total detections and total NGs will be displayed.
On Run Monitoring interface, you can make some operations as follows:
●  : Execute current project once.
●  : Execute current project continuously, and click to stop the execution.
●  : Zoom in or out the image, the ratio will be displayed.
●  : Display the image in the original ratio or self-adaptive ratio.
●  /Switch Project: Open the device's projects management window to switch the project.
●  /Edit: Switch to the main interface to edit the project parameters of current device.
●  : Reset the displayed detection data, including the OK rate, total NGs, total detections,
and time cost.
No comments to display
No comments to display