
4. Debugging
4.1 Use of teaching pendant
4.1.1 Connection of teaching pendant
For connection of teaching pendant and wiring, refer to "3.6 Teaching pendant wiring".
4.1.2 Edit method
Modify the drive parameters by following the steps below.
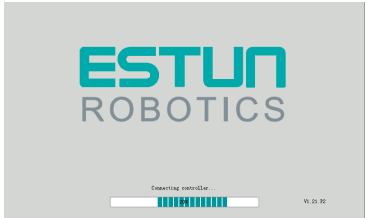
Step 1: The control cabinet will make the initialization diagnosis when it is powered on.
The teaching pendant will display the initialization screen as shown in the figure below.
Step 2: Upon initialization, check the running state of the system through the status indicator of
the teaching pendant. It will be normal as follows:
Run indicator is always on, while the Err indicator is off.
Step 3: When the Home screen appears on the teaching pendant, click "Servo PnFn Setting".
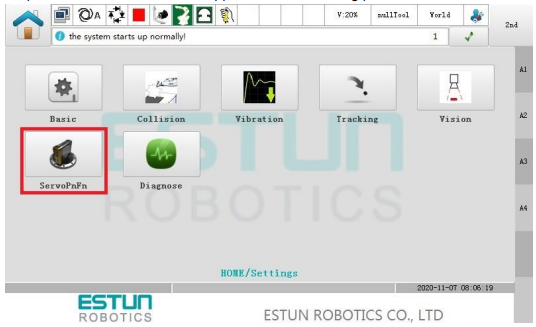
Step 4: When the "Set Pn Parameter" appears on the teaching pendant, click "PN Parameter Setting" of the drive shaft (i.e. Axis 1) to be modified.
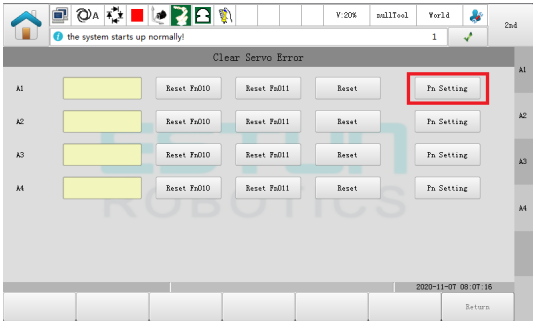
Step 5: Set the desired parameters in the pop-up parameter dialog box.

4.2 Use of ESView
4.2.1 Install ESView
System requirements
Users are required to prepare a PC that meets the following conditions.
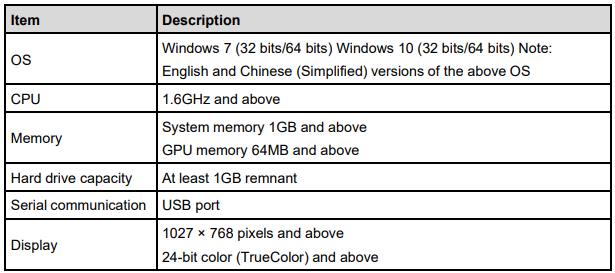
Preparation before installation
Prepare the Window operating system, communication cable and WinRAR in advance.
Visit the official website of ESTUN at www.estun.com, and download ESView in the "Download".
Please contact us if you cannot get it or need help.
Power on the computer and start Windows.
Close other running software if it has already been started.
Copy the compressed file of ESView to any directory on your PC.
If PC has been connected to the drive unit, just disconnect it.
It is recommended to uninstall the ESView that you have installed before re-installing it.
Install software
To make sure successful installation, please close other running software before installation of
ESView and confirm that the Windows user have the administrator privileges.
Install the ESView by following the steps below:
Step 1: Open and unzip the ESView compressed file to any directory on your PC.
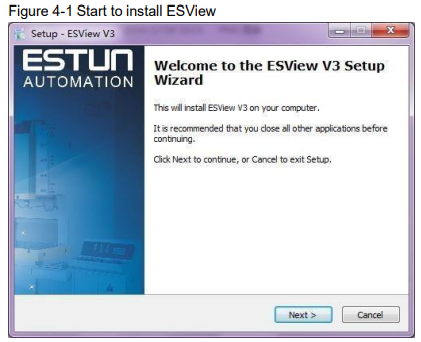
Step 2: Double click and run the ESView installation program, and enter the installation wizard, as shown in Figure 4-1.
Figure 4-1 Start to install ESView
Step 3: Install ESView to your PC by following the installation wizard.
4.2.2 Connection to PC
Connect the PC to the drive using a USB cable. Please refer to "3.13.2 Connection to PC" for details.
4.2.3 Start ESView
Online operation
Through online operation, you can upload and download the parameters of servo drive unit.
Perform online operation after connecting PC with the servo drive unit using the USB-USB communication cable.
Step 1: Connect the drive unit with the PC using a USB connection cable.
Step 2: Select "All Programs" → "ESView" → "ESView" from the Windows start menu. Or, find the shortcut of the "ESView" program directly on the desktop and double-click it.
Step 3: The "Communication Setting" dialog box will pop up automatically after starting ESView.
If ESView has already been started, select "Home" → "Connection" from the menu of ESView
or click  directly.
Step 4: Choose “Serial”.
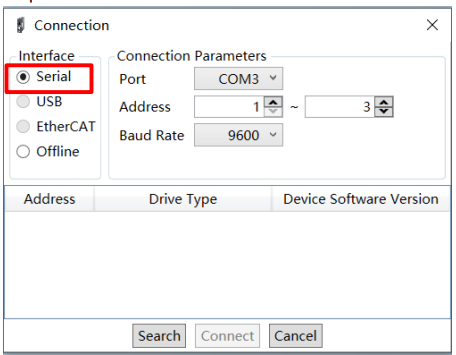
Step 5: Set the "Communication Parameters".
□ Port: Choose the correct serial port number from the drop-down list.
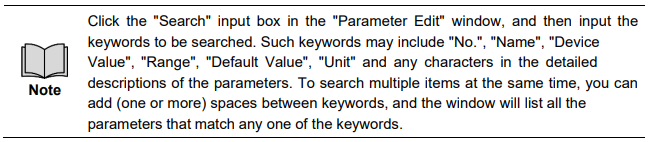
User may open the "Device Manager" on the PC and find the port number in "Port→USB
Serial Port (COMx)". The port is "COM3 according to the figure below.

□ Address: Set the communication address range of the device to be searched. The defaulted address can be as follows:
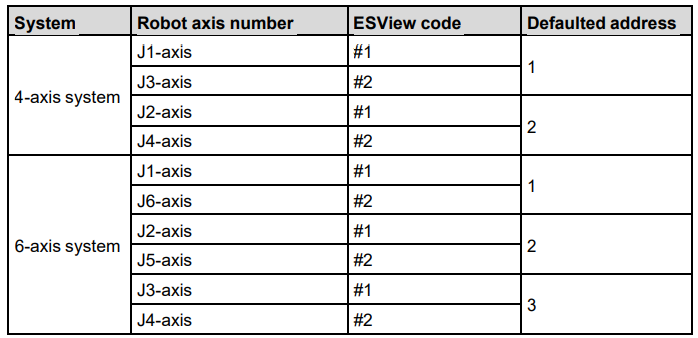
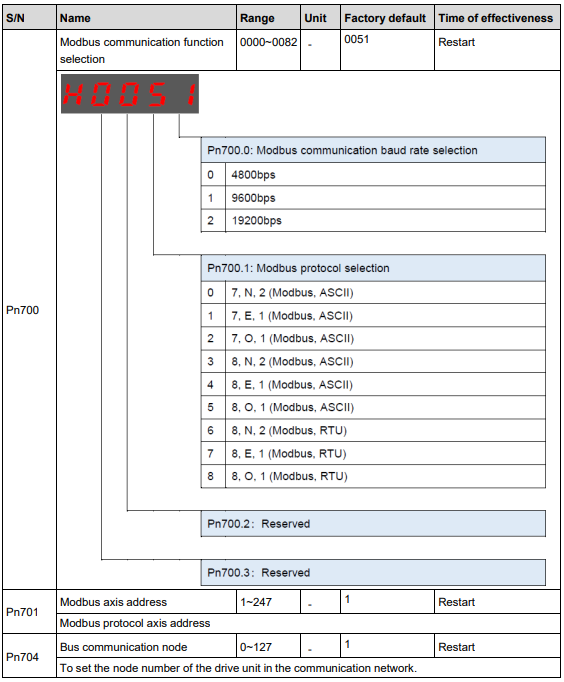
[Note] The "Address" can be viewed or modified through Pn701.
□ Baud rate: Set the rate when communicating with the device. The actual communication rate can be viewed through the parameter Pn700.0, which is defaulted as 9600.
Step 6: Click on “Search”
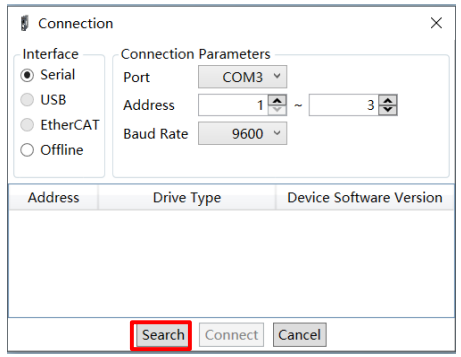
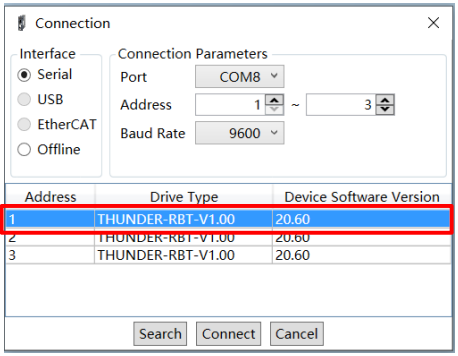
Step 7: Select the drive to be connected. The drive with address "1" is selected according to the figure below.
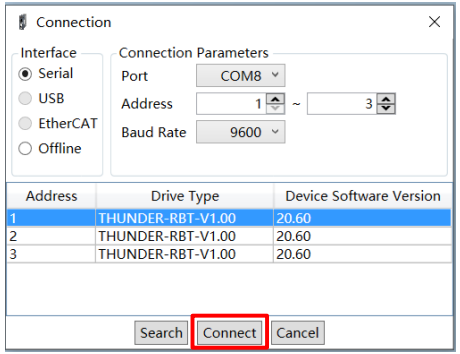
Step 8: Click on “Connect”.
Step 9: After entering the main window of ESView, the devices connected will pop up in the "Device" column on the left, and users can set the drive unit or motor online and in real time at this moment.
Offline operation
For off-line operation, users are allowed to operate the oscilloscope, FFT, mechanical analysis and other image operations without connecting any devices. Although it is not necessary to connect the drive unit, some functions may be restricted, and cannot be set correctly.
Step 1: Select "All Programs" → "ESView" → "ESView" from the Windows start menu. Or, find the shortcut of the "ESView" program directly on the desktop and double-click it.
Step 2: The dialog box "Connect" will pop up automatically after starting the ESView program.
If the user has already started ESView, select the "Home" → "Connect Servo" in the menu of ESView.
Step 3: Select “Offline”.
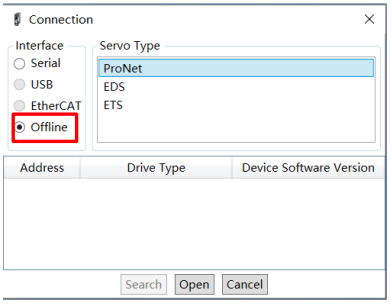
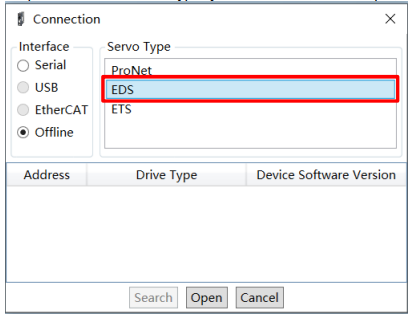
Step 4: Select the “Drive Type” you want to set, for example, the EDS.
Step 5: Click on “Open”
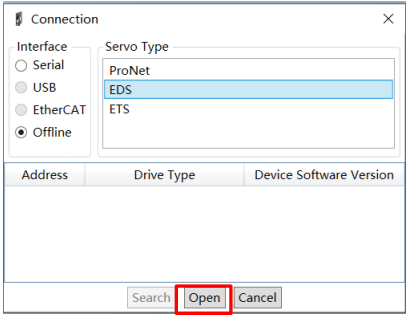
Step 6: After entering the main window of ESView, you can find that the created offline devices have been displayed in the "Device" column on the left.

4.3 Parameter transmission
Open the "Edit Parameters" window by following the steps below.
Step 1: Double click the "Edit Parameters” option in the device column of ESView.
Figure 4-1 Choose the "Edit Parameters"
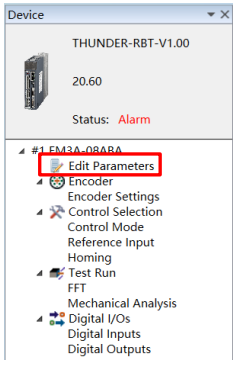
Step 2: The "Edit Parameters" window will be displayed in “Function Display Area”
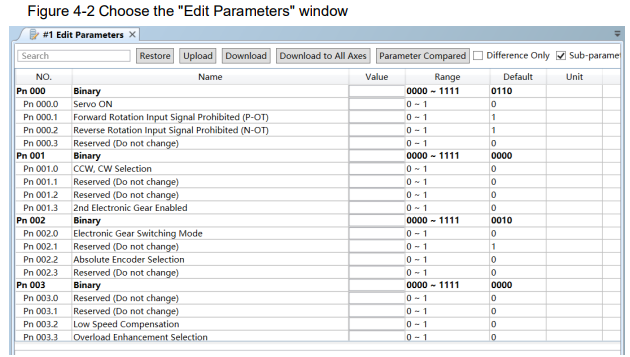
4.3.1 Upload
Upload all
Click "Upload" in the "Edit Parameters" window. After waiting for a moment, ESView will read the settings of all parameters in the drive unit and display them in the "Device Value".

Users may select "Upload" in the pop-up menu by right-click any non-editable position inthe parameter list.
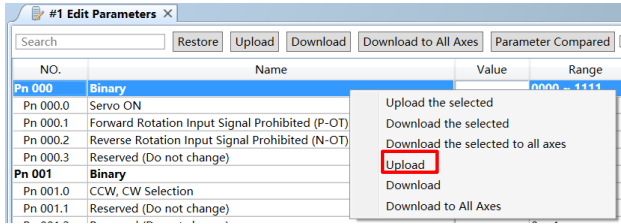
Upload selected parameters
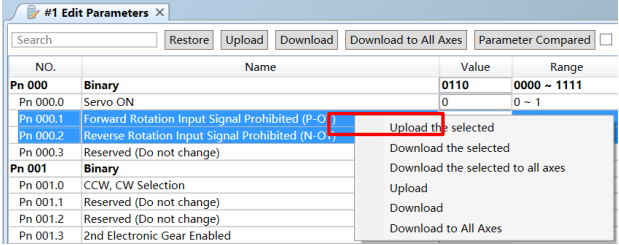
Select some parameters in the "Edit Parameters" window by dragging the mouse, or select the parameter values to be read one by one by pressing and holding the "Ctrl" key on the keyboard, and then right-click one of the selected items and choose "Upload the selected" in the pop-up menu.

4.3.2 Edit
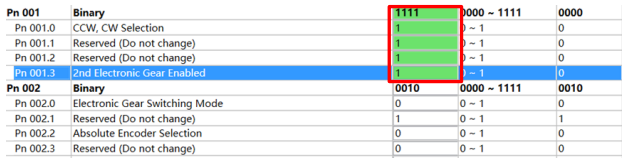
After successfully uploading the parameters, users may modify the parameters to be edited
directly in the column "Device Value", which will lead to the changes in the parameters, as
shown in figure below.
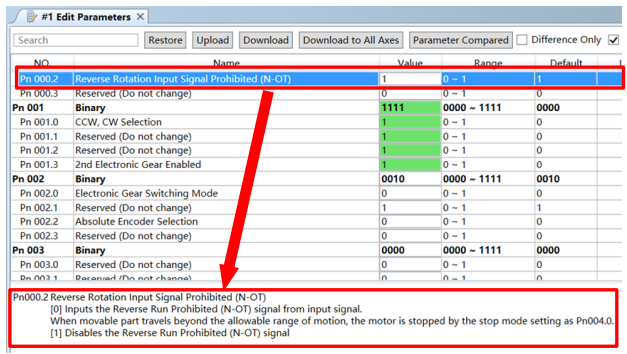
A detailed specification of the parameters will appear at the bottom of the parameter list when editing a parameter, to facilitate user's setting.
4.3.3 Save
Users may save the current parameter setting to the local path of PC.
Step 1 Click on the  in the "Edit Parameters" window.

Step 2 Then, select the path where you want to store the parameter file in the pop-up "SaveAs" dialog box.
Step 3 Click “Save”.
4.3.4 Import
By executing "Import Parameter Data", users may download the parameter settings in the offline parameter file to the device being connected.
Step 1 Click on the in the "Edit Parameters" window.

Step 2: Select and open a correct offline file in the pop-up "Open" dialog box (suffix name "*. esvpa").
Step 3: The "Parameter Import" window will appear in "Function Display Area", and the parameter settings in the selected offline file will also appear in the "Device Value".
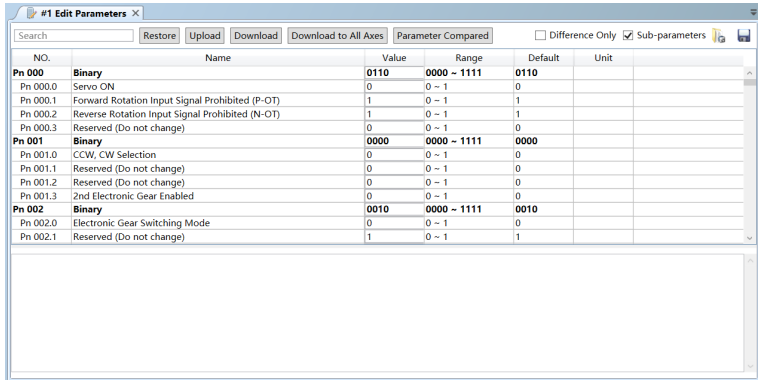
Step 4: In the "Edit Parameters" window, users can "Edit" and "Download" parameters.
4.3.5 Download
Download all
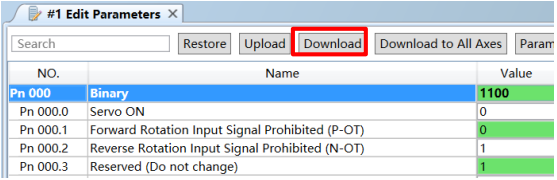
Click "Download" in the "Edit Parameters " window, and the edited parameters will be written into the drive unit after waiting for a moment.
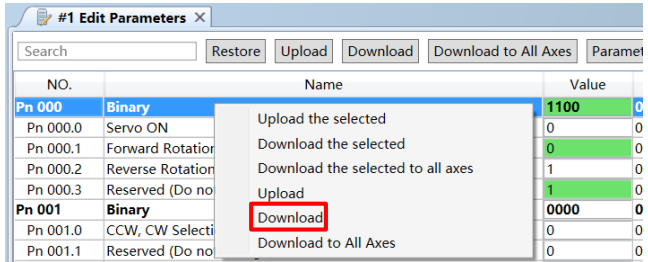
Users can also right-click any non-editable position in the parameter list, and then select "Download" in the pop-up menu.
Download selected items
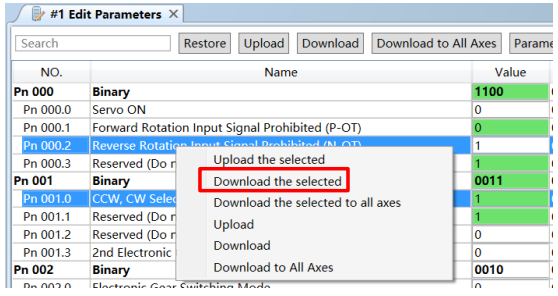
Select some parameters by dragging the mouse in the "Edit Parameters" window, or press and hold the "Ctrl" key and select the parameter values to be downloaded, and then right-click one of the selected items and choose the "Download the selected" in the pop-up menu.

4.3.6 Factory reset

Step 1: Click "Restore" in the "Edit Parameters" window.
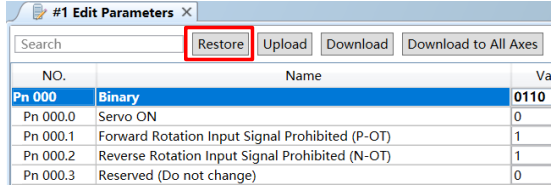
Step 2: If it is confirmed to execute the "Reset to Factory Defaults", click "OK" in the pop-up warning box.
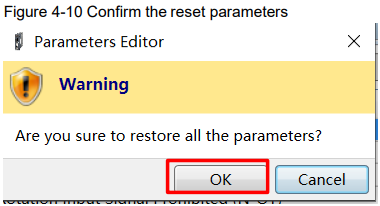
Step 3: ESView will send the command of “Reset to Factory Defaults” to the drive unit, and the device will start to restore the factory defaults.
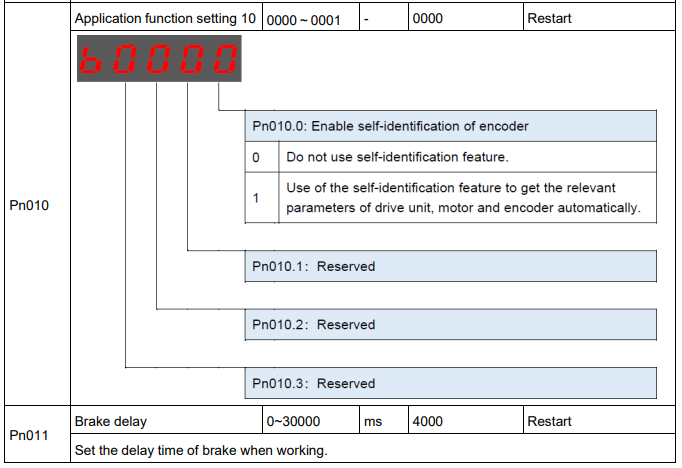
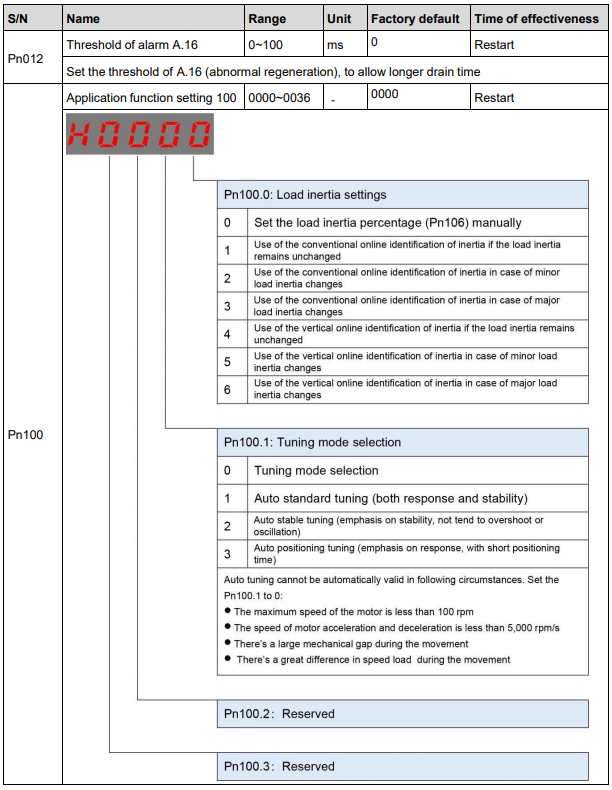
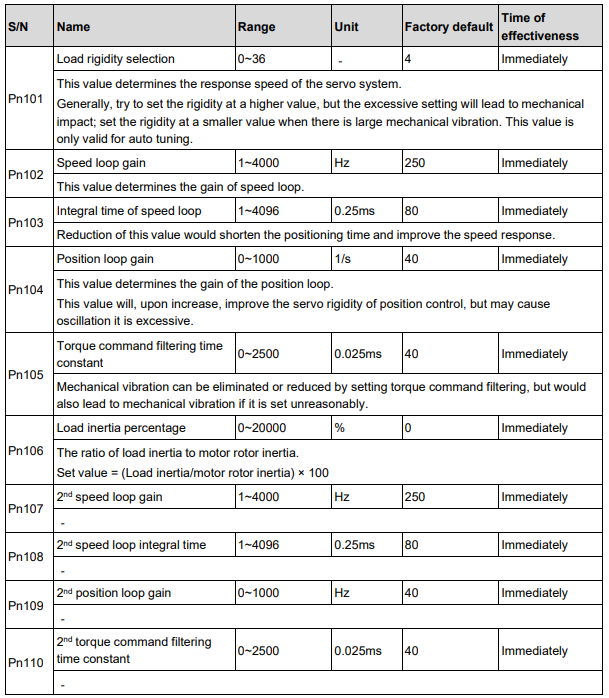
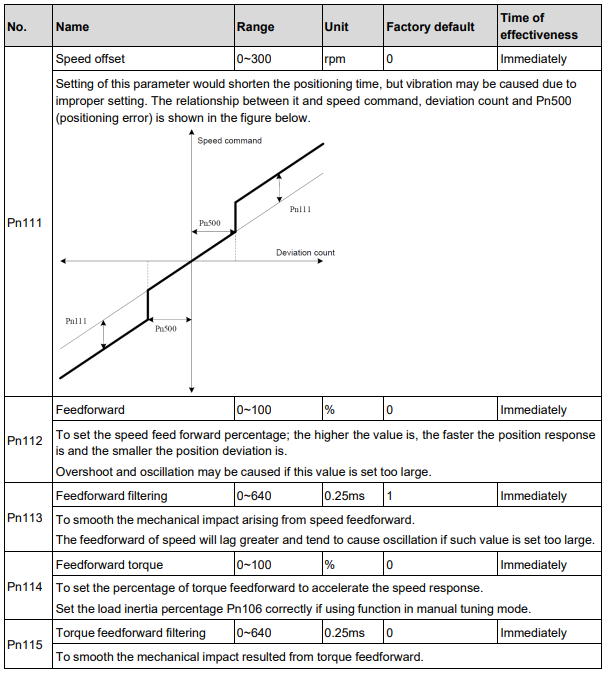
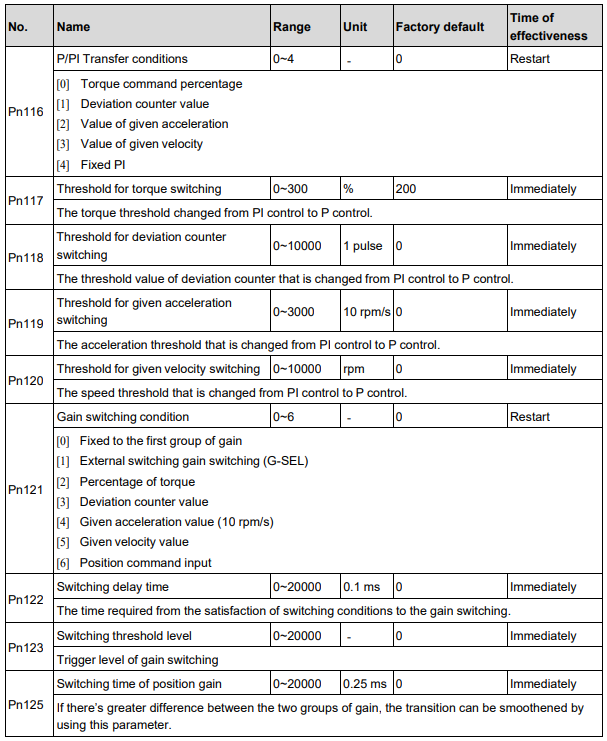
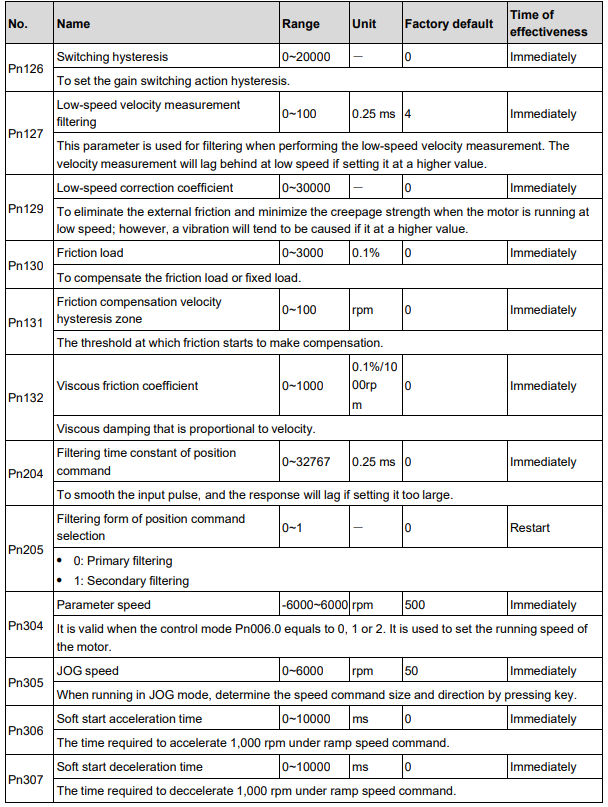
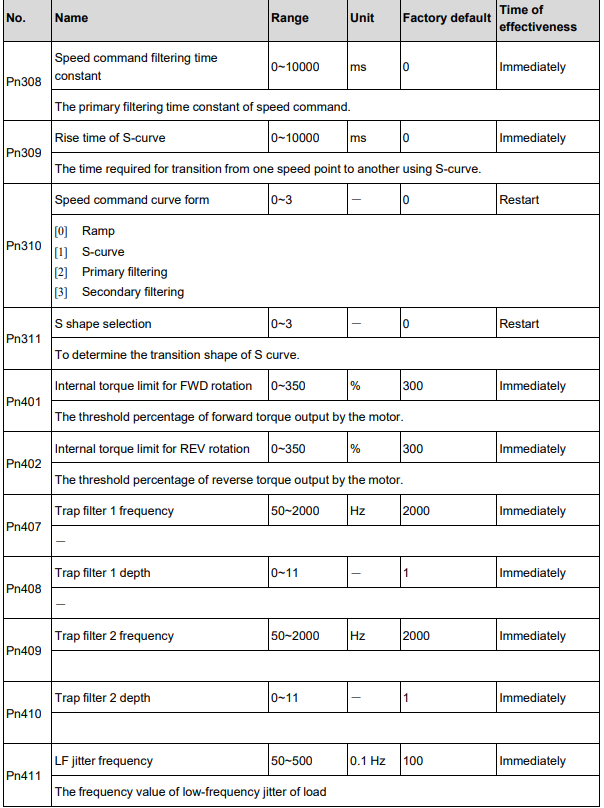
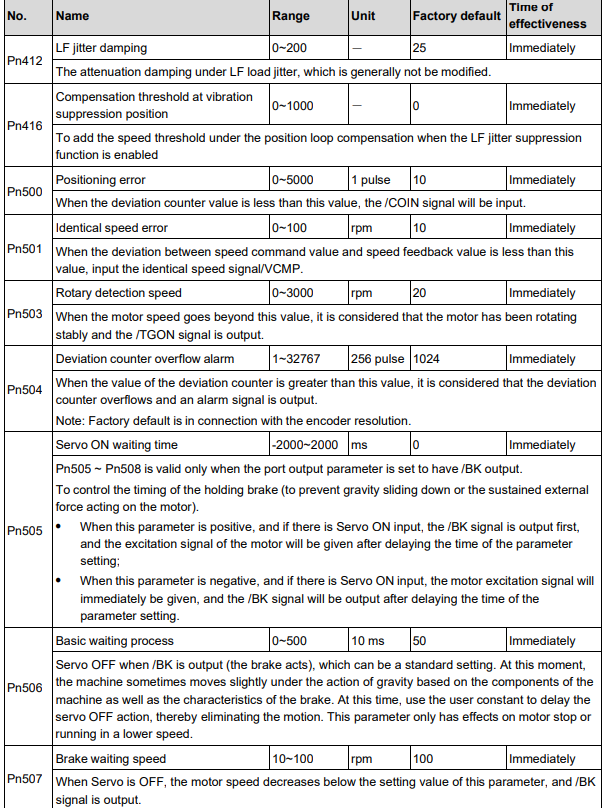
4.4 Definitions of parameters
Directions for use
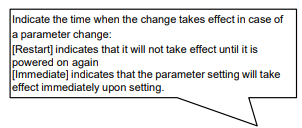
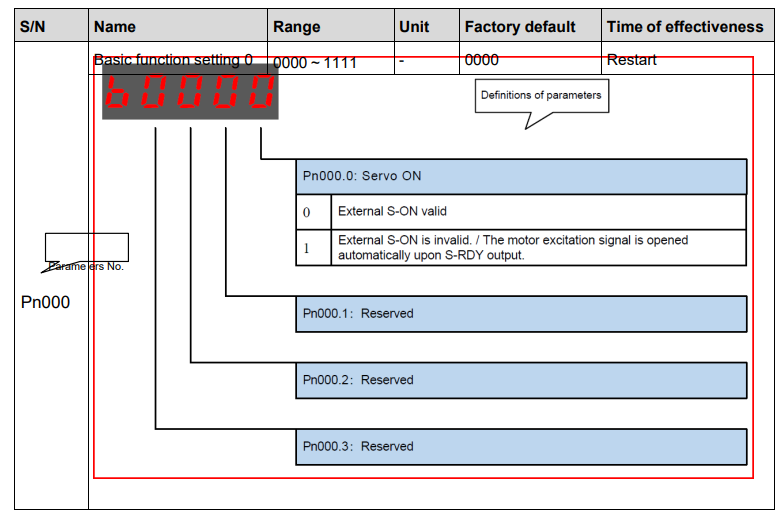
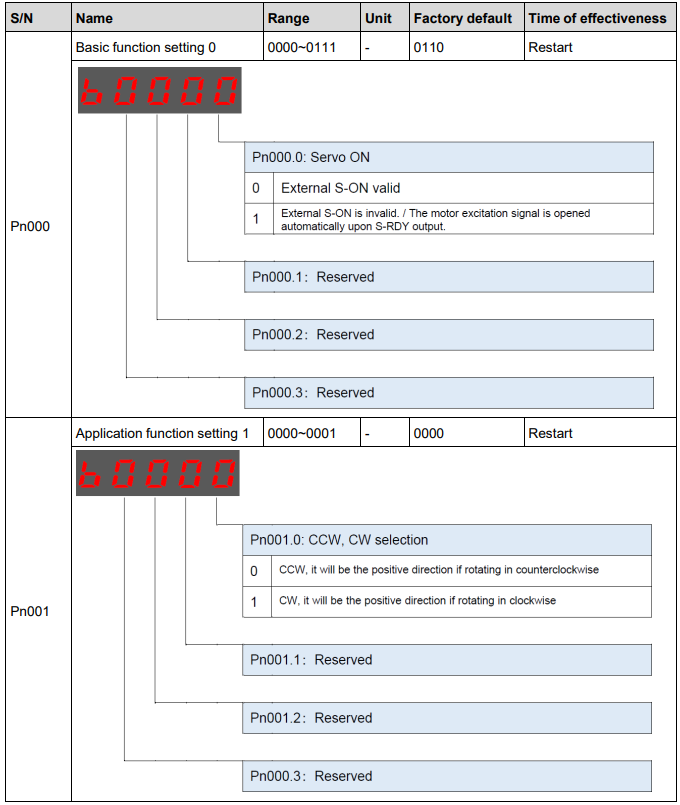
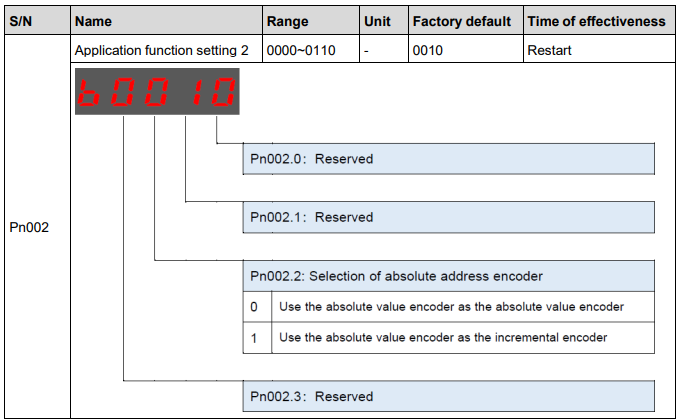
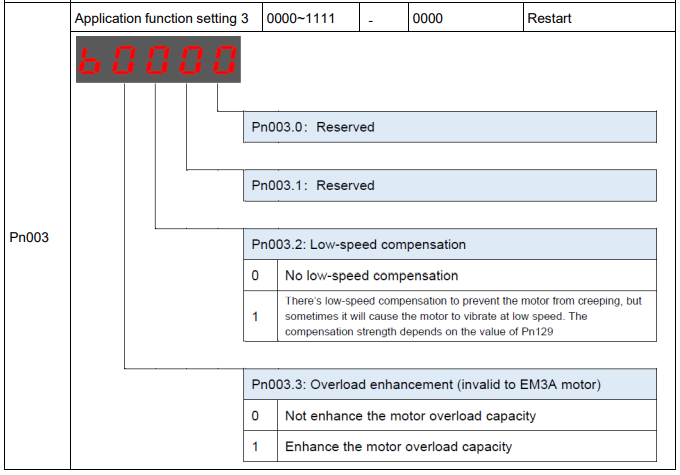
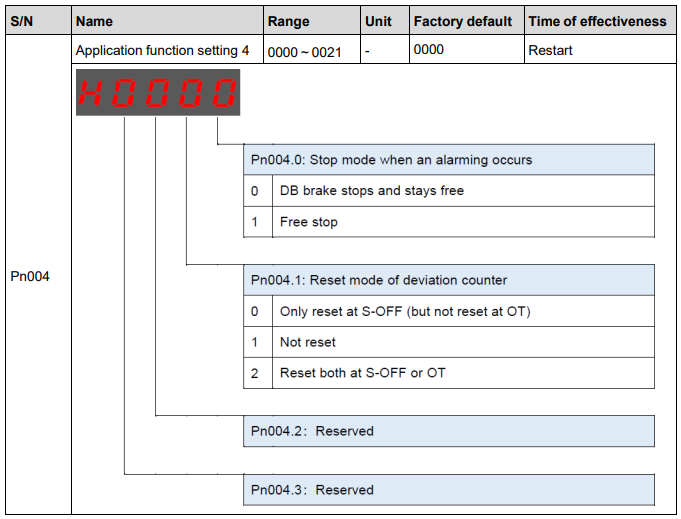
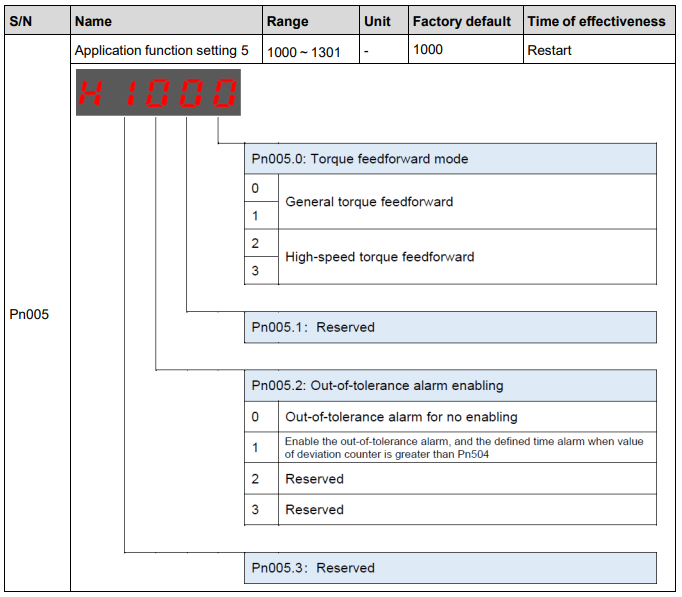
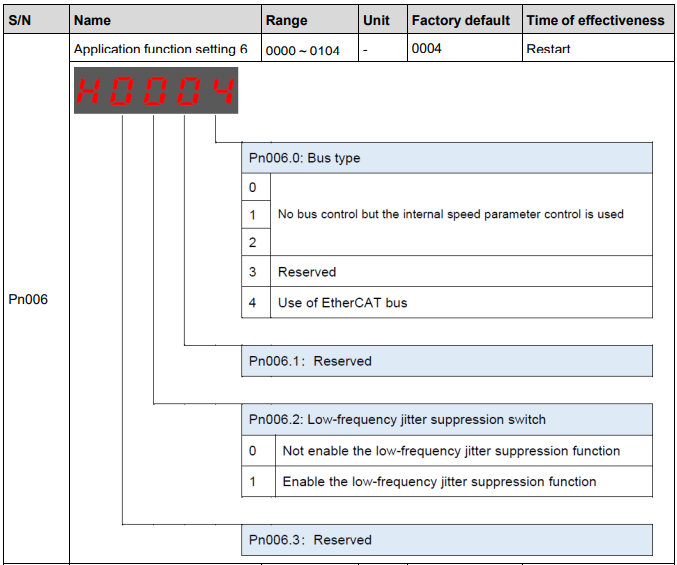
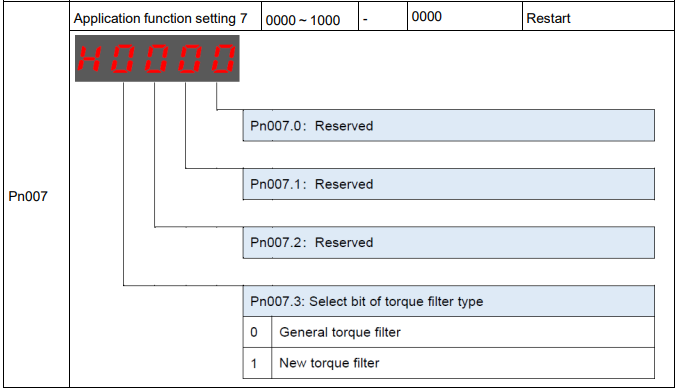
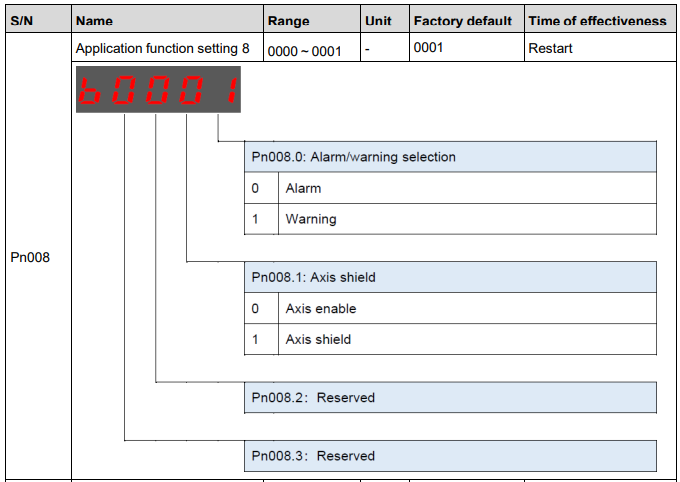
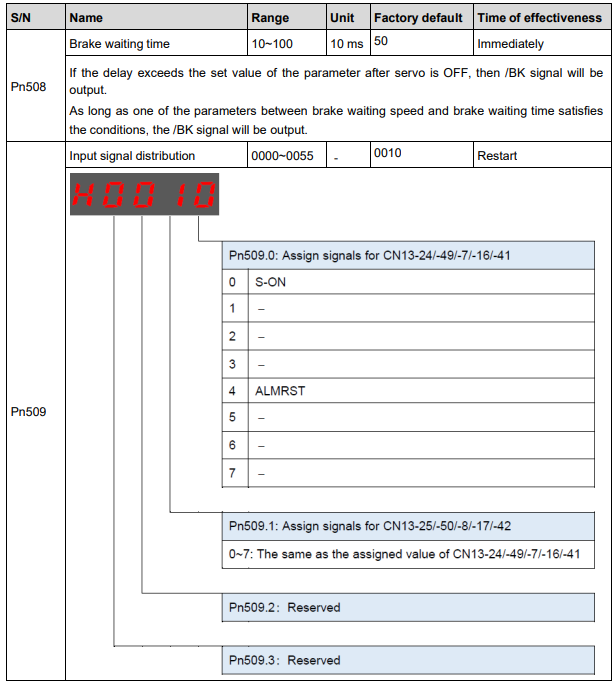
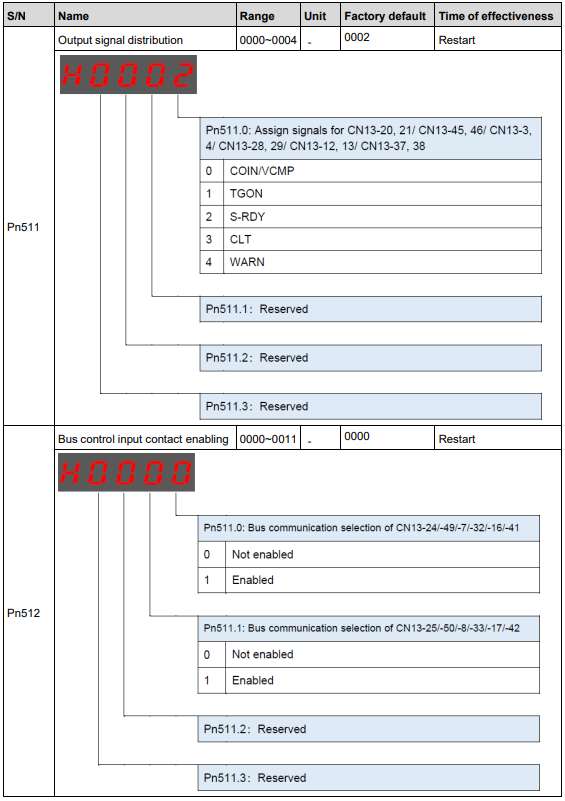
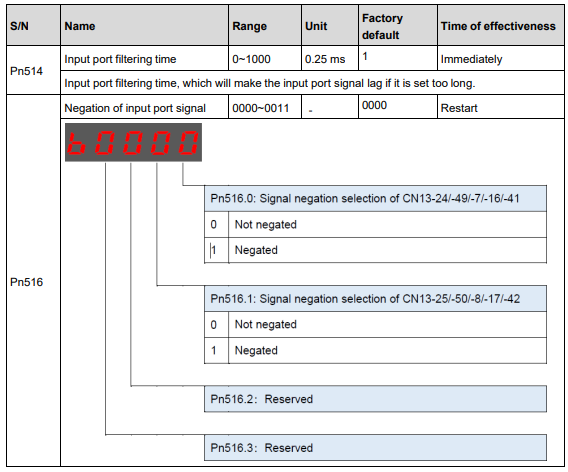
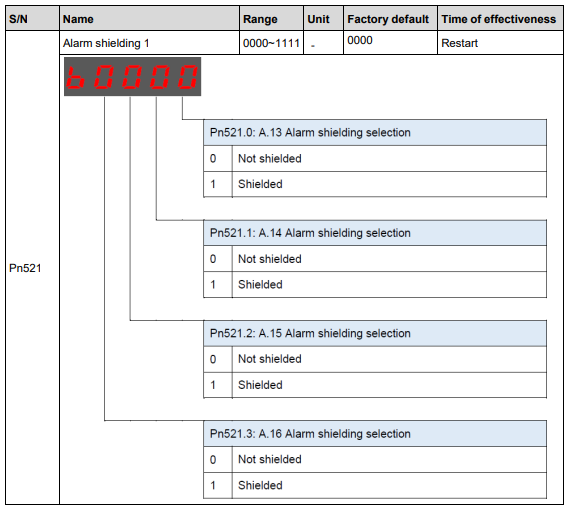
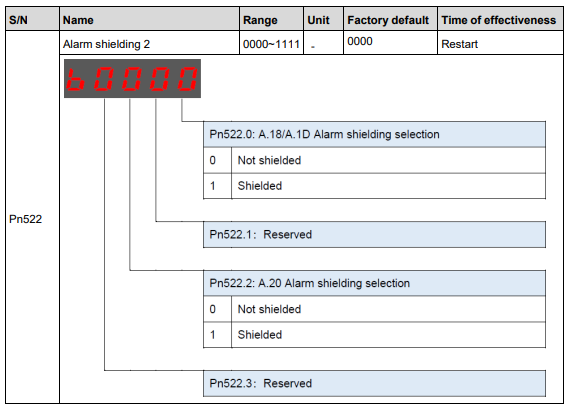
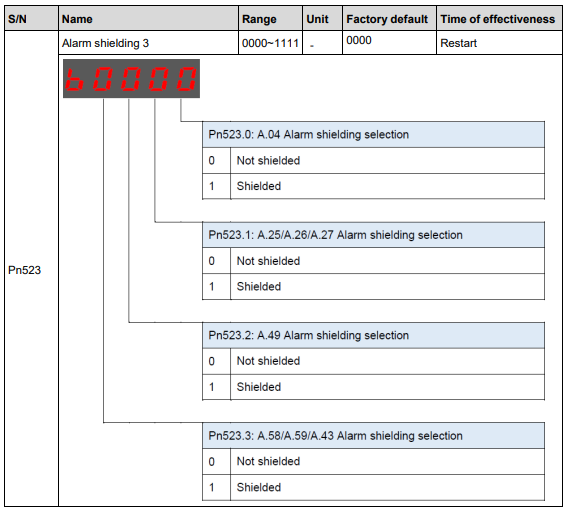
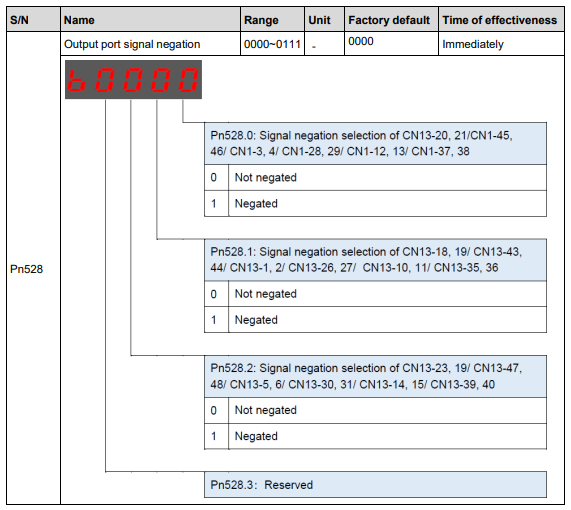
Explanation of parameters
No comments to display
No comments to display