
8. Menu Bar
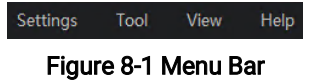
8.1 Settings
You can configure the Software settings, including general parameters, capturing/recording parameters, network parameters, buffer, history export, code draw, shortcut parameters, and permission.
8.1.1 General Settings
Click Settings → General to enter the following page.
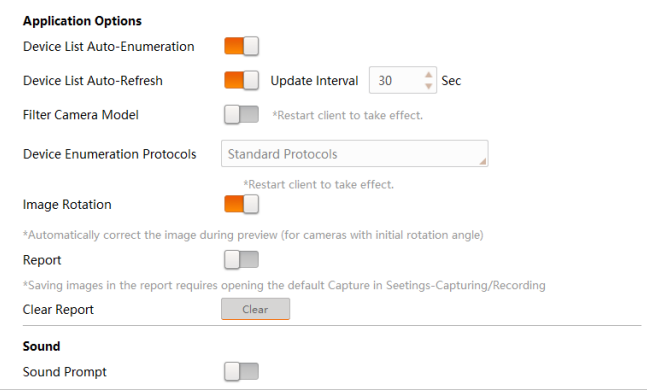
Figure 8-2 General Settings
Application Options
Device List Auto-Enumaration
If enabled, the Software will enumerate the camera list (device list) automatically.
Device List Auto-Refresh
If enabled, the Software will refresh the camera list (device list) automatically. You can set the update interval (unit: second, range: 1 to 120). The default value is 15.
Note
Camera Link camera does not support device list auto-refreshing.
Filter Camera Model
If enabled, only specific camera models will be displayed. You can set the Device Type Filtering Tag to filter devices with certain name format.
Note
You need to restart the Software to take the settings into effect.
Device Enumeration Protocols
Select protocols to enumerate the devices.
● Standard Protocols: Enumerate devices via GVCP (GigE Vision Control Protocol).
● Private Protocols: Enumerate devices via private protocols.
● Standard and Private Protocols: Enumerate devices using standard protocols and private protocols.
Note
You need to restart the Software to take the settings into effect.
Image Rotation
If this function is enabled, when a code shows obliquely, the Software will adjust the image of the code displayed in the live view window.
Note
This function should be supported by the device.
Report
If this function is enabled, the codes read by the device will be automatically stored in the database. Click Clear to clear the database. On the control toolbar, click to open the report of code reading. Click Select A Database and select a file (By default, the path is "..\Web\QualityReport\client") to view the report.
Note
The display experience may vary by different browsers. You can try other browsers if you failed to open the report.
Sound
Enable this function, and select the sounds to be displayed when a code is read successfully or when a code failed to be read.
Note
You should upload a file in .wav format.
Click OK to finish setting.
8.1.2 Capture and Recording Settings
You can set the recording parameters and capture parameters, including the saving path of the captured pictures and recorded videos, picture format, video format, etc. You can also set saving path and file name prefix for the cutted-out waybill image.
Steps
For more details about recording, see Capture and Recording.
1. Click Settings → Capturing/Recording.
2. Edit the parameters.
Select Directory
Saving Path
Click  to select the saving path for the recorded video files and captured pictures.
Auto Save
Automatically save the recorded the video files or the captured pictures to the selected saving path during live view.
Note
● See Acquisition and Live View for details about live view.
● See Capture and Recording for details about recording and capture during live view.
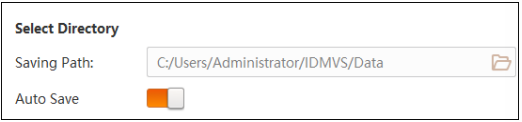
Figure 8-3 Select Directory
Capturing
Run Mode
You can select Test, Normal, and Raw. For details about the three modes, see Running Mode.
Note
● If you select Test or Normal, the picture format can be JPG, BMP, or RAW. But the picture formats vary by different firmware versions. For some firmware versions, the picture format will be JPG by default and cannot be changed.
● If you select Raw, the default picture format will be BMP, and you can change it to JPG or RAW.
Picture Format
Select the format of the captured pictures from BMP, RAW, and JPG.
Note
You can configure picture quality only when you select JPG.
Save Type
Set the type of saved pictures.
Default
Save the original pictures.
Render
Save the rendered pictures. The rendered pictures contain the recognized content of the barcode in code reading frames.
Default + Render
Save the original pictures and the rendered pictures.
Saving Strategy
Set the picture saving strategy.
All
Save all the captured pictures.
OK
Save the captured pictures with the barcode reading results. The pictures will be saved in the OK folder under the saving path you set.
NG
Save the captured pictures without the barcode reading results. The picture will be saved in the NG folder under the saving path you set.
Picture Quality
Select the picture quality from Normal, Better, and Best. You can also drag the slider to customize the compression ratio.
Note
For the picture quality, the larger the compression ratio is, the better the picture quality will be. The compression ratio of Normal level ranges from 1 to 40, the Better level ranges from 41 to 70; and the Best level ranges from 71 to 100.
File Naming Rule
Custom the naming rule of the captured pictures.
Continuous Capture
Set parameters for continuous capture.
Capture by Frame
Set the interval (in frame) for capture and the threshold to stop capturing. For example, you can enable the Software to capture at an interval of 2 frames and stop capturing after 1000 frames.
Capture by Time
Set the interval (in minute) to capture and the threshold to stop capturing. For example, you can enable the Software to capture at an interval of 1minute and stop capturing after 5 minutes.
Default Capture
If enabled, the images in continuous capture will be saved by default; if disabled, you need to manually save the images.
Auto Clean Image
Set whether to auto clean the images. If enabled, you need to set the maximum saving time (unit: day, range: 1~30). The images will be deleted after the saving time.
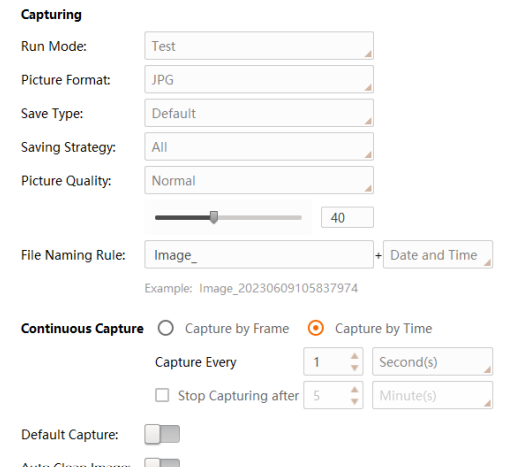
Figure 8-4 Capturing Settings
Recording
Video Format
Set the video format of the recorded video files.
Note
If you select AVI as the video format, you can configure the following two parameters.
Video Quality
Set the video quality to Normal, Better, or Best. The better the video quality, the more image details can be displayed. You can drag the slider to customize the compression ratio.
Playback Speed
Set the playback speed to original frame rate or set a custom speed.
Video Naming Rule
Customize a naming rule for the video files.
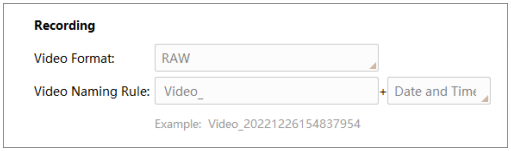
Figure 8-5 Recording Settings
Waybill Cutout
Saving Path
Click  to select the saving path for the cutted-out waybill images.
File Name Prefix
Set the prefix for the name of the cutted-out waybill image.
Note
Make sure you have enabled waybill cutout. For details, see Waybill Cutout Settings
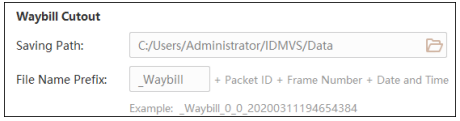
Figure 8-6 Waybill Cutout
3. Click OK.
8.1.3 Network Settings
You can enable automatic network detection to ensure the fluency of image acquisition. Click Settings → Network to enter the following page.

Figure 8-7 Network Settings
Enable or disable automatic network detection, and click OK to save the settings.
Note
Automatic network detection is disabled by default.
8.1.4 Buffer Settings
You can set the buffers for capture and recording to avoid frame dropping and get as many images as possible during capture and recording.
Click Settings → Buffer to enter the following page.

Figure 8-8 Buffer Settings
Set the buffer quantity used for capturing and recording according to the actual needs to avoid dropping frame, and click OK to save the settings.
8.1.5 History Export Settings
You can set the saving path and saving number of the barcode reading history, and set the format of the barcode reading history file. You can also enable the Software to continuously save the barcode reading history.
1. Click Settings → History Export to enter the following page.
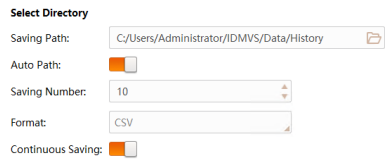
Figure 8-9 History Export Settings
Set the parameters.
● Saving Path: Click  to select the saving path for the barcode reading history.
● Auto Path: Automatically save the barcode reading history to the default saving path.
● Saving Number: You can set the maximum saving number of the history record file for the saving path. For example, if the saving number is 10, and there are already 10 files of barcode reading history saved in the saving path, the latest 10 files of reading history records will replace the previous 10 files.
Note
The saving number can be no more than 100, 000.
● Format: Set the format (CSV or XLSX) of the history file.
Note
Continuous saving is supported only when the file format is CSV.
● Continuous Saving: If enabled, once a new record of reading history is generated, the software will automatically save the file of barcode reading history to the selected saving path. Otherwise, you can only manually save one file of barcode reading history at one time. For details about reading history, see View Reading History.
2. Click OK to save the settings.
8.1.6 Code Draw
You can enable the Software to display a rectangle on the recognized bar code and the content of the bar code on live video image. You can also enable the Software to display the content of the bar code on an editable file.
Code Draw
Note
For details about live view, see Acquisition and Live View.
Click Settings → Code Draw to enter the following page.
● Draw Code Rect: If enabled, a rectangle will show on a barcode in the image.
● Draw Code: If enabled, the content of the barcode will appear in the lower-left of the
image.
● Font Size: Set the font size for the content of the bar code.
● Draw Color: Set color for the rectangle and the content of the bar code. You can click
to add more colors.
Note
You can hover the cursor onto a color and then click the appeared to delete the added color.
● Code Len: Select a maximum code length according to the length supported by the device.
Note
If the value is smaller than the length supported by the camera, the code will be displayed according to the value you select.
After enabling Draw Code Rect and Draw Code, the live video image will be displayed as follows:
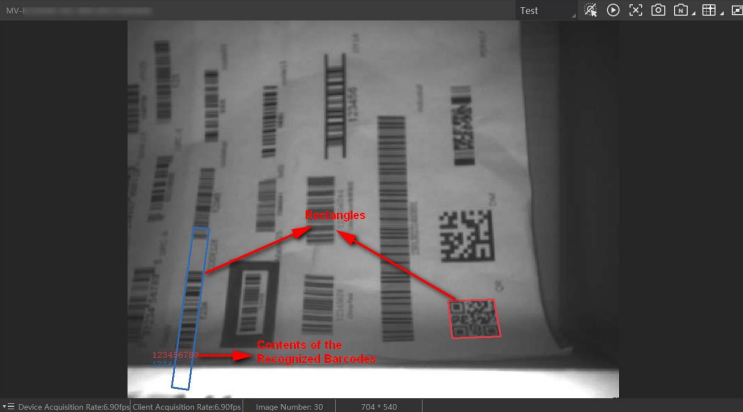
Figure 8-10 Code Draw Image
Focus Print
Focus Lock
If you enable this, the cursor will not move when moving the mouse.
Focus Print
If enabled, the content of the bar code will appear on an editable file.
Code Seperation
Customizing the separator between two bar codes or the prefix/suffix of bar codes.
No Read String
Customize the text that will be output when no code is read.
Focus Print Enter
Add an Enter at the end of the content of the bar code.
Focus Print Line Feed
Add a Line Feed at the end of the content of the bar code.
8.1.7 Keyboard Shortcut Settings
You can configure keyboard shortcuts for some frequently-used functions, such as connecting/disconnecting camera and starting and stopping acquisition. Click Settings → Shortcut to enter the shortcut settings page. Select an operation, and then press two or more keys at the same time to set shortcut for the operation.
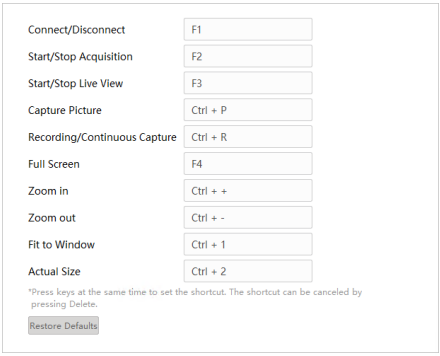
Figure 8-11 Keyboard Shortcut Settings
(Optional) Click Restore Defaults to restore the shortcut settings to default. Click OK, and the shortcuts will be displayed on the right-click menu and hover tips of the configured functions.
8.1.8 Permission Management
After setting a password and relaunching the Software, you will be asked to enter the password before entering the main interface.
Steps
1. Click Settings → Permission to enter the following page.
2. If you want to set a password to log in to the Software, switch on Enable to show the window for setting a password.
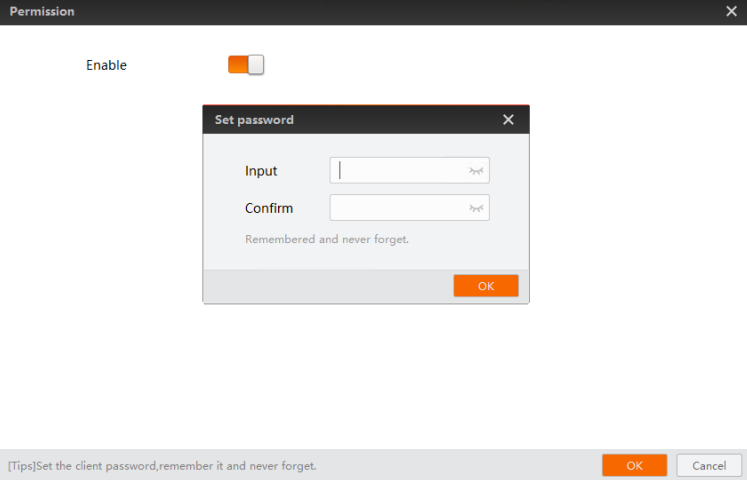
Figure 8-12 Enable Permission Settings
3. Enter the password, and confirm the password.
Note
The password should contain 1 to 8 characters. Only English letters, digits, and special characters !@#$_ are allowed.
After setting the password, each time when you launch the Software, you need to enter the password to log in.
4. Optional: Click Modify, and enter the old password, new password, and confirm password to change the login password.
Note
When modifying the password, ensure that the account has been registered and the user name is correct.
5. Click Assignment on the right of the Role.
1) Enable the Operator.
2) Click Permission Settings, and then check permissions for the operator.
| Role | Permission |
| Manager | All permissions of the Software, and configuring permissions of the operator. |
| Operator | Cannot configure the permission. |
3) After selecting and saving the permission, enter the password in the Setting Password text bar.
4) Click OK.
6. Enable Lock client and select a timeout duration.
Example
If you select 15 min, the Software will be locked if there are no operations on the Software for 15 minutes.
Note
On the main interface, click  on the top right, and then the window for locking the Software will pop up, and you can lock the Software. Then the
  will turn to
 .
.
7. Switch off Enable and enter the password to disable the function of permission verification, so that you will not be required to enter the password each time you launch the client, and the Software will not by locked. Meanwhile, all the account information will be cleared.
Note
Only the administrator has the permission to cancel logging in with a password. If you uninstall the Software, you can choose to save the user data, and the next time when you install and launch the Software, you can log in with the previous account(s)
8.2 Tool
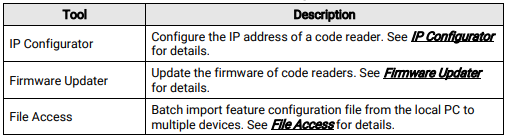
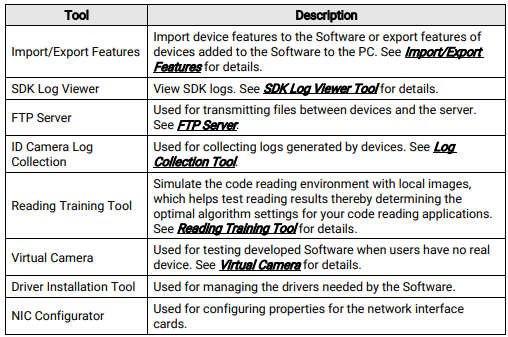
The Software provides multiple tools for camera configuration and management, such as IP configurator, firmware updater, code reader, FTP server, and SDK log viewer. The following table shows the brief description of these tools.
Table 8-2 Tool Description
8.3 View
You can adjust the image quality of the live video by setting the display mode and rendering engine.
Note
The settings will be effective for all cameras on the Software.
Display Mode
You can click View → Display Mode and then select 30 fps or 60 fps to set the display mode to 30 frames per second or 60 frames per second. The latter provides better image quality.
Rendering Engine
You can click View → Rendering Engine to set the rendering engine mode to D3D or GDI.
Note
● By default, the rendering engine mode is set to GDI, which is applicable to all PCs for it does not have requirements for the performance of the graphics card.
● The image quality of D3D mode is better than that of GDI mode, but D3D mode is only applicable to the PC which has been installed with graphics driver (and the available memory of the graphics card should be more than 1 GB).
8.4 Help
You can change language settings, view user manual, and view version information about the Software.
Click Help → Language to change the Software language.
Click Help → User Manual to view the user manual of the Software.
Click Help → Communication Matrix to view the communication matrix of the Software.
Click Help → ASCII Table to view the ASCII table.
Click Help → Development to access the SDK documents of the Software.
Click Help → About to view the version information of the Software.
No comments to display
No comments to display