
3. Wiring and Connections
3.1 Precautions for Wiring
3.1.1 General Precautions
3.1.2 Countermeasures against Noise

Since the Drive uses microprocessors, it may be affected by switching noise from peripheral devices.
To prevent the noise from the Drive or the peripheral devices from causing malfunctions of any devices, take the following countermeasures against noise as required.
Install the input reference device and Noise Filter as close to the Drive as possible.
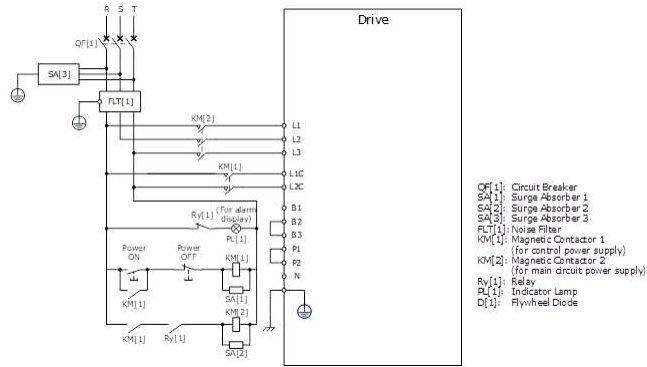
Always install a Surge Absorber for relays, solenoids, and Magnetic Contactor coils.
Never place the following cables in the same duct or bundle them together. Also, separate the cables from each other by at least 30 cm.
Never share the power supply with an electric welder or electrical discharge machine. If the Drive is placed near a high-frequency generator, install Noise Filters on the input side on the Main Circuit Power Supply Cable and Control Power Supply Cable even if the same power supply is not shared with the high-frequency generator. Refer to the section Noise Filters for information on connecting Noise Filters.
Implement suitable grounding measures. Refer to the section 3.1.4 Grounding for information on grounding measures.
Noise Filters
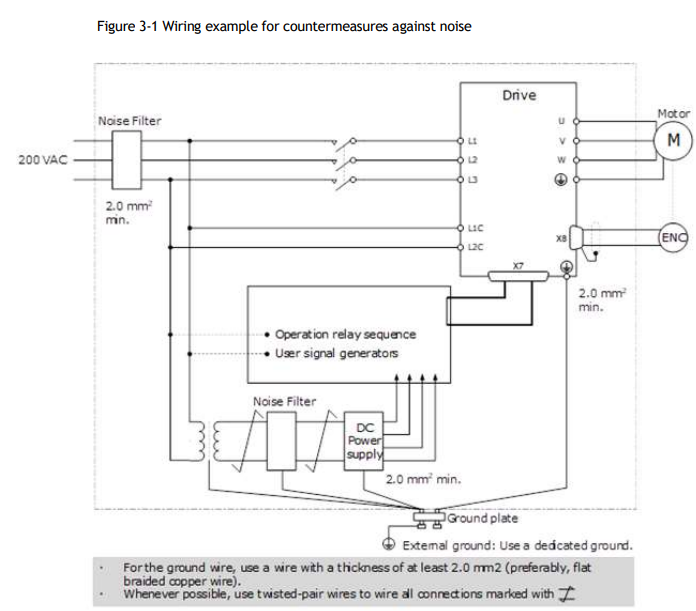
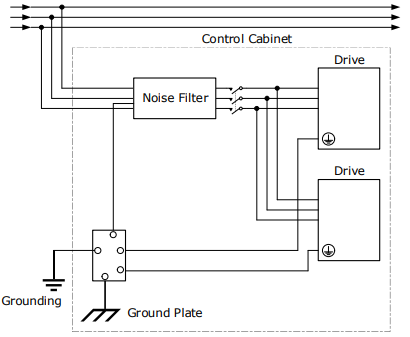
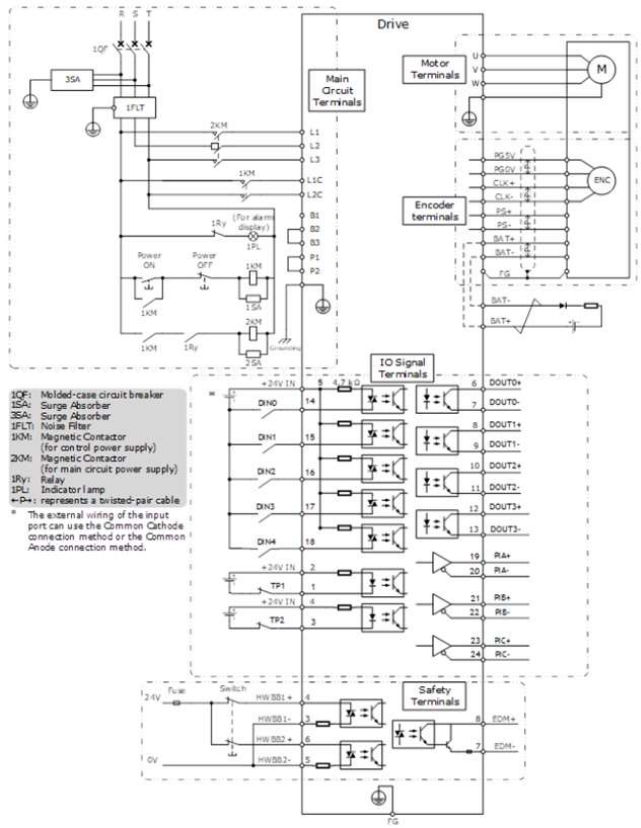
Noise Filters must be fitted in appropriate places to protect the Drive from the adverse effects of noise. Figure 3-1 is an example of wiring for countermeasures against noise.
Noise Filter Wiring and Connection Precautions
Always observe the following precautions when wiring or connecting Noise Filters.
Separate input lines from output lines. Do not place input lines and output lines in the same duct or bundle them together.
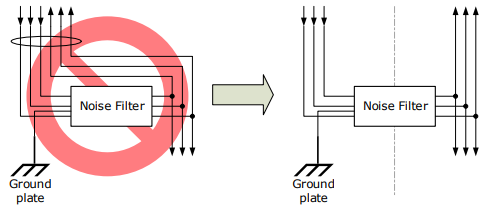
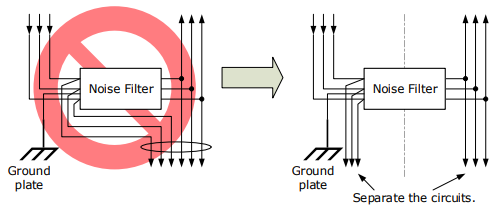
Separate the Noise Filter ground wire from the output lines. Do not place the Noise Filter ground wire, output lines, and other signal lines in the same duct or bundle them together.
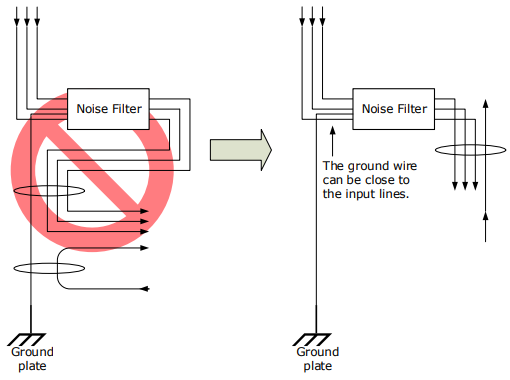
Connect the Noise Filter ground wire directly to the grounding plate. Do not connect the Noise Filter ground wire to other ground wires
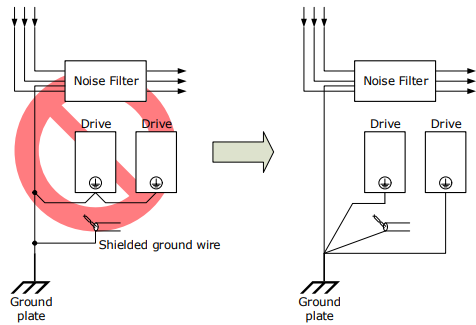
If a Noise Filter is located inside a control panel, first connect the Noise Filter ground wire and the ground wires from other devices inside the control panel to the grounding plate for the control panel, then ground the plate.
3.1.3 Recommended EMC Filters
To comply with the limits based on IEC/EN 61800-3 second environment (C2) the Drive and Motor must be installed with an EMC/RFI filter. Recommended filters are:
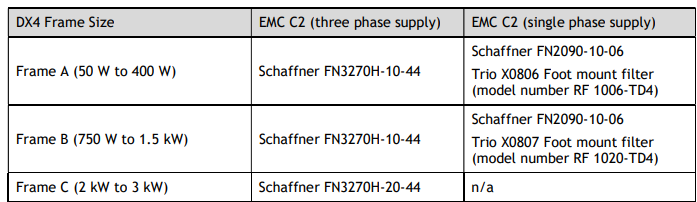
These filters have been tested with cable lengths of 3m and 20m.
3.1.4 Grounding
Implement grounding measures as described in this section. Implementing suitable grounding measures will also help prevent malfunctions, which can be caused by noise. Always use an unpainted backplane for electrical cabinets.
Observe the following precautions when wiring the ground cable.
Ground the Drive to a resistance of 100 mΩ or less.
Be sure to ground at one point only.
Ground the Motor directly if the Motor is insulated from the machine.
Motor Frame Ground or Motor Ground
If the Motor is grounded thought the machine, the switching noise current can flow from the main circuit of the Drive through the stray capacitance of the Motor. To prevent this always connect the Motor frame terminal (FG) or ground terminal (FG) of the Motor to the ground terminal on the Drive. Also, be sure to ground the ground terminal .
Noise on I/O Signal Cables
To prevent noise entering the I/O Signal Cable connect the shield of the I/O Signal Cable to the connector shell and ensure the shell is connected to ground.
If placing cables in metal conduits, ensure the conduit is connected to ground.
For all grounding, use a single grounding point.
Ferrite Coils
While ferrite coils can be used to solve application specific EMC issues, they should not be necessary for applications.
3.2 Basic Wiring Diagrams
3.3 Power Supply (X1, X2)
3.3.1 Terminals Arrangement
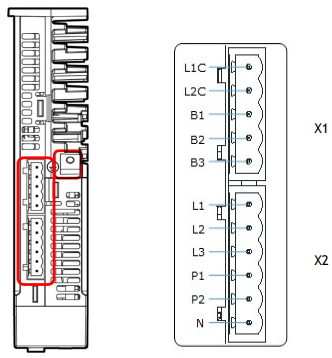
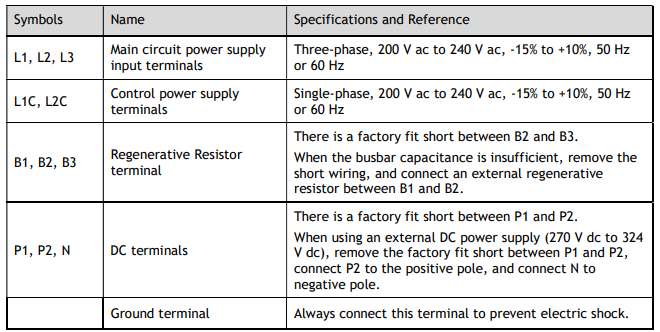
The power supply to Drive includes main circuit terminals and control circuit terminals.
Signal Diagram
Pin Layout
3.3.2 Wiring Procedure
Prepare the following items before preparing the wiring for the Main Circuit Terminals and Control Circuit Terminals.
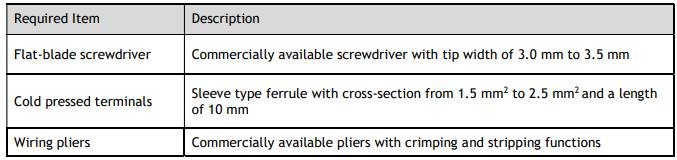
Follow the procedure below to wire the Main Circuit Terminals and Control Circuit Terminals.
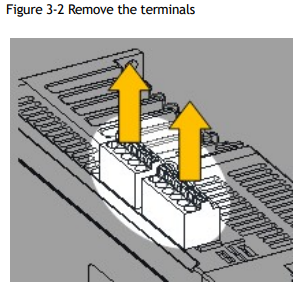
Step 1 Remove the Main Circuit Terminals and Control Circuit Terminals from the Drive.
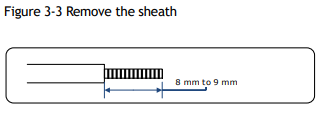
Step 2 Peel off the sheath so that the conductor portion of the cable will protrude from the tip of the ferrule.
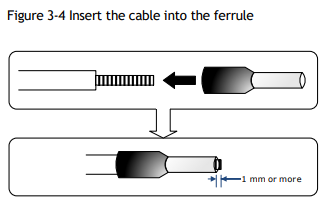
Step 3 Insert the cable into the ferrule (It should protrude 1 mm or more from the ferrule).
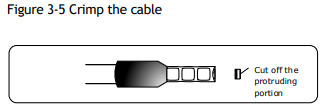
Step 4 Crimp the cable that has been inserted into the ferrule and cut off the cable conductor portion protruding from the ferrule (The allowable protruding length after cutting should not be more than 0.5 mm).
Step 5 Insert the crimped cable into the connection terminals directly until the cable is not easily pulled out (A slight pull is allowed).
Step 6 Make all other connections in the same way.
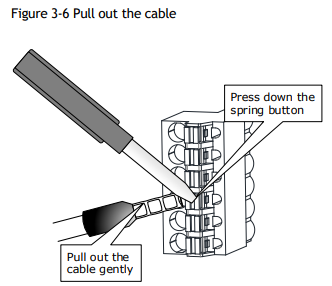
Step 7 To change the wiring, pull the cable out of the connection terminals.
Use the flat-blade screwdriver to press down the spring button corresponding to the terminal, and then gently pull out the cable.
Step 8 Once the wiring is completed, attach connection terminals to the Drive.
NOTE
The above wiring procedure is also applicable to the Motor Terminals.
3.3.3 Wiring Diagrams
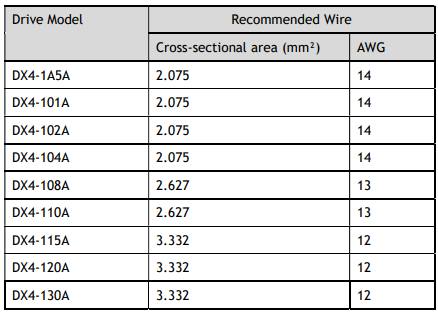
The wiring diameter of the power input is determined by the Drive model. The following table lists the recommended wire diameters for each Drive model.
Wiring Example for Three-phase Power Supply Input
Wiring Example for Single-phase Power Supply Input
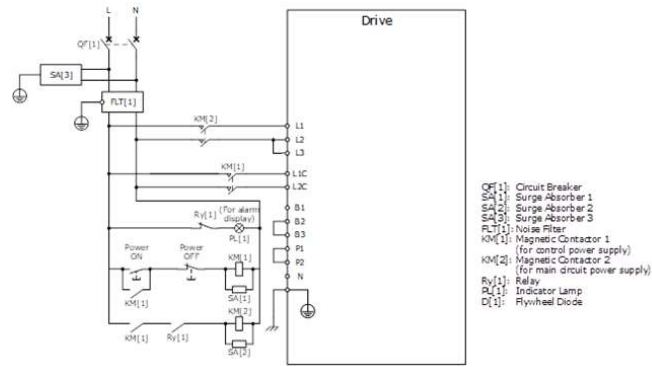
NOTE: for single phase wiring L or N can be wired into either L1 or L2
Wiring Example for DC Power Supply Input
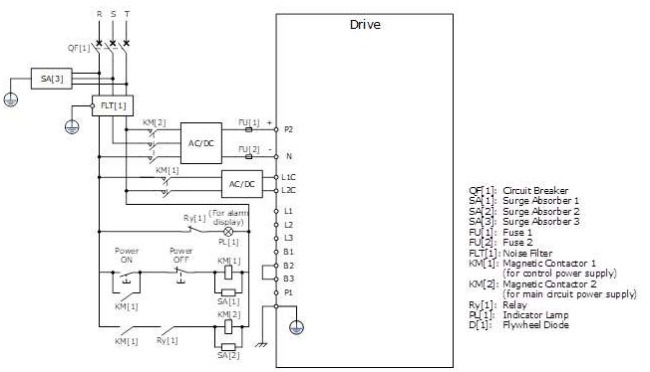
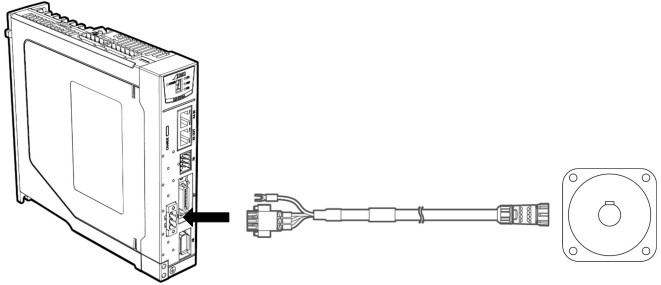
3.4 Motor Power (X3)
Connection Diagram
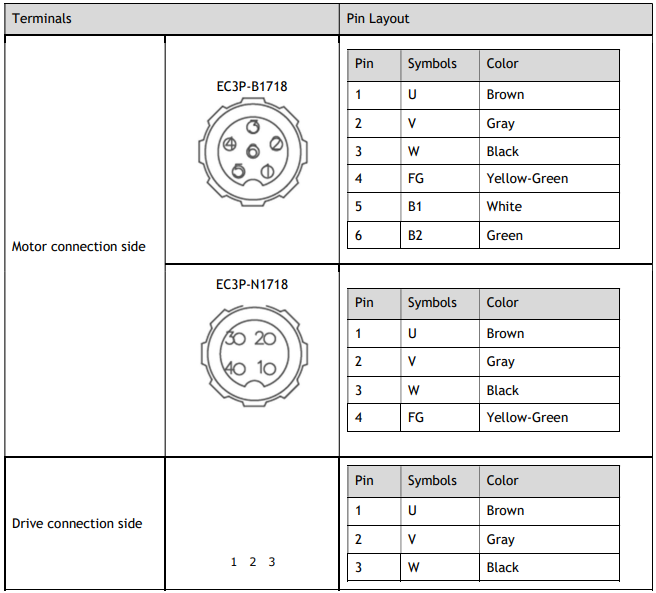
Terminals Arrangement
3.5 EtherCAT Communication (X4, X5)
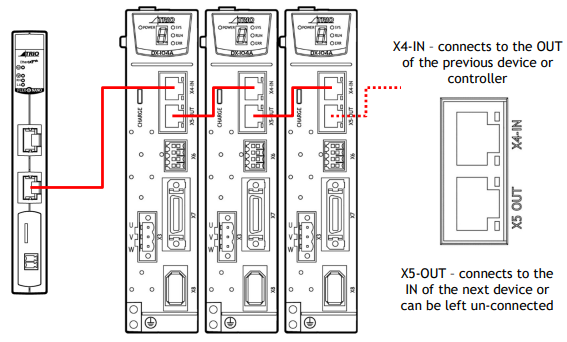
Connection Diagram
Pin Layout
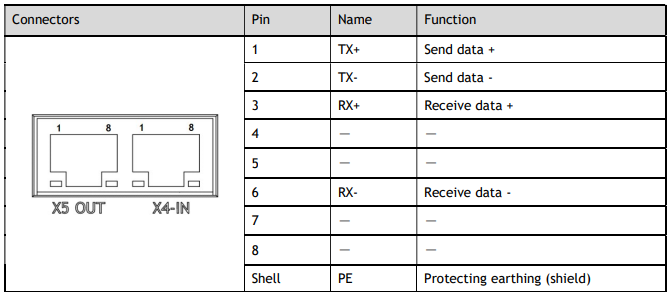
EtherCAT communication (X4-IN and X5-OUT) are RJ45 terminals. The communication cable from the network master or controller should be connected to X4-IN and X5-OUT should be connected to the X4-IN terminal of the next Drive (or network device).
Cable Description
Use category 5 (CAT5e SF/UTP) Ethernet communications cables for network connections. Metal shielded connectors are recommended to prevent signal interference.
3.6 Connecting STO Function Signals (X6)
A Safety Function Device shall be connected for using the STO function. For the connection and usage, please refers to Chapter 4 STO.
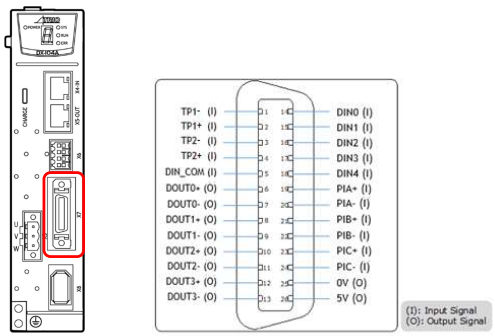
3.7 I/O Connector (X7)
Signal Diagram
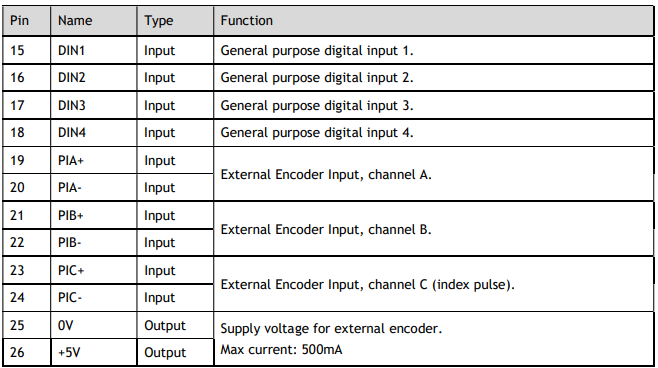
Pin Layout
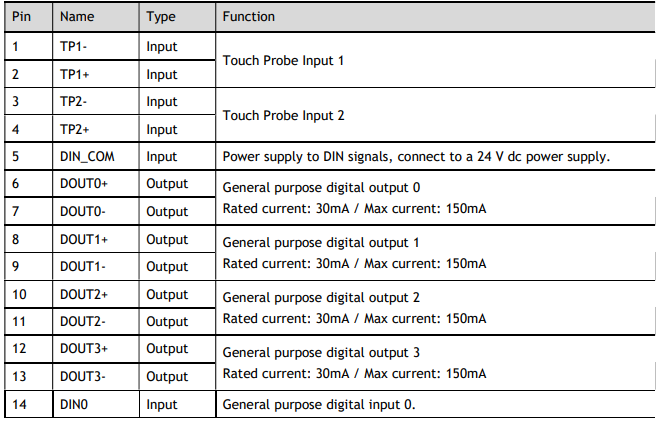
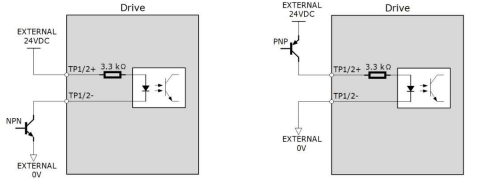
The TP inputs can be connected to either an NPN or PNP sensor.
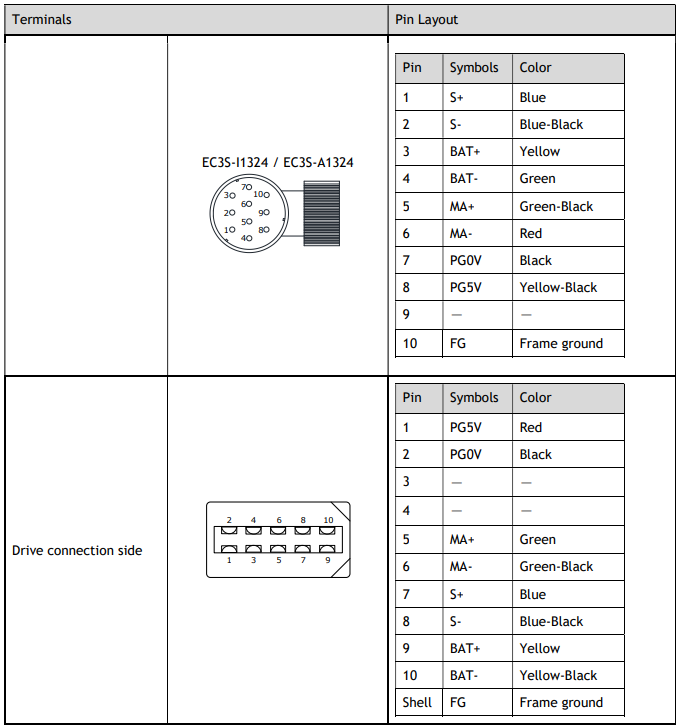
3.8 Encoder (X8)
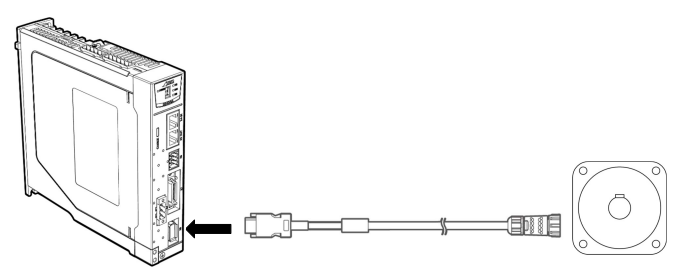
Connection Diagram
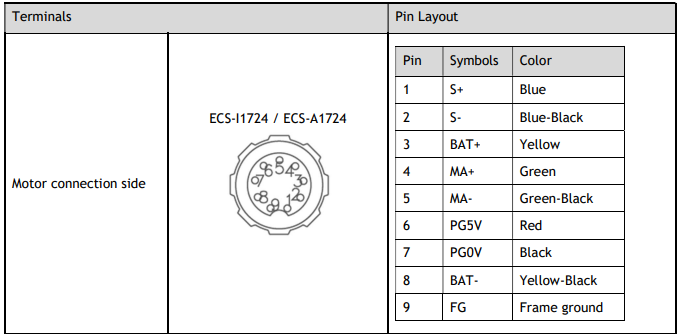
Terminals Arrangement
3.8.1 Encoder Battery Connection
Absolute encoders are fitted on motors with an encoder type of L; e.g. MXL-02A0630LA222. These encoders require a battery supply to retain the absolute encoder data when the Drive power is removed.
This battery supply is provided by an in-line battery fitted into a battery box in the cable which allows the encoder supply to be retained when the Encoder Cable is removed from the Drive.

No comments to display
No comments to display