
6. Commissioning
All configuration and commissioning of DX4 is performed using Motion Perfect v5.0 (or above).
6.1 Motion Perfect
Motion Perfect is a Microsoft Windows™ based application for the PC, designed to be used in conjunction with Trio Motion Technology's range of multi-tasking motion controllers, servo drives, HMI and IO expansion products.
A PC with the following specifications is required to run Motion Perfect:
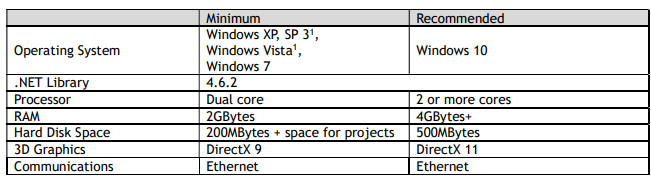
[1] As of 11th April 2017 Microsoft has dropped support for Windows Vista. The main consequence of this is that PCs running Windows Vista or older will be more open to malware infection as security related patches will no longer be available. Although we will continue to test basic functionality on Windows XP and Windows Vista and will continue to support it as long as possible, there is no guarantee that all functionality will work.
Motion Perfect is a free download and is available to from the Trio web site (www.triomotion.com).
6.2 Setup
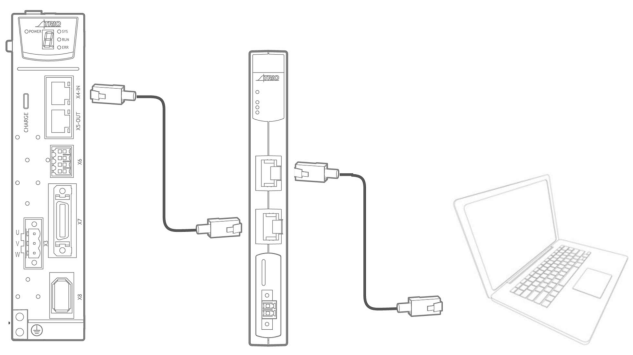
To communicate with DX4 the drive must be connected to a Trio controller via EtherCAT and the Trio controller needs to be connected to a PC via Ethernet and the PC needs to be running Motion Perfect.
6.2.1 Initial Connection
To make the initial connection to a controller:
Make sure that your controller is powered up and connected to the computer
Start Motion Perfect. Once it has started up the initial screen should be displayed.
Select "Connect in Sync mode" from the "Controller" menu. As Motion Perfect has not been connected before the "Connection" dialog will be displayed.
Select the ‘Ethernet’ as the communications interface used by your controller. Then enter the IP address of the controller (default 192.168.0.250) and the TCP port (default 23).
Click on the "Apply & Connect" button. The "Connect" will close and Motion Perfect will go into Sync Mode showing the the Controller Tree on the left.
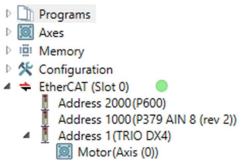
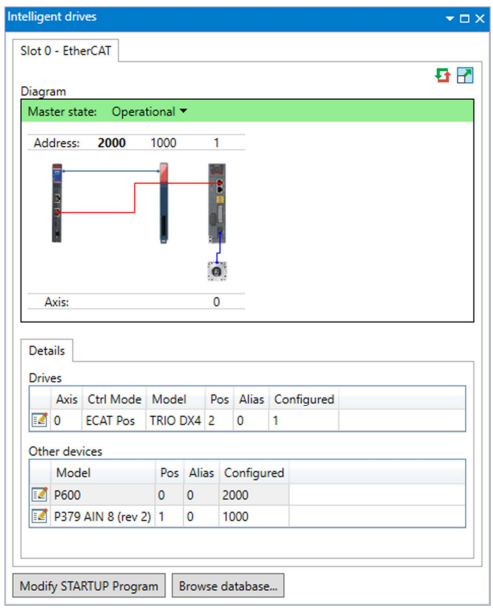
The drive will be automatically detected by the Trio controller and appear as an EtherCAT node. This can be seen in either the controller tree, or the intelligent drives tool
Controller Tree example
Intelligent Drives tool example
EtherCAT State
If the EtherCAT state is not operational (green indicator in the controller tree, and green banner in Intelligent Drives), it may be necessary to re-start the EtherCAT network.
A re-start of the EtherCAT network can be issued from either the controller tree by right clicking on the EtherCAT root node, or from the Intelligent Drives tool by right clicking on the controller.
This will force the Controller to re-scan for devices on the EtherCAT network.
Axis Assignment
To operate correctly the controller must assign the drive an axis number. The rules for axis assignment are:
If there is a NODE_AXIS entry in MC_CONFIG for the node number (based on network position) use axis number specified by NODE_AXIS.
If the Drive has a non-zero device node number (Pn704) and this node number is unique on the network, then the axis number will be the node number -1. Node number 13 would be axis number 12.
Otherwise the axis number is allocated based on the network position and AXIS_OFFSET. If AXIS_OFFSET is 0, the first EtherCAT drive would be axis 0, then second axis 1, etc.
By default, Drives are allocated axis numbers based on network position.
If there is a conflict during the axis allocation process, and the drive cannot be allocated a node number the EtherCAT network will not achieve an operational state.
Typical reasons for this are:
Duplicate axis number allocation in MC_CONFIG. To resolve this, change the NODE_AXIS command in MC_CONFIG to avoid the duplication
Conflict with local hardware. If the Controller has a local axis hardware, this will use axis 0 (zero), which may cause a conflict with the EtherCAT network. To change the base number of axis allocation of either the local hardware or the EtherCAT network, use the AXIS_OFFSET command in MC_CONFIG. The command AXIS_OFFSET(-1) = 32 will force the local hardware axis allocation to start at axis 32, leaving the lower axis numbers free for EtherCAT.
6.3 Drive Commissioning Screens
In either case, double clicking on the drive or motor in either the Controller Tree or the Intelligent Drives tool will open the device configuration screen. This is where all drive configuration and commissioning tools can be found.
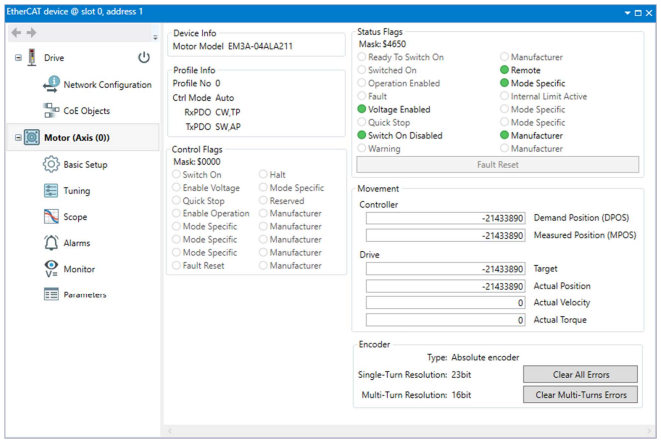
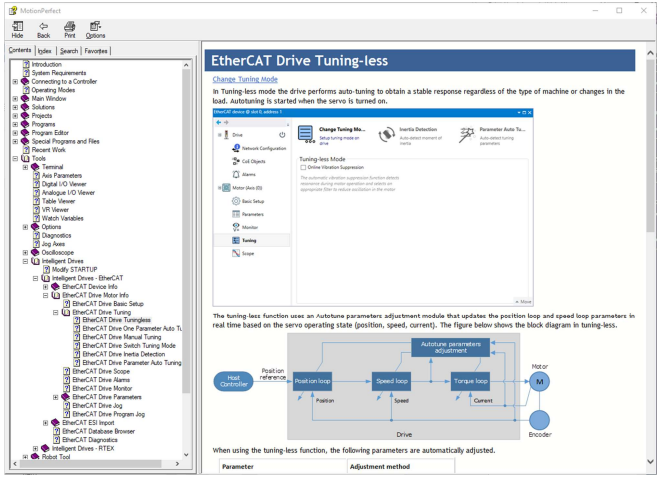
From any of the device configuration screens, for help or more information, pressing F1 will launch the Motion Perfect help based on the screen in view.
The commissioning screens for the Drive are listed below. The menu is split into 2 groups, Drive and Motor. The Drive screens are for status and operations that are not necessarily axis specific. The Motor screens show detail that is axis specific.
Drive
EtherCAT information
Device information
Update firmware (DSP and FPGA)
Drive status
Network Configuration
Flexible process data mapping
CoE Objects
Read / Write access to all objects
Create custom object lists
Display values in decimal or hexadecimal
Motor
Motor model detected
Live monitor of key parameters used by controller
o Control word, Status word
o DPOS, MPOS
o Target
o Actual Position, Actual Velocity, Actual Torque
o Status of motor feedback device
Basic Setup
Allows easy access to basic drive configuration
Parameters that define the physical operation of the drive
o Power supply type
o Motor Direction and Abs. Encoder Usage
o Behavior in case of alarm
o Internal torque limit
o Brake control
Tuning
Selection of tuning mode
Access to tuning tools
Access to control law parameters though graphical interface
Generate test move without using the command line
Scope
Select up to 8 drive parameters to capture
Data capture performed on the drive
Zoom / Cursors on graph
Save and Load graph data
Generate test move without using the command line
Alarms
View active alarm and historical alarm log
Trouble shooting tips for all alarm codes
Monitor
Read only access to drive status
Items in logical groups for viewability
Show / Hide option to customize view
Import / Export monitor item set
Parameters
Read / Write access to all drive parameters
Folding tree structure for easy navigation
Text search for easy location based on name
Filters to identify changes
Import and export of full or partial parameter set
Create STARTUP program based on full or partial parameter set
6.4 Basic Operation
To ensure safe and correct operation, check the following items before you start.
Make sure that the Drive and Motor are installed, wired, and connected correctly.
Make sure that the correct power supply voltage is supplied to the Drive.
Make sure that there are no loose parts in the Motor mounting.
If you are using a Motor with an Oil Seal, make sure that the oil seal is not damaged. Also make sure that oil has been applied.
If you are performing trial operation on a Motor that has been stored for a long period of time, make sure that all Motor inspection and maintenance procedures have been completed.
If you are using a Motor with a Holding Brake, make sure that the brake is released in advance. To release the brake, you must apply the specified voltage of 24 VDC to the brake.
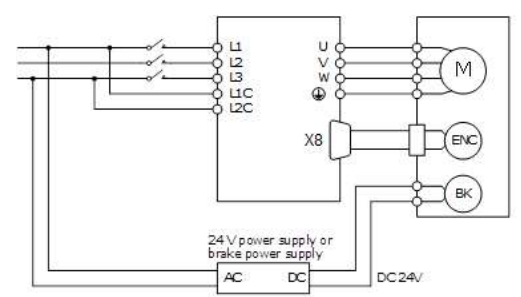
Once connected to a motor, when the Drive is powered up it will auto detect the motor and perform an auto setup which will allow operation of the motor.
The default power supply selection for the main circuit is Three Phase, 200 VAC, 50Hz. If the supply in use is different to this the drive will generate an alarm. The correct supply type can be selected from the Basic Setup page in the drive commissioning screens or by directly writing to parameter Pn007.1 and Pn007.3
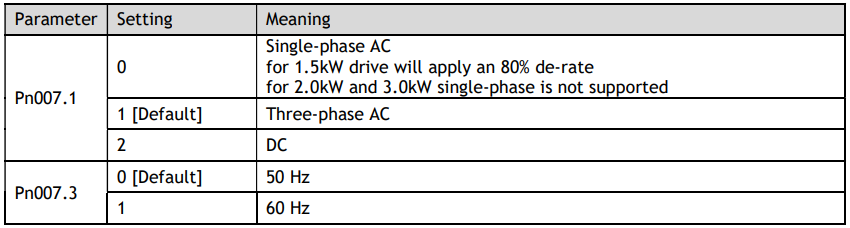
Once the supply type has been changed the drive will require a re-start for the new selection to apply.
If using an absolute encoder, the drive will generate an alarm if it detects a low battery voltage at the encoder. If a battery is fitted and the voltage is correct, this alarm can be cleared from the Motor page in the drive commissioning screens. If there is no battery fitted, then the usage of the encoder will need to be changed to incremental. Changing the encoder usage from absolute to incremental will not change the encoder resolution but will ignore multi-turn information from the encoder and inhibit the low battery voltage alarm. The correct encoder usage can be selected from the Basic Setup page in the drive commissioning screen or by writing directly to parameter Pn002.2.

Once the encoder usage has been changed the drive will require a re-start for the new selection to apply.
To perform simple motion the Move panel in the Scope page (or Tuning page) in the drive commissioning screens can be used. This offers either Jog or Program Jog motion.
6.4.1 Drive Firmware – Checking and Updating
The version of firmware installed on the DX4 drive may not always be the current recommended
type.
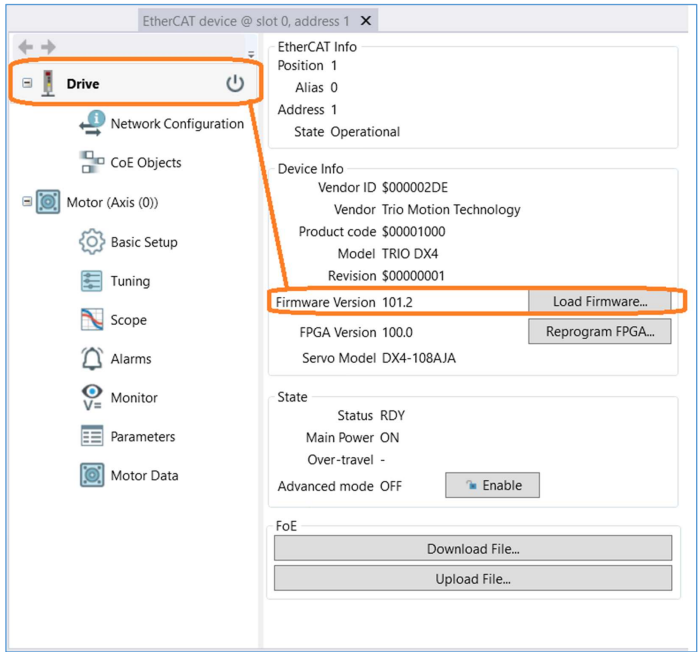
The current version can be checked by going on line to the drive via Motion Perfect and looking at the Drive section of the DX4’s properties. An example of this is shown below. To initiate the update of firmware to the drive select the Load Firmware button and follow the on screen instructions when prompted.
Firmware versions are always available for download from the Trio website on the DX4 Product page Software section.
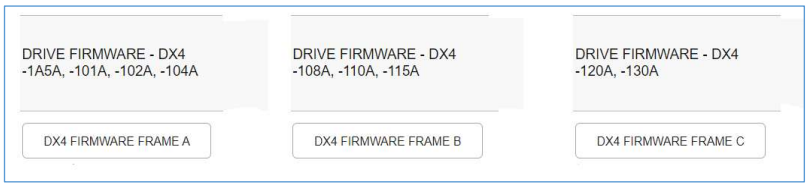
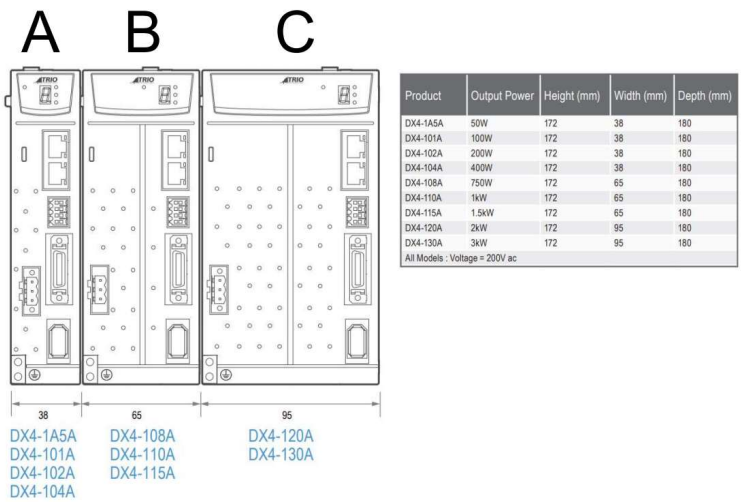
The correct firmware to download is based on the frame size of the DX4. Using the information below is also an easy to use indication on the file name type to use.
The firmware files have the .bin file extension.
Example:
DX4_DSP_APP_A_A000_V101B4.bin A frame size firmware version
DX4_DSP_APP_A_B000_V101B4.bin B frame size firmware version
DX4_DSP_APP_A_C000_V101B4.bin C frame size firmware version
6.4.2 Holding Brake
A holding brake is used to hold the position of the moving part of the machine when the drive is turned off, so that moving part does not move due to gravity or an external force.
This brake can be either built into a motor or can be provided as a separate component.
The holding brake is used in the following cases.
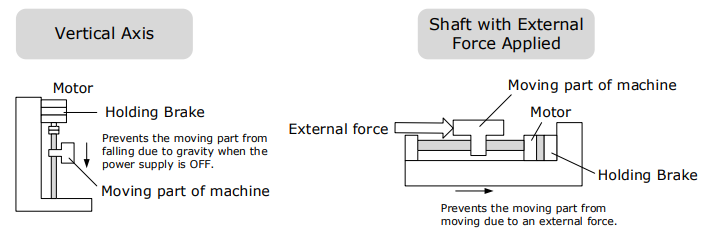

If the motor has a holding brake a digital output on the drive can be assigned for brake control. Any of the digital outputs on the drive can be configured as the brake control output.
The assignment is made by selecting from the Basic Setup page in the drive commissioning screens or by writing directly to parameter Pn511.
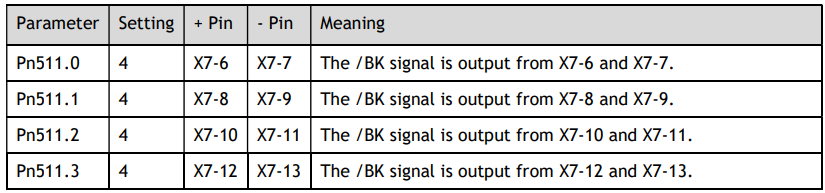
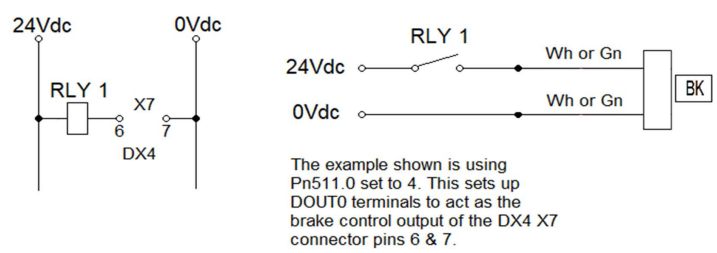
An Interposing relay must be used to control the supply to the motor brake coil. The motor power cable with the brake option selected will have two spare coloured cores ready for external holding brake control. The two cores are White and Green and connection to the brake is not polarity sensitive, both cores may be connected to either +24Vdc or 0V.
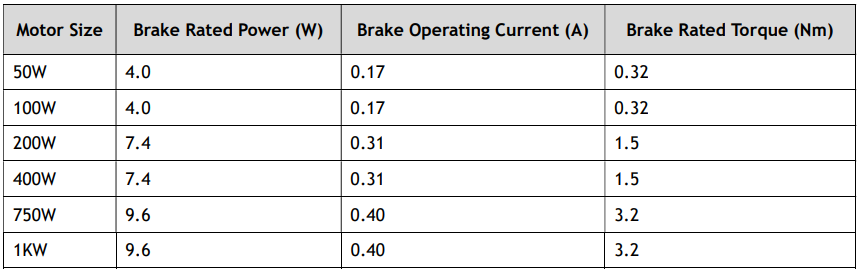
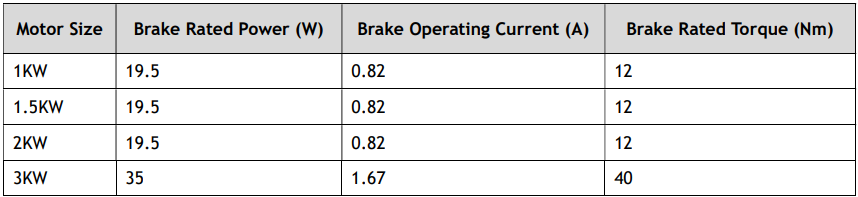
Contact current rating for suitable interposing relay type when controlling the motor brake coil is listed in the tables below.
MXL Range Motors
All Brake Voltage Rated at 24Vdc ±10%
MXM Range Motors
All Brake Voltage Rated at 24Vdc ±10%
Selecting a digital output in the Basic Setup screen will enable the brake control timing parameters.
Brake Operating Sequence
The time required to release the brake and the time required to brake should be considered to determine the brake operation timing, as described below.
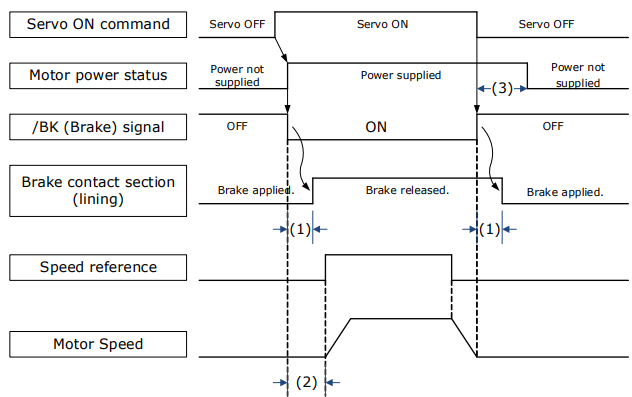
(1): The brake delay times for motors with Holding Brakes.
(2): Before you output a reference from the host controller to the drive, wait for at least 50 ms plus the time required to release the brake after you send the S-ON command.
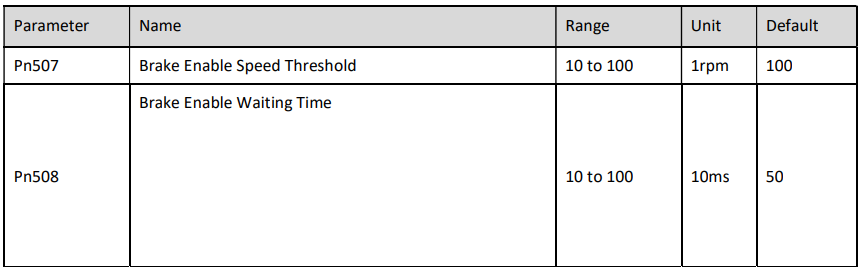
(3): Use Pn506 (Brake Engage Delay Time), Pn507 (Brake Engage Speed Threshold), and Pn508 (Brake Engage Timeout) to set the timing of brake operation.

Brake Control when Motor is Stationary
Disabled -> Enabled
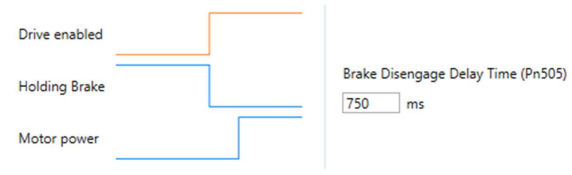
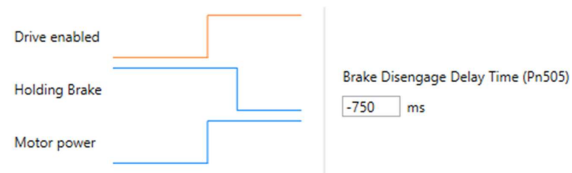
The brake disengage delay time controls the sequence and delay of brake signal when the drive changes from disabled to enabled when the motor is stationary.

If Pn505 is a positive value, when the Servo ON command is received, the brake signal will change first, and then power will be supplied to the motor after the delay time.
If Pn505 is a negative value, when the Servo ON command is received, the power will be supplied to the motor immediately, then the brake signal will change after the delay time.
Enabled -> Disabled
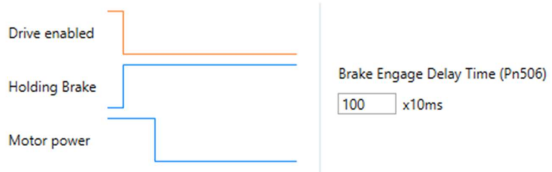
The brake engage delay time controls the delay between the brake signal and motor power when the drive changes from enabled to disabled when the motor is stationary.

When the motor is used to control a vertical axis, the machine moving part may move slightly due to gravity or an external force.
This slight motion can be eliminated by setting the Brake Engage Delay Time (Pn506) so that power supply to the motor is stopped after the brake is applied.

Brake Control when Motor is In Motion
If an alarm occurs or the Servo OFF command is received while the motor is operating, the motor will start stopping and the brake signal will be turned OFF. You can adjust the timing of brake signal output by setting the Brake Engage Timeout (Pn508).
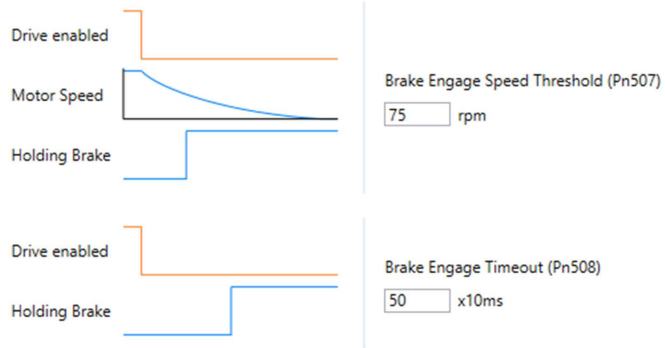
The brake signal changes when either of the following conditions is satisfied:
When the motor speed falls below the level set in Pn507 after the power to the motor is turned OFF.
When the time set in Pn508 is exceeded after the power to the motor is turned OFF.
6.4.3 Jog Motion
The ‘jog’ motion is a velocity profiled move. It has no end point so will generate continuous motion in a specific direction. The velocity profile is defined by acceleration, speed and deceleration value and will generate a trapezoidal velocity profile. Motion is commanded when the mouse button is clicked and halted when the button is released.
The Jog control is shown below:

The motion profile is controlled three parameters:
Jogging Speed: the maximum speed the jog profile will demand in revs per minute (RPM)
Acceleration Time: the time to accelerate from rest to 1000 RPM in milliseconds (ms)
Deceleration Time: the time to decelerate from 1000 RPM to rest in milliseconds (ms)
To initiate motion, first the drive must be enabled by clicking the ‘Motor enable’ button. This will enable the motion arrows.
Click and hold the arrow buttons to run the motor. The jog motion is continuous; while the button is pressed the motor will run in the direction of the arrow. The motor will stop when the button is released.
The ‘+’ arrow will cause forward rotation, the ‘-‘ arrow will cause reserve rotation.
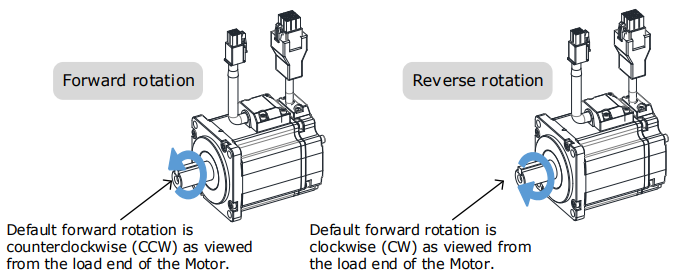
The rotation direction of the Motor can be changed by setting the Motor Direction from the Basic Setup page in the drive commissioning screens. The figure above shows the default setting.
When the drive is enabled via the ‘Jog enable’ button, the drive switches to a local control mode. While in this mode the position change is not sent to the controller. The controller values of MPOS and DPOS will not change during a jog. When the drive is disabled, the update of MPOS and DPOS on the controller resume.
6.4.4 Program Jog Motion
The ‘program jog’ motion is a sequence of two profiled moves of a specific distance with a programmable dwell time between moves. Each move has an independent move distance, acceleration, deceleration and speed. Both are profiled using a trapezoidal velocity profile. Once started, the motion will repeat until stopped by the user.
The Program Jog control is shown below:
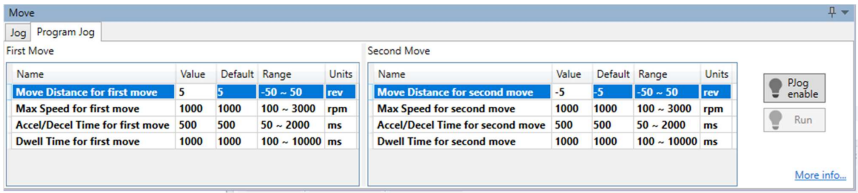
The parameters controlling the program jog are:
Move Distance: the distance to move, this is a signed value where a positive value represents forward motion and a negative value represents reverse motion. The distance is specified in revolutions (revs)
Max Speed: the maximum speed of the profiled velocity in revs per minuite (RPM)
Accel/Decel Time: the time to accelerate from rest to Max Speed in milliseconds (ms). The deceleration value is the same as acceleration.
Dwell Time: the delay time before starting the next move in milliseconds (ms)
To initiate motion, first the drive must be enabled by clicking the ‘PJog enable’ button. This will enable the ‘Run’ button.
Clicking the ‘Run’ button will start the motion.
The sequence will run repeatedly until stopped by either clicking the ‘Run’ button or the ‘PJog enable’ – during motion clicking either will disable the axis.
When the drive is enabled via the ‘PJog enable’ button, the drive switches to a local control mode.
While in this mode the position change is not sent to the controller. The controller values of MPOS and DPOS will not change during a jog. When the drive is disabled, the update of MPOS and DPOS will resume.
No comments to display
No comments to display