
5. CHECK AND MAINTENANCE
Before performing all maintenance activities, carefully read the first chapter on safety precautions.

5.1. DAILY MAINTENANCE
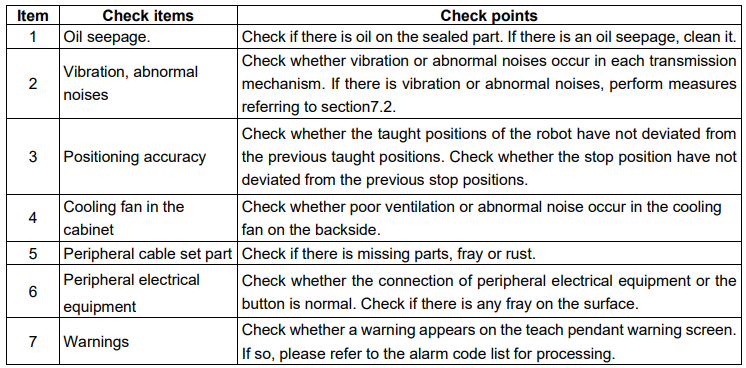
When operating the system every day, the following items should be checked at any time
5.2.REGULAR INSPCTION AND MAINTENANCE
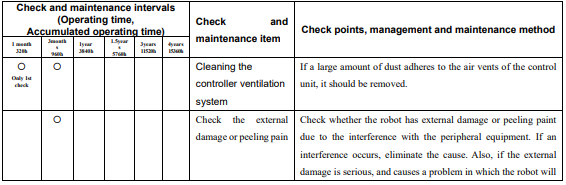
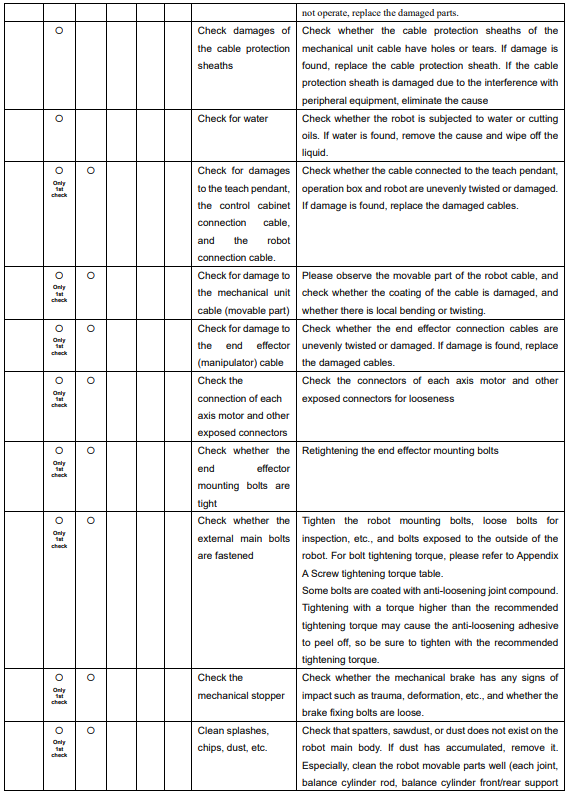
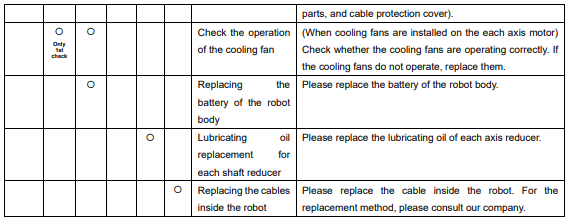
Inspection and maintenance are carried out at approximately predetermined intervals of operation cycle or accumulated operation time. Perform regular maintenance steps to keep your robot performing at its best. Regular inspection and maintenance can be operated by users according to the following table, or contact our professional staff to provide services.
5.3.ADJUSTMENT OF THE DRIVE BELT
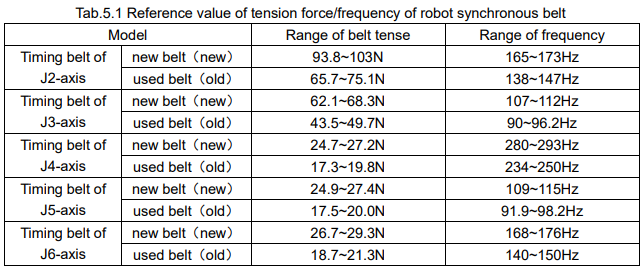
After the synchronous belt has been used for a period of time, the belt tension is easy to decrease, and it needs to be tensioned at this time. When measuring the tension force of the synchronous belt, the priority is to measure the frequency (Hz) to judge. When using the frequency block for measurement, the internal parameters of the tensioner do not need to be set.

In this series of robots, some axes are driven by synchronous belts. Steps for tensioning the synchronous belt (take the J5 axis as an example):
1. Remove the forearm cover plate with nickel-plated hexagon socket head cap screws M3×8, remove the forearm cover plate and place it in the storage area;
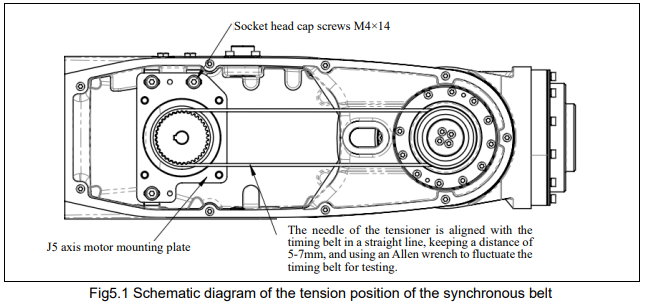
2. Adjust the installation position of the M4X14 fixing screws at the waist hole of the J5-axis motor mounting plate, and re-tighten and install the J5-axis motor mounting plate with pre-tightening;
3. Test the tension of the synchronous belt 465-3GT-6 as shown in the figure, so that the tension of the synchronous belt is appropriate (see the table below for the specific range);
4. Tighten the M4X14 socket head cap screws that fix the J5-axis motor mounting plate, and fix the J5-axis motor mounting plate;
5. Place the forearm cover at the installation position and fasten it with nickel-plated hexagon socket head cap screws M3×8.
5.4.REPLACING THE BATTERIES
The position data of each axis is preserved by the backup batteries. The batteries need to be replaced every 1 year. Also use the following procedure to replace when the backup battery voltage drop alarm occurs.
Procedure of replacing the battery:
1.Press the emergency stop button to stop the robot motion.
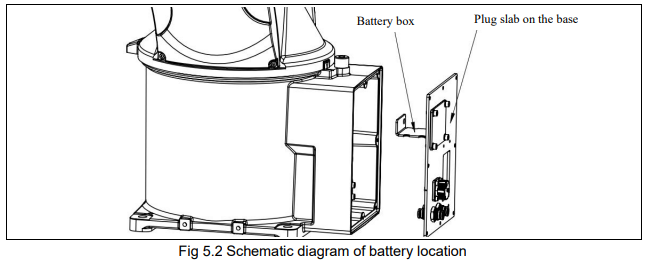
2.Remove the plug cover on the robot base.
3.Take out the old batteries from the battery case fixed on the base.
4.Insert new batteries into the battery case while observing the correct direction.
5.Re-mount the plug cover after replacing the battery.

5.5.ROBOTIC LUBRICATION
The reducer needs to be filled with grease regularly, please be sure to use the specified grease. If users need to replace the robot grease, please contact our technical service personnel.


No comments to display
No comments to display